Easy DMS - Document Management System
What is Easy DMS
What are the main features of Easy DMS
How to configure the plugin
How to create custom fields
How to configure document tagging
How to configure roles and permissions
How to activate Easy DMS on a project
How to configure Approval workflows
How to work with Easy DMS module
How to configure WebDAV
WebDAV troubleshooting
What is Easy DMS
Easy DMS is a document management system used to track, manage and store documents and reduce paper. It's capable of keeping a record of the various versions created and modified by different users (history tracking). Easy DMS is available as a separate plugin for Easy Project. It is aimed to extend the current Easy Project's Documents module. Easy DMS comes with WebDAV functionality so you can manage your documents directly from your file manager (such as Windows Explorer) in addition to standard web access. Easy DMS is intended to be used by any users who need to work with documents.
What are the main features of Easy DMS
- Directory structure
- Document versioning / revision history
- Email notifications for directories and/or documents
- Document locking
- Multi (drag/drop depending on browser) upload/download
- Multi-download via zip
- Direct document or document link sent via email
- Configurable document approval workflow
- Document access auditing
- Integration with Easy Project's activity feed
- Wiki macros for quick content linking
- Full read/write webdav functionality
- Optional document content full-text search
- Documents and files symbolic links
- Document tagging
- Trash bin
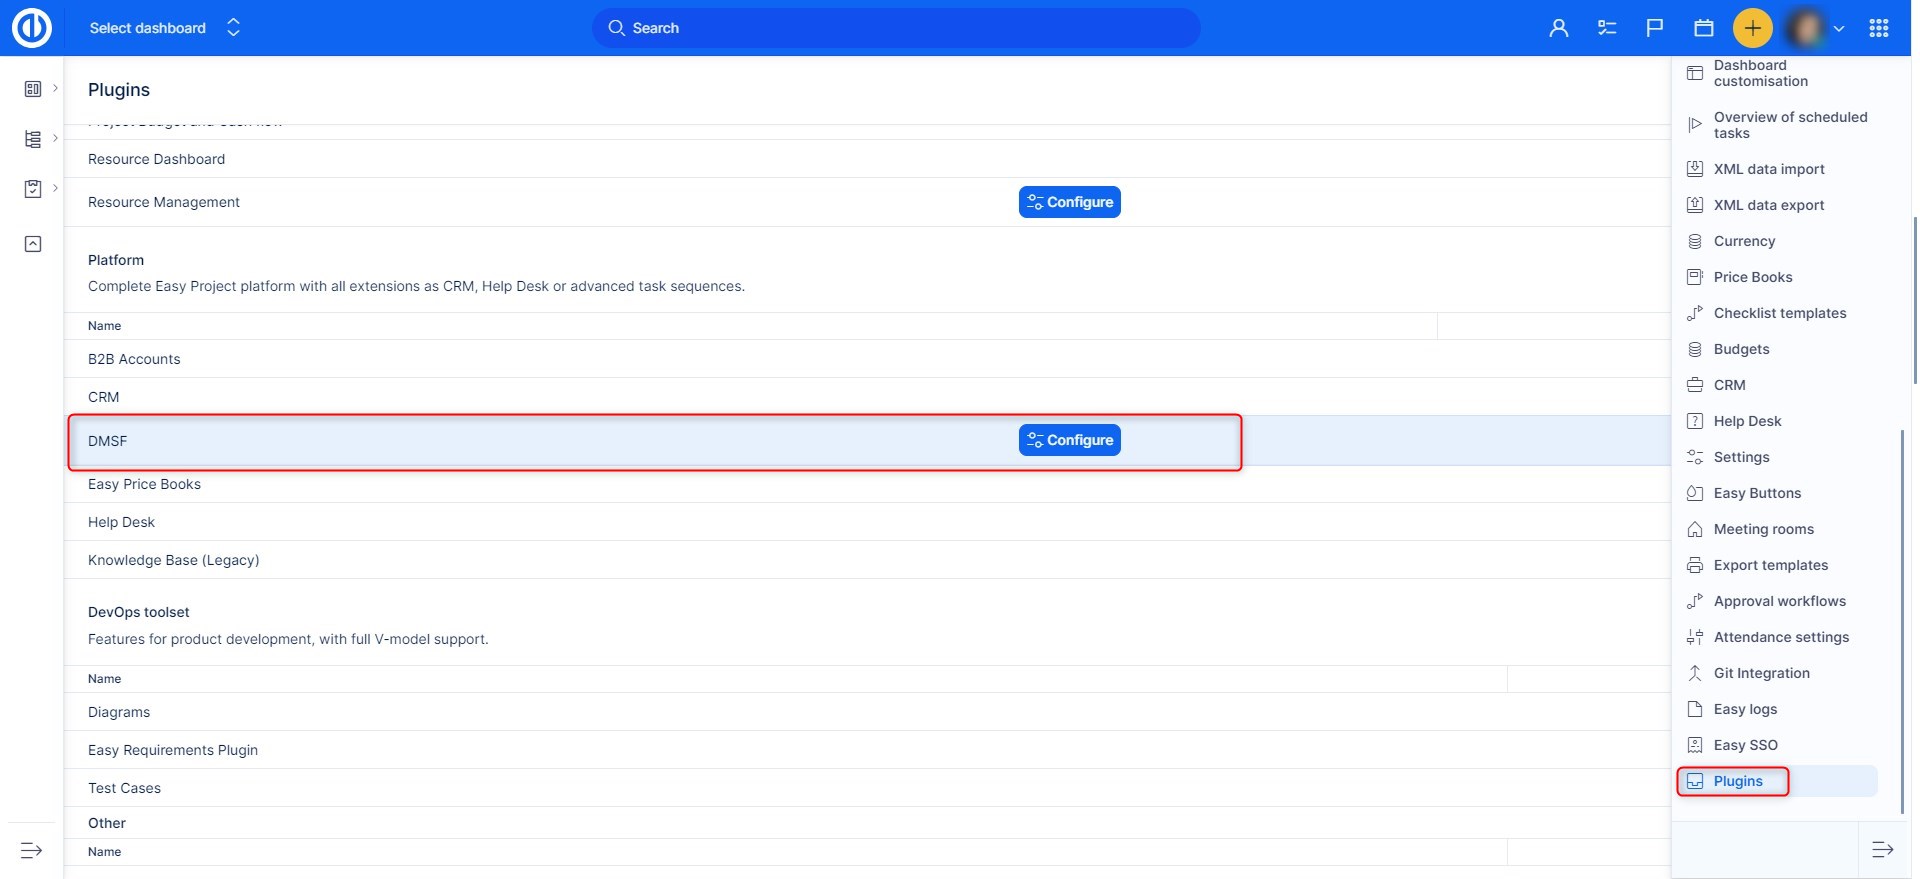
How to configure the plugin
You can configure the plugin in Global menu >> Administration >> Plugins. The plugin configuration is available by clicking on Configure.
Available options are as follows (the default value in square brackets):
General:
- Maximum files download: [0] Limits maximum number of files downloaded in zip or sent via email. 0 means unlimited.
- Maximum notification receivers info: [10] Limits maximum number of displayed email notification receivers.
- Maximum email attachment size: [0] Limits maximum file size that can be sent via email. 0 means unlimited. The number is in MB.
- File storage directory: [/files/dmsf] Where the uploaded files will be physically stored.
- LibreOffice binary: If LibreOffice is installed on the server and the LibreOffice binary path is configured in the plugin settings, clicking on a document that LibreOffice can convert to PDF (e.g., DOCX, XLSX) will display the document as an inline PDF rather than immediately offering it for download. The document can still be downloaded via the 'Download' option in the context menu.
- Physical file delete: [No] Whether files are physically deleted after their deletion in the web interface.
- File default notification: [Deactivated] Allows set notifications per project.
- Display notified recipients: [Deactivated] When activated the user will be informed about all recipients of just sent the email notification.
- Title format: [‘’] - Title format used when a document is downloaded.
- Act as attachable: [No] - This feature provides the possibility to attach documents to tasks. The new/edit task form contains a Drag&Drop area for uploading documents.

The following selection "Project preferences" will show up in project settings under DMSF tab only when the above checkbox is ticked in the plugin configuration.
- Sub-projects as sub-folders: Add sub-projects as sub-folders into DMS view- Default: no
- Global DMS menu disabled: If yes, DMSF menu item is not present in the top menu - Default: no
- Empty minor version by default: [No]
- Remove the original Documents module: [No]
DMS Columns :
You can select which columns will be visible in the main document view. (All custom fields are available as columns)
Send documents by email:
- From - An email address from which emails are sent with documents.
- Reply-to - An email address for reply-to field when documents are sent by email.
- Links only - Send links only instead of documents.
Approval Workflow:
- Keep documents locked: [no] Documents will be kept locked when approved.
- Only approval zero minor version: [no]
WebDAV
- WebDAV: [Activated] WebDAV once enabled can be found at http://.../dmsf/webdav/[project identifier]
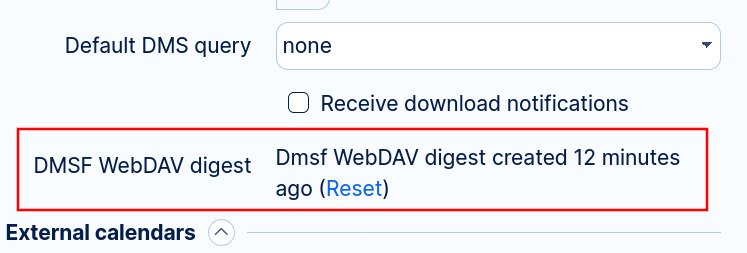
- WebDAV authentication: [Digest] This option is essential to use with Microsoft Office.
- On the user profile make sure to reset Digest after selecting this option:
- Webdav strategy: [Read-only] Enables the administrator to decide if WebDAV is a read-only or read-write platform for end users.
Full-text search
- Directory containing Xapian databases: [files/dmsf_index] A location of Xapian full-text searching database.
- Stemming Language: [english] A language used for stemming.
- Stem strategy: [Stem none] This setting controls how the query parser will apply the stemming algorithm. The default value is STEM_NONE. The possible values are:
- STEM_NONE: Don't perform any stemming.
- STEM_SOME: Search for stemmed forms of terms except for those that start with a capital letter, or are followed by certain characters, or are used with operators which need positional information. Stemmed terms are prefixed with 'Z'.
- STEM_ALL: Search for stemmed forms of all words (note: no 'Z' prefix is added).
- Note that the stemming algorithm is only applied to words in probabilistic fields - boolean filter terms are never stemmed.
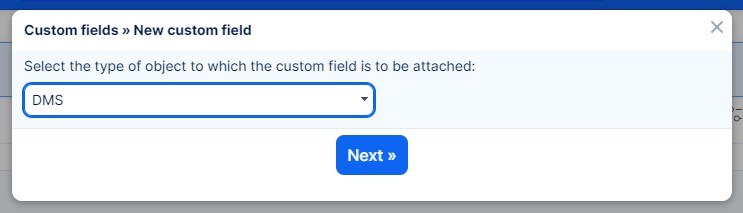
How to create custom fields
Custom fields can be applied on documents and folders. There in the Easy Project Administration is an item Custom field. If New custom field from the command toolbar is selected there is a new Easy DMS type available. Then there is a common New custom field form where can be specified the new custom field parameters.
How to configure document tagging
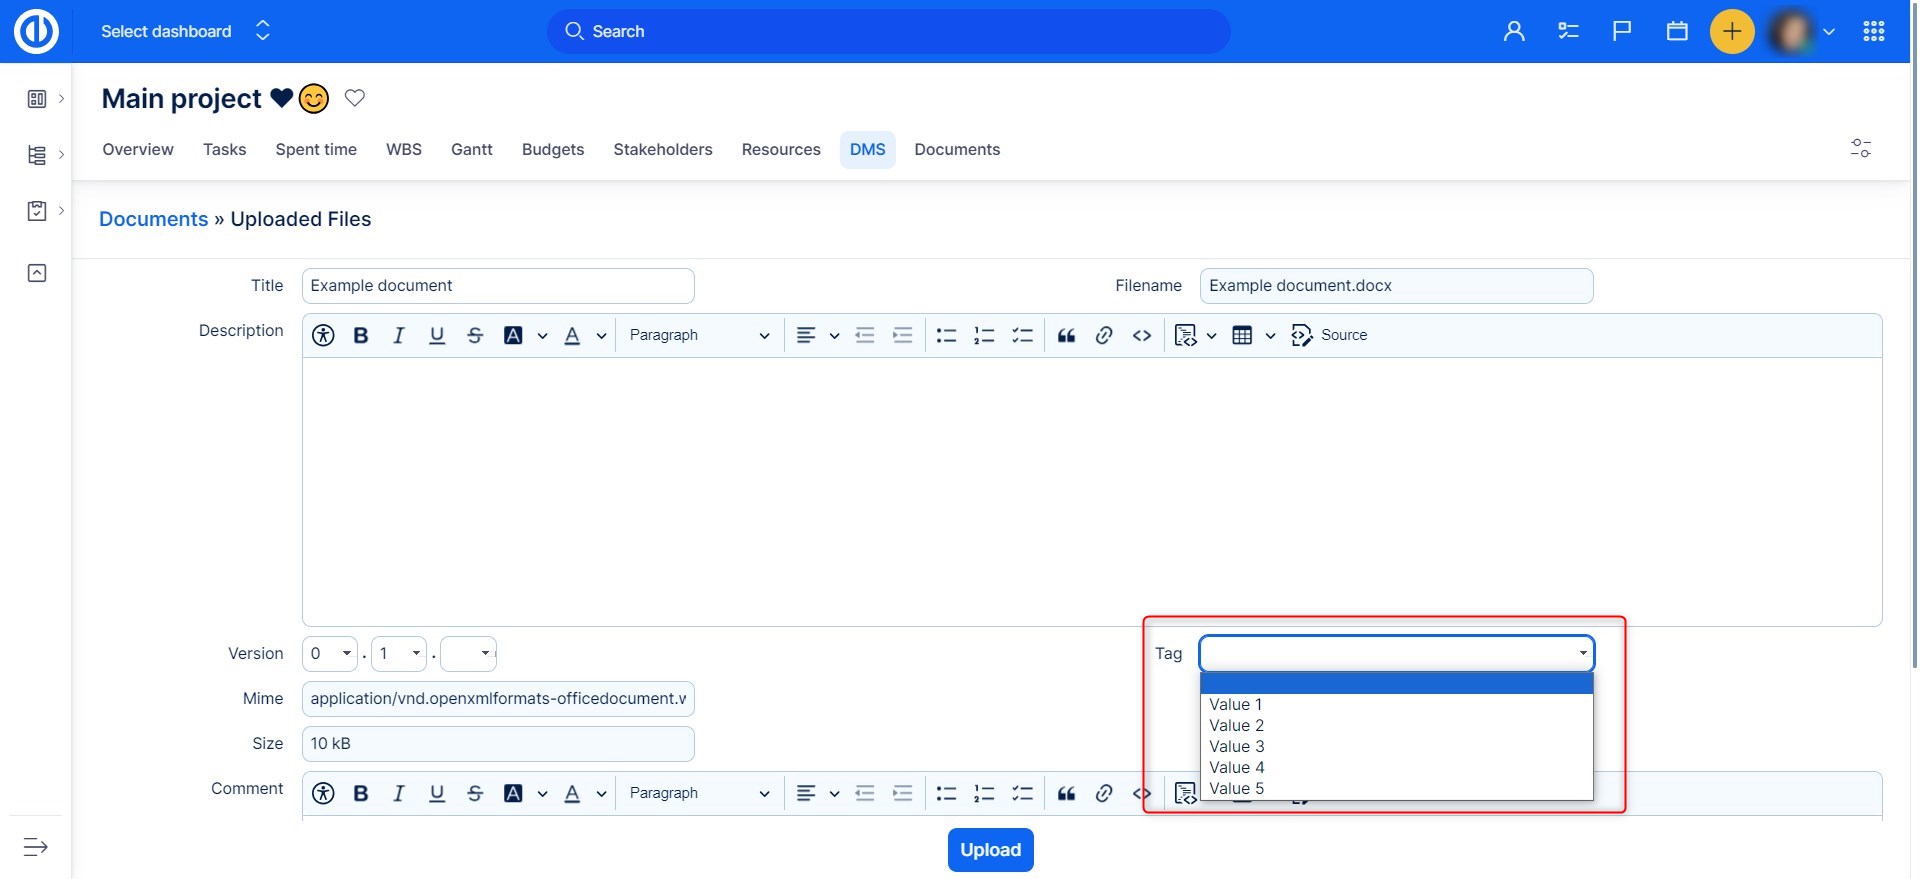
In order to use Documents tagging feature let's add a new DMS custom field named Tag as a list with possible values specified according to your requirements.
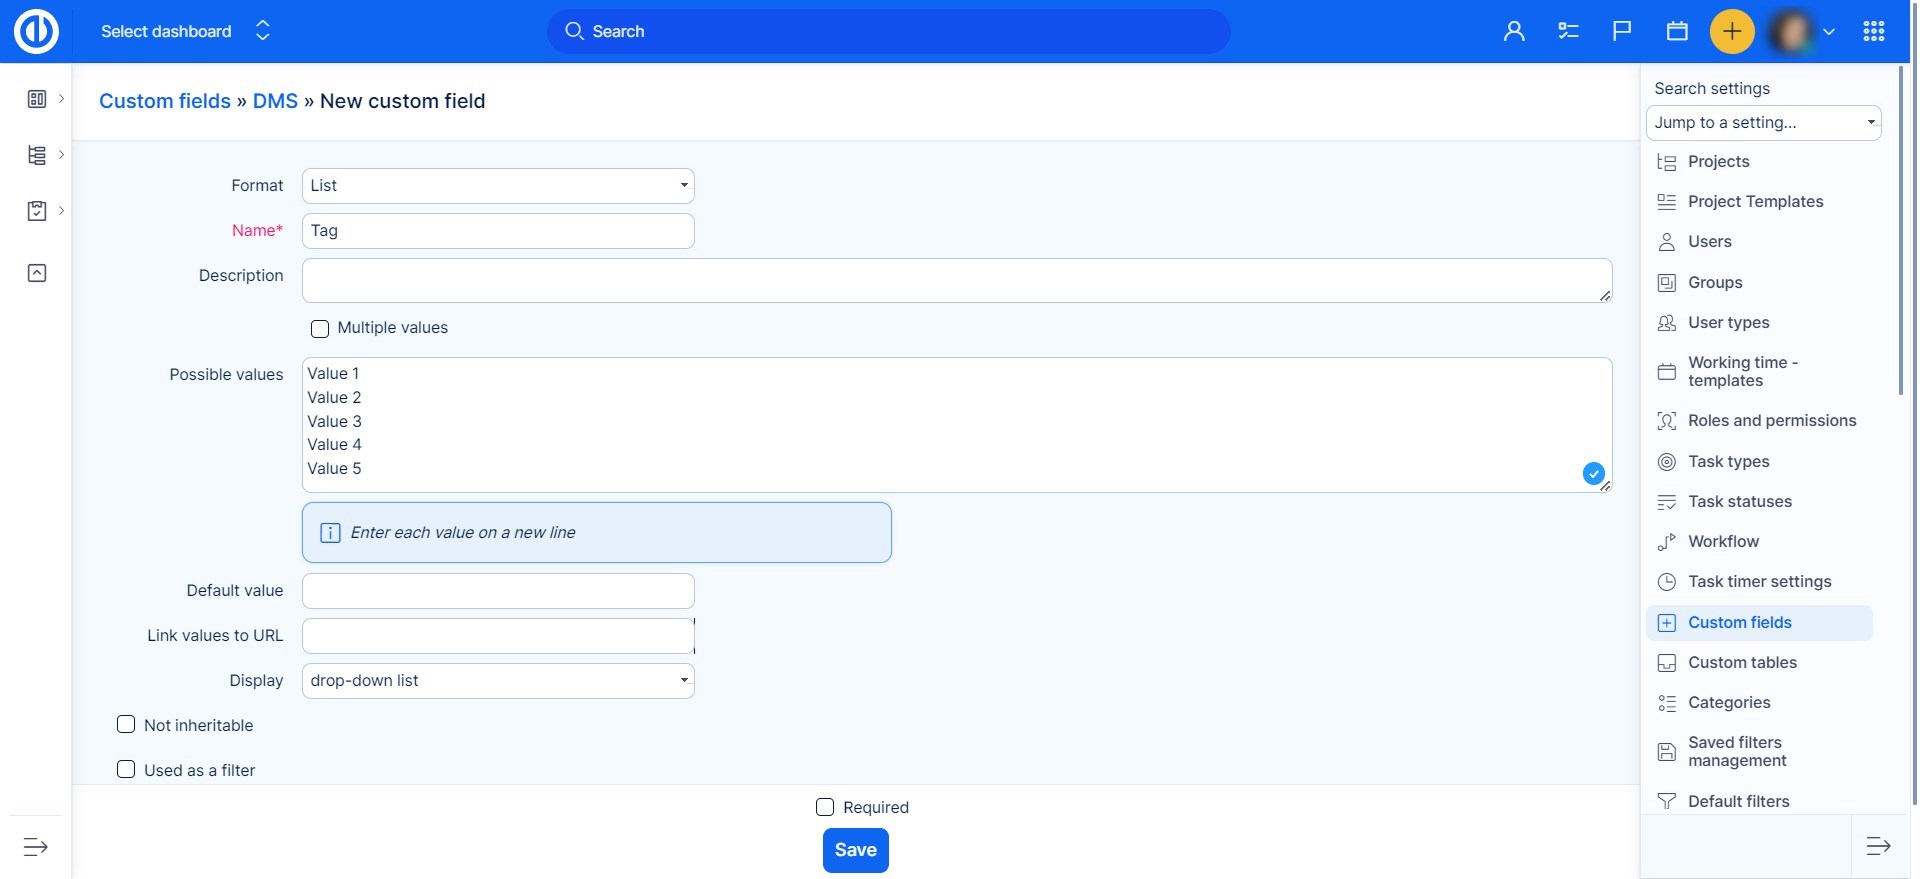
When the custom field is saved, you find it in edit mode while uploading new document or new revision. Just select the appriate value of the tag and save.
How to configure roles and permissions
Roles and permissions can be configured in Global menu >> Administration >> Roles and permissions. Available permissions related to Easy DMS are as follows:
- View DMS file revision accesses
- View DMS file revisions
- Browse documents
- User preferences DMS tab is enabled in the project settings
- View documents Documents can be downloaded, emailed, copied and moved. Approval workflow is available.
- Folder manipulation Folders can be created, deleted, edited, locked, unlocked. Email notification can be switched on/off.
- File manipulation Documents can be uploaded, locked, unlocked. Email notification can be switched on/off. Approval workflows can be applied. Symbolic links can be created/deleted.
- Delete documents It allows enter the Trash bin and delete/restore documents.
- Force file unlock A member is allowed to unlock a document locked by someone else.
- File approval Enable/Disable document approval workflow approving.
- Manage workflows Approval workflow tab is enabled in the project settings. Members are allowed to define approval workflows of the project.
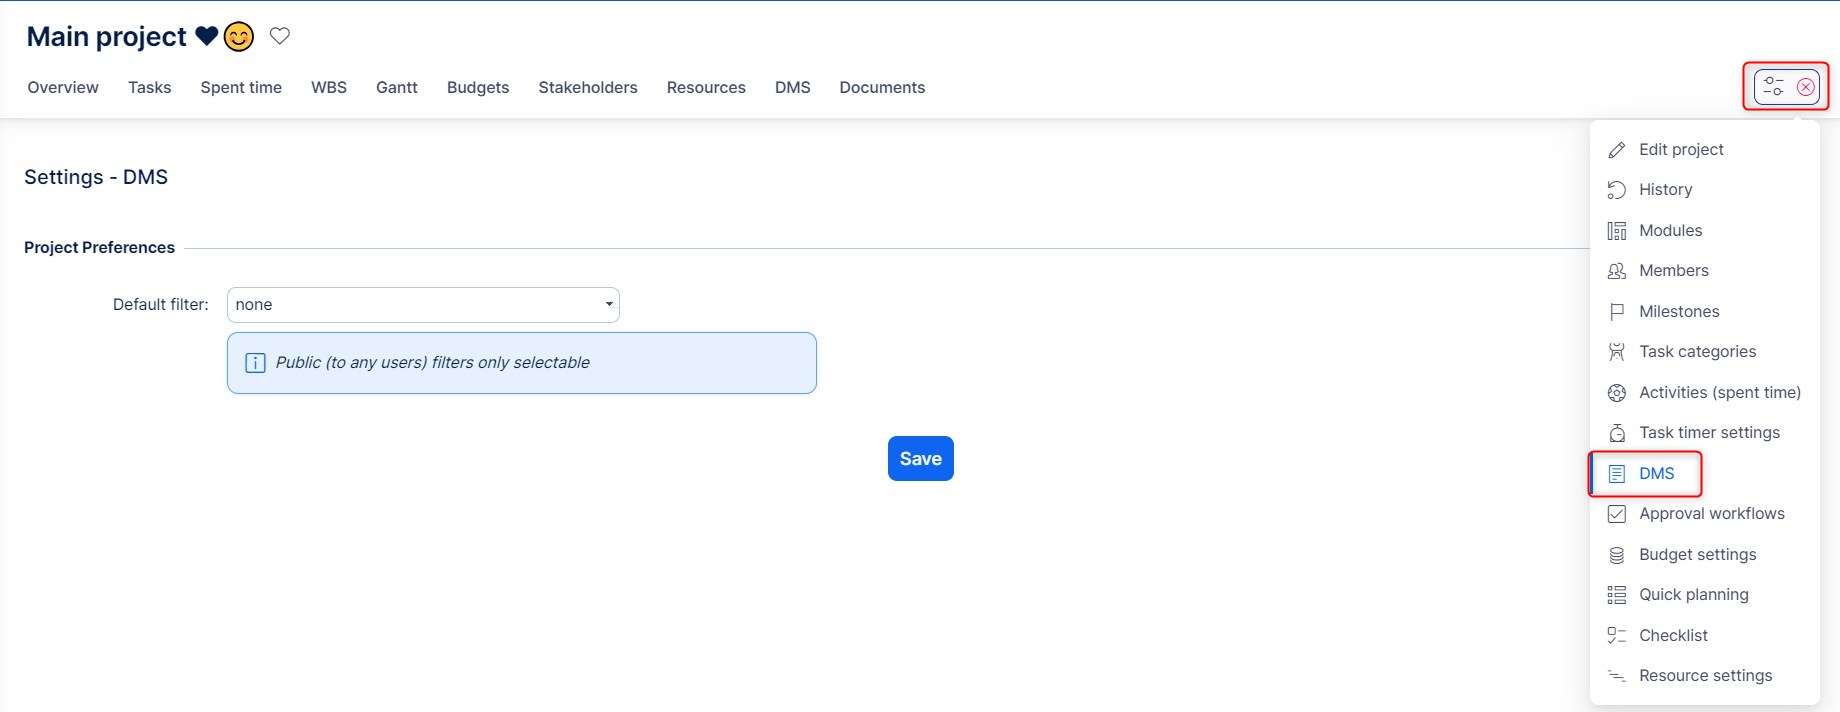
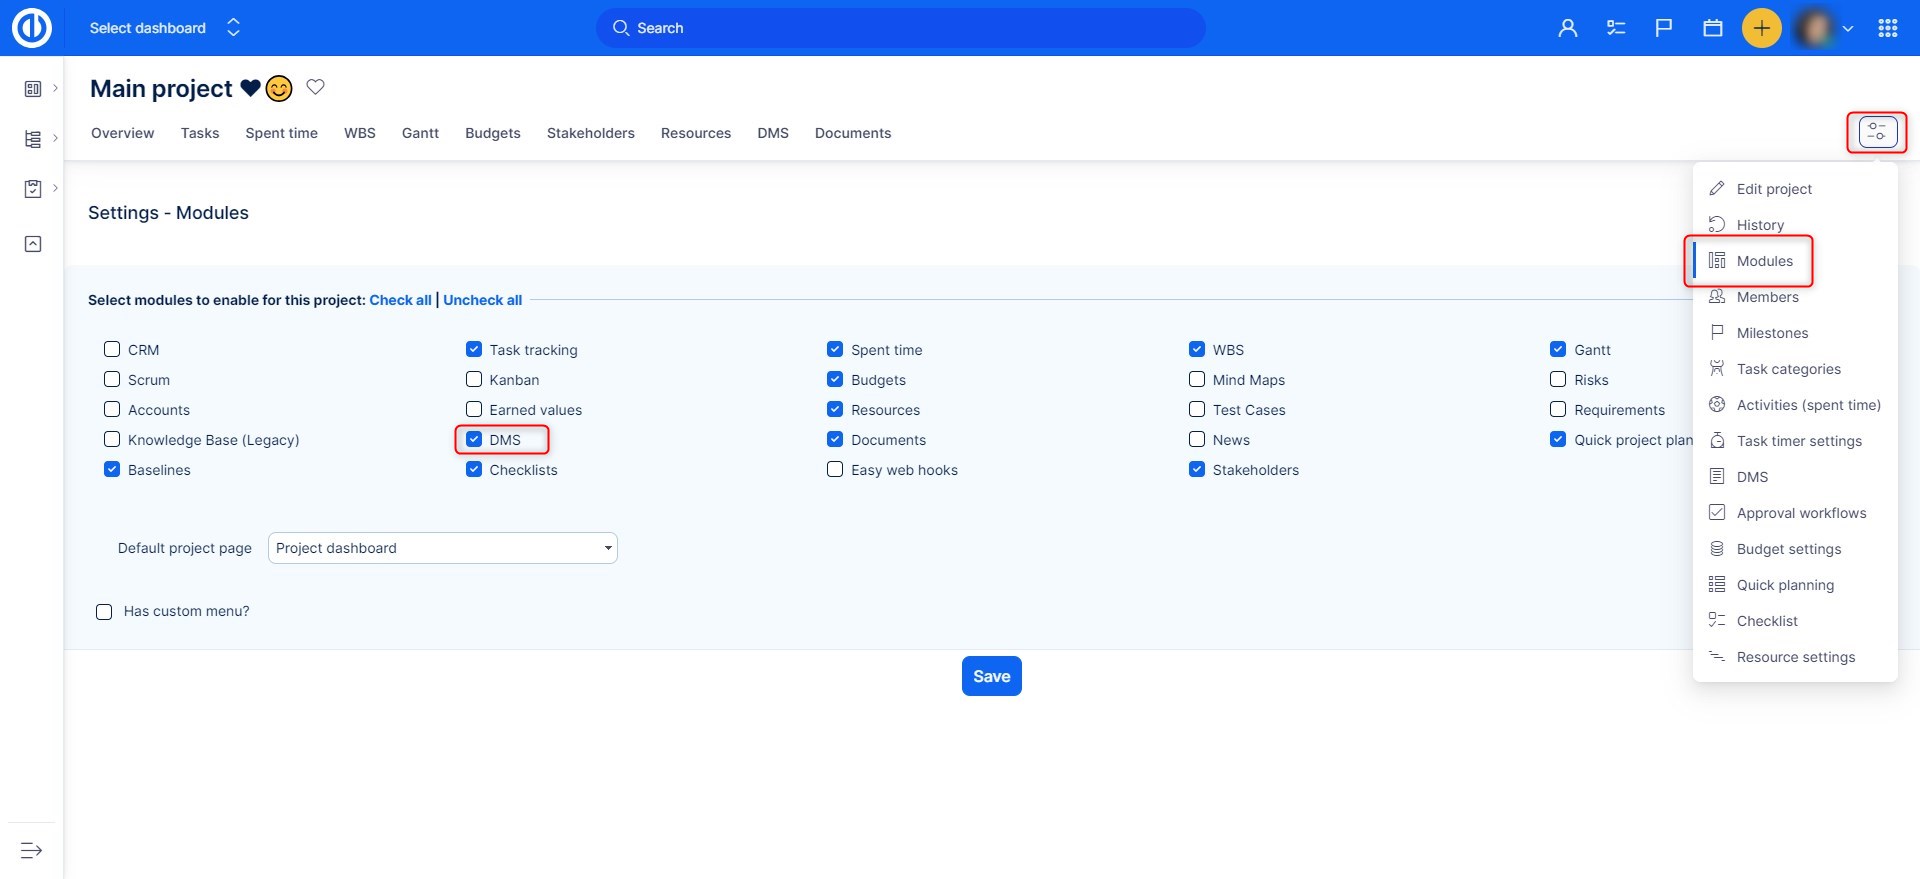
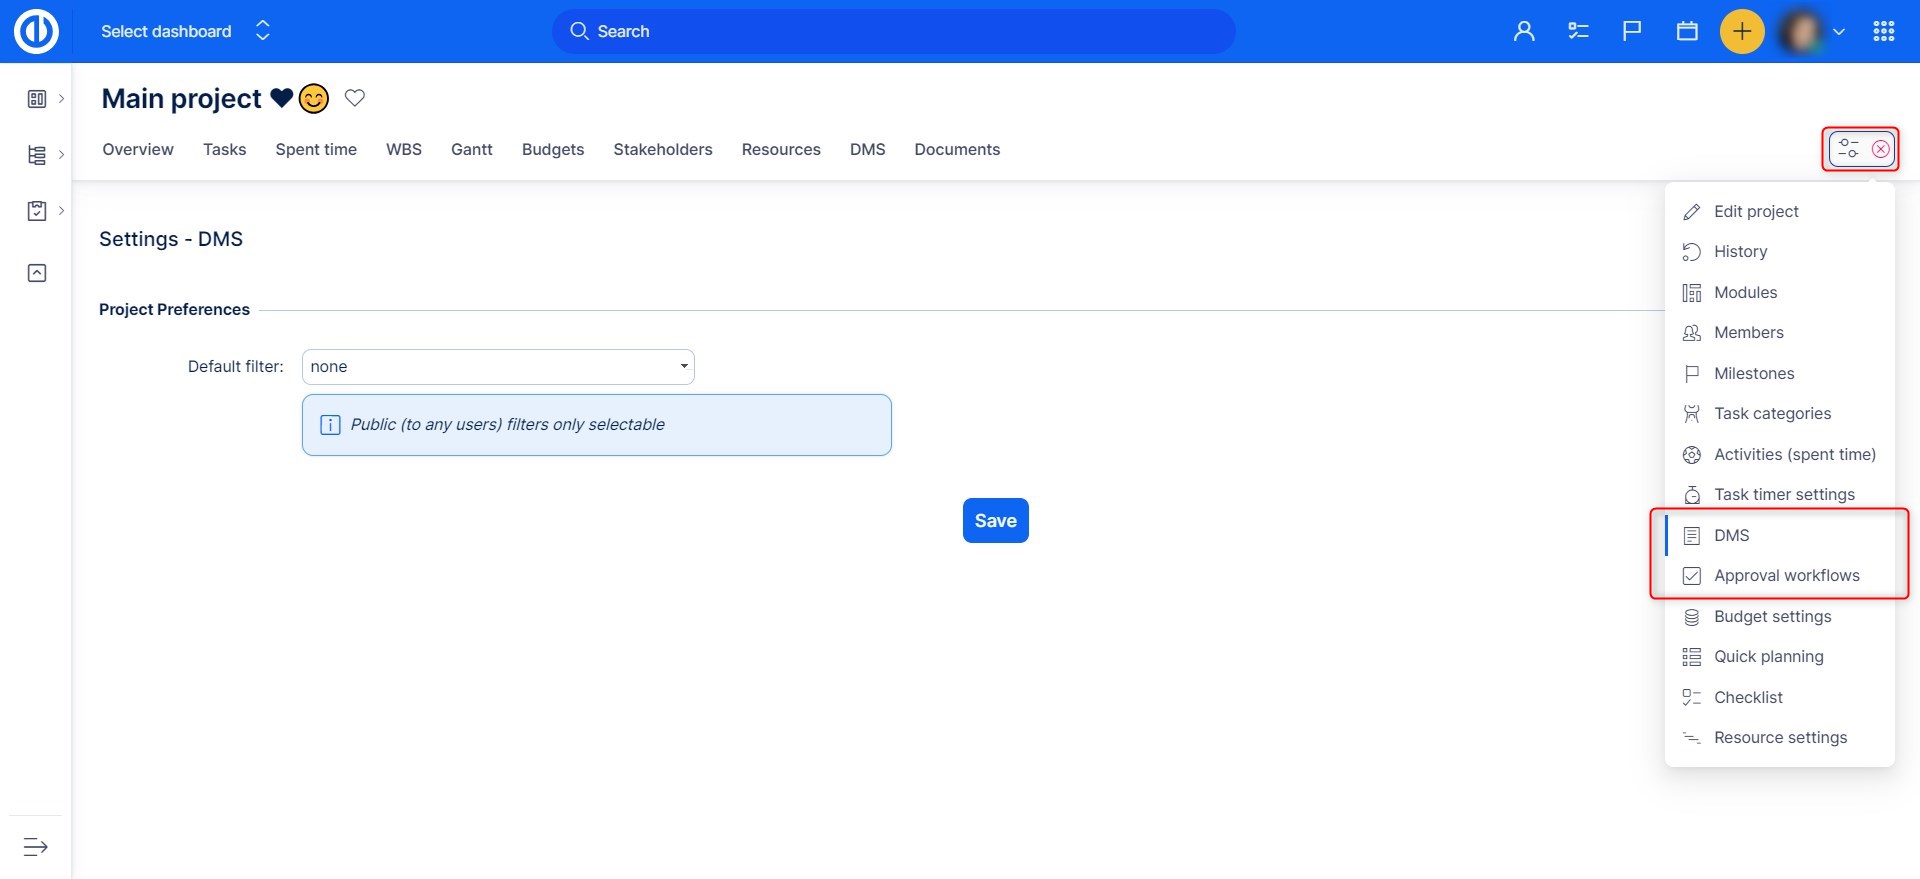
How to activate Easy DMS on a project
I order to make Easy DMS available on a project, it is necessary to have checked the corresponding module in the Modules tab. To do so, go to the particular project's Settings >> Modules - tick "DMS" checkbox and click on Save. Immediately after, Easy DMS and Approval workflows tabs will appear in the top menu of the particular project as illustrated below. Each project member with corresponding permissions can set email notifications related to DMS documents and folders of the project.
How to configure Approval workflows
This settings allows project managers to define approval workflows. The approval workflow feature as a part of Easy DMS allows users to create an approval chain for document approving. An approval workflow is defined by a logical name and by assigned users – approvers in a particular order with a given dependency. Each approval workflow consists of one or more approval steps. Each approval step includes one or more approver and their dependency. It means that we can assign a new user with a dependency AND or OR. So to proceed to a next approval step it is required an approval by one or all approvers. Consequently we are able to define serial or parallel workflow this way.
Approval workflows can be configured both on global and project level. The global level settings is available in Global menu >> Administration >> Approval workflows. Here can be defined global approval workflows available in all projects as illustrated below. The project level settings is available in the corresponding tab on a particular project with Easy DMS module activated, as explained previously.
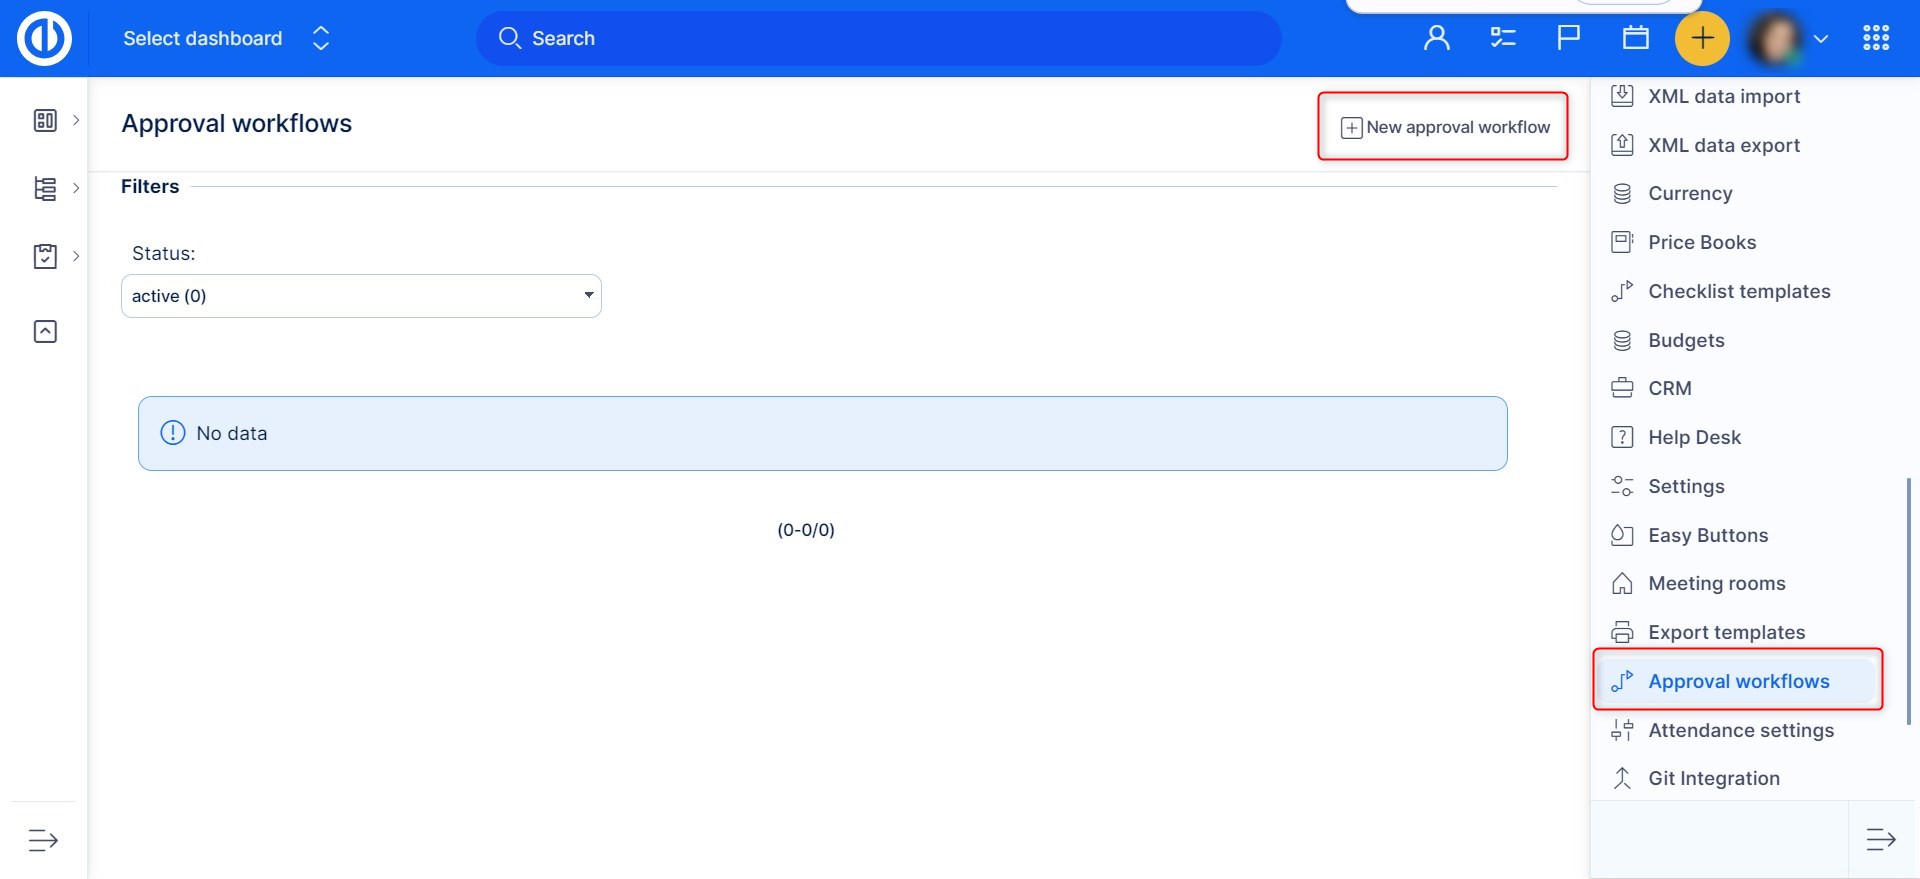
To create a new approval workflow click on the respective button in the top right corner. Then you are expected to enter a name of the new approval wokflow. If you already have created some approval workflows, you can copy one into the new one by selecting it from "Copy workflow from" in the dropdown menu.
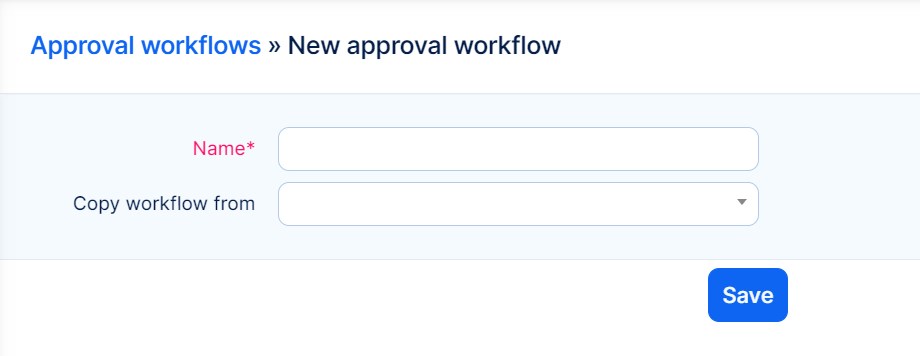
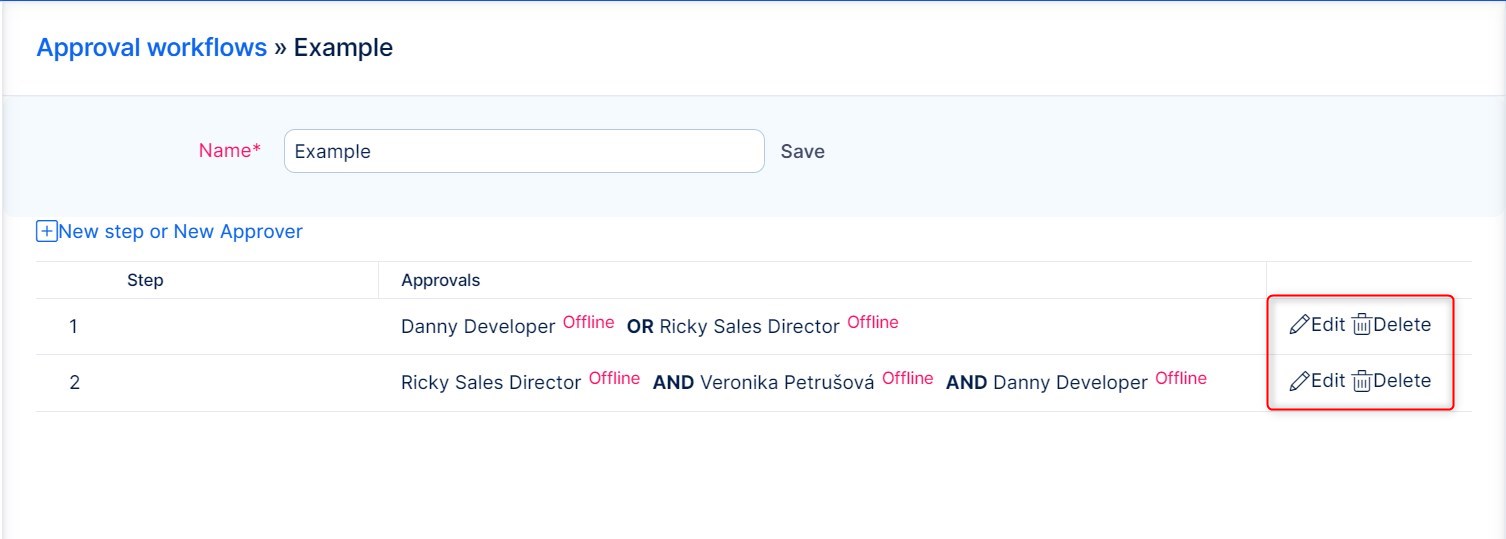
When everything is filled in, click on Create button. Just created workflow appears on the workflow list. In order to change the workflow name or to define workflow steps click on the workflow name. Then workflow update form appears. In the top of the form, you can update the workflow name. Edit the name there and click on Save button.
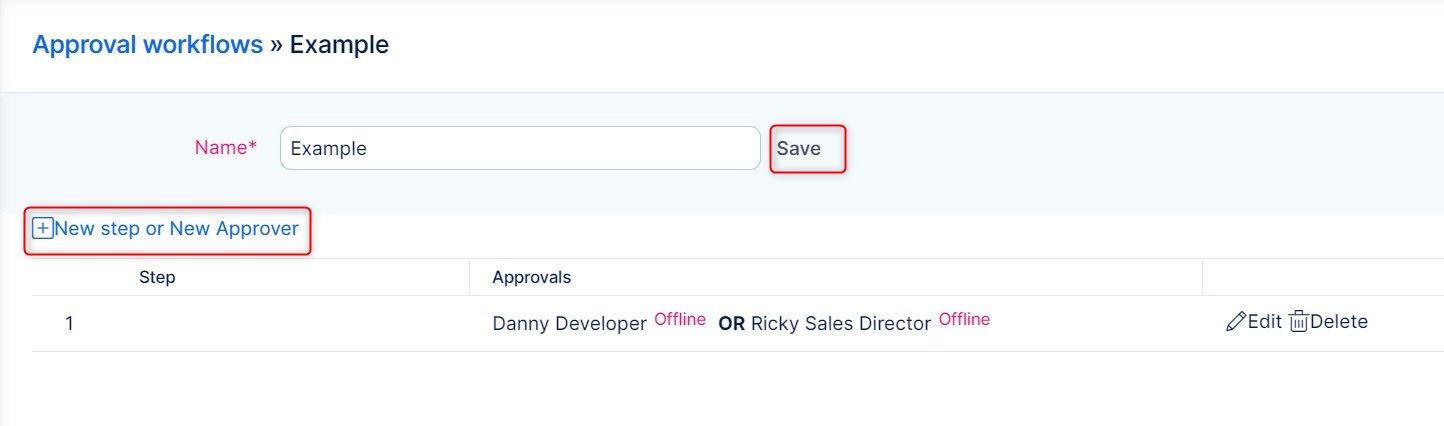
Using the New step button you can choose one or more approvals and by clicking on AND or OR button you will add a new approval step to the end or by choosing an existing step from the list to an existing step.
Examples
Adding a new step with a single approver
- Select a user from the list.
- Step value remains on its default value New step.
- Add a new approval step by clicking on the button ADD.
Adding a new step with more than one approver
- Select two or even more users from the list.
- Step value remains on its default value New step.
- Add a new step by clicking on the button AND or OR depending on the relation of approvers in the step.
Adding a next approver into an existing step
- Select a user from the list.
- Change Step value to the number of an exiting step.
- Add a new step by clicking on the buttons AND or OR depending on the relation of the new approver in the step.
Later on exiting approval steps can be removed or reordered by clicking on corresponding icons next to the step approvals. Keep in mind that the workflow is approved only once each step is met. For example, if you have one step with two approvers with OR operator, only one approval is required. On the contrary, if you have two steps with one approver per each step, then two approvals are required.
Approval workflow constraints
Deleting of an already used approval workflow causes that the affected documents remain in their last approval state: Assigned, Waiting for approval, Approved or Rejected but it is impossible to continue in an unfinished workflow. The approval log is also unavailable. Documents with the unfinished workflow remain locked. In order to reassign the workflow or in another way to update the document it is necessary to unlock the document first and then to create a new revision of the document either by uploading a new version of the document or by creation of a new revision in the document details.
In case of removing one of the steps of a particular workflow, the affected documents remain in their last approval state: Assigned, Waiting for approval, Approved or Rejected. If there are unfinished approval steps, it is possible to continue in the approval chain. The missing step is skipped. If the document is in the state Waiting for approval and the just removed step was the last approval step, the document remains in the state Waiting for approval and it is impossible to continue in approving.
In case of adding or reordering one or more approval steps into a particular workflow, the affected documents remain in their last approval state: Assigned, Waiting for approval, Approved or Rejected. The added steps are not included into already assigned workflows and therefore have no influence on assigned approval workflows. The updated workflow is reflected by documents with workflow assigned after the update.
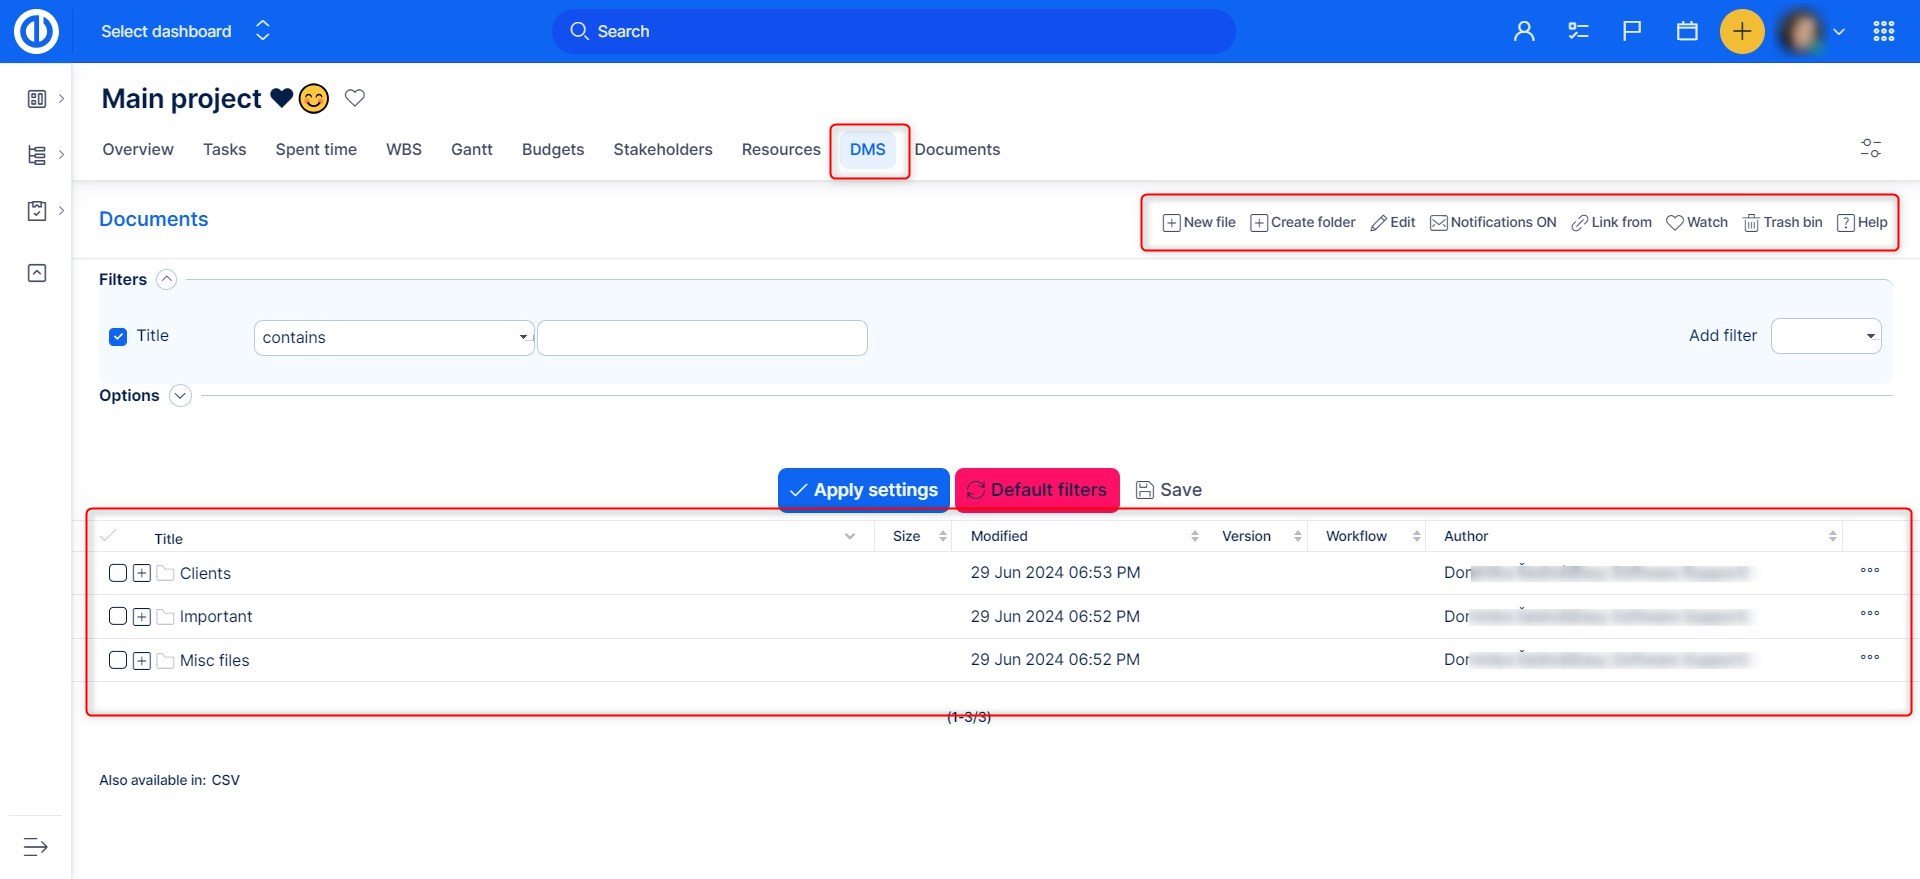
How to work with Easy DMS module
Documents
The Documents module allows you to store all documentation relevant to a project at one place, sorted into folders. You can switch on the Documents module by going to the project Settings → Modules tab. Check the check box in front of the DMS item, which is the Document Management System Feature.
At the screen, you find two major areas: folder and files tree in the upper part of the screen, and an area for uploading files in the lower part of the screen.
Documents management
The documents are stored in folders, which should have such a structure that provides an easy orientation within the topic. The DMS directory structure supports the drag & drop function for easy and fast dragging of documents from one folder to another, or one subfolder to another parent folder.
New folder
You can create a new folder by clicking the button "Create folder" in the right upper corner. This takes you to the following screen:
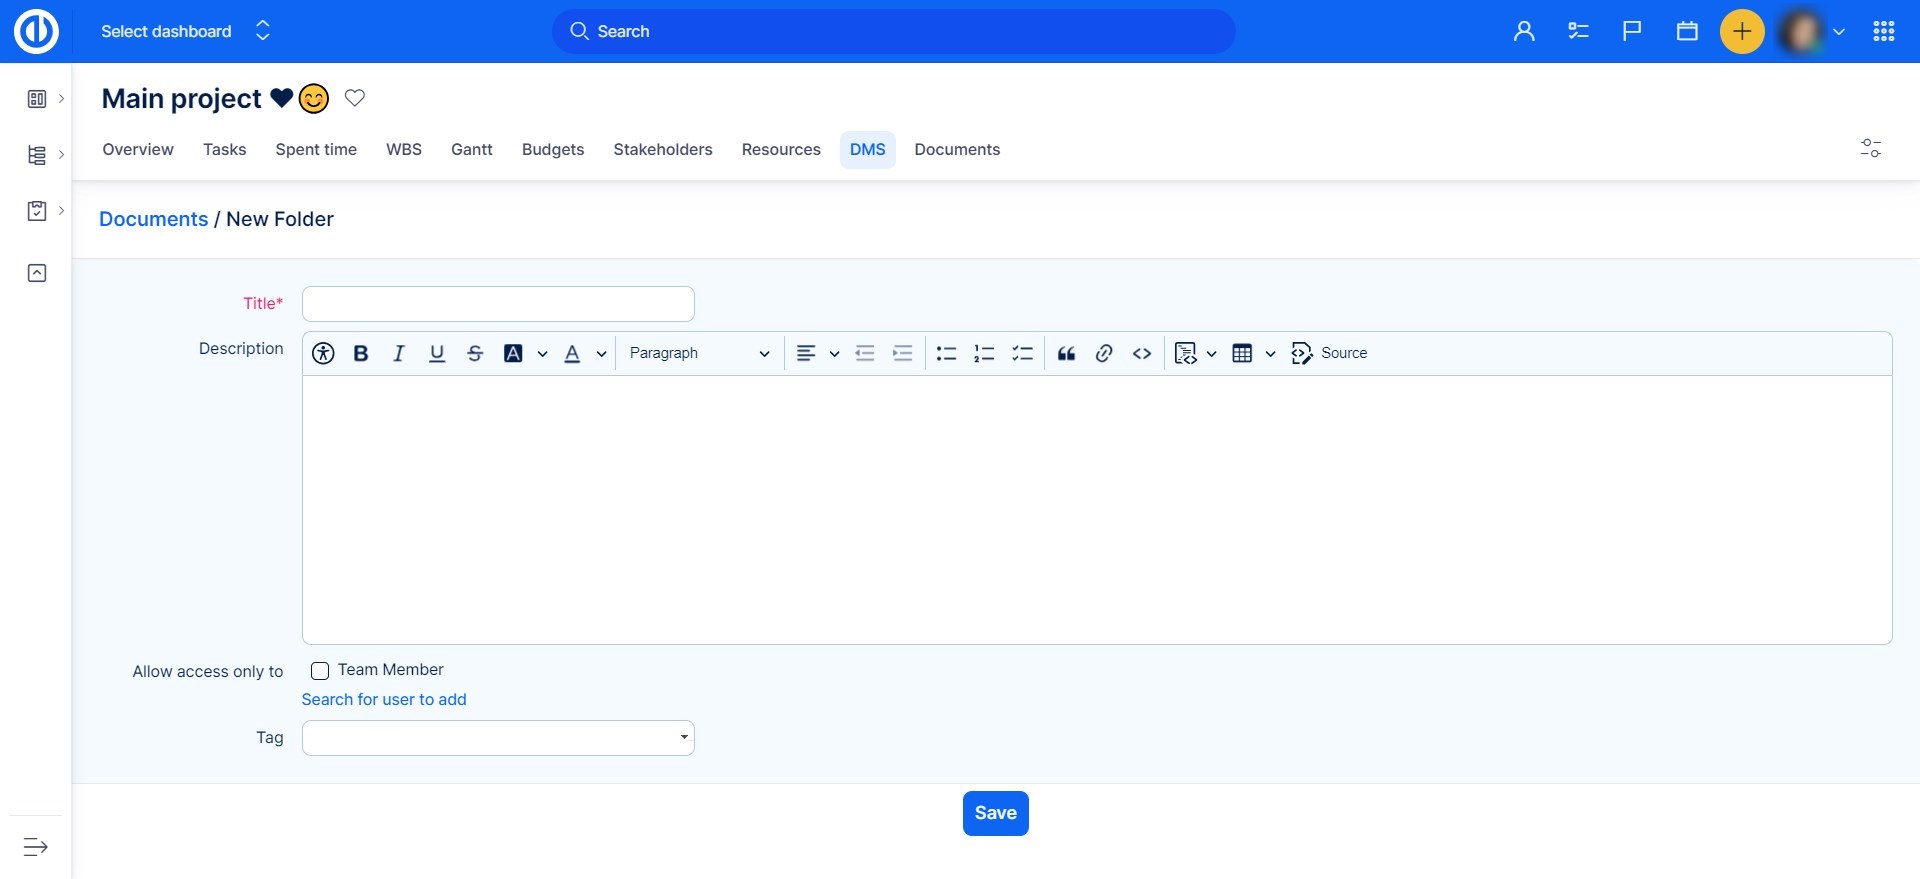
The new folder will be created as a subfolder of the current location in the folder tree. Enter a title for the new folder. You can add a folder description using various types of text formatting, such as headings, lists, links to web pages, documents, and so on. Finally, you can select user roles that will only be granted access to that folder. If you are satisfied with the settings, click the Save button.
A new folder can be also created by copying an existing folder. Display a list of folders and choose a folder to copy. In the right menu (or by right-clicking on) of this folder, choose Copy/Move.
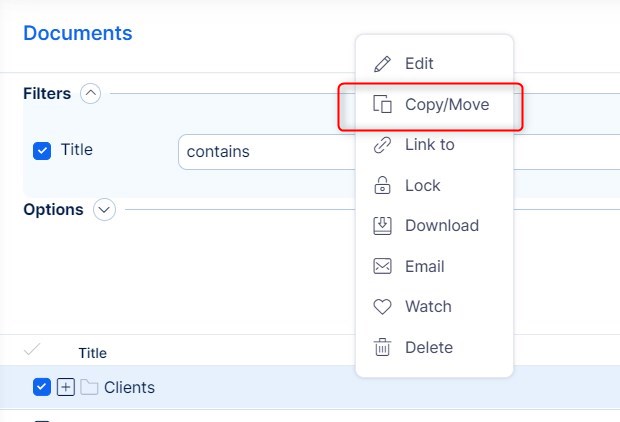
Select the Target project and Target folder. Click the Copy button.
Folder permissions
In the new folder form or later in the edit form, you can specify extra folder permissions. By selecting roles and members, you can control access to the folder.
List of folders
Each line of the folder list contains:
- the folder name
- date of creation, author
- folder edit tools
- possibility to erase a folder
- notification flag
The editing tool uses the same form as is used for creating a new folder. You can change the folder title and description here. You can sort the folders in the alphabetical or reverse alphabetical order. You achieve this by clicking the sign of the arrow right from the column name (unsorted, alphabetical order, reverse alphabetical order).
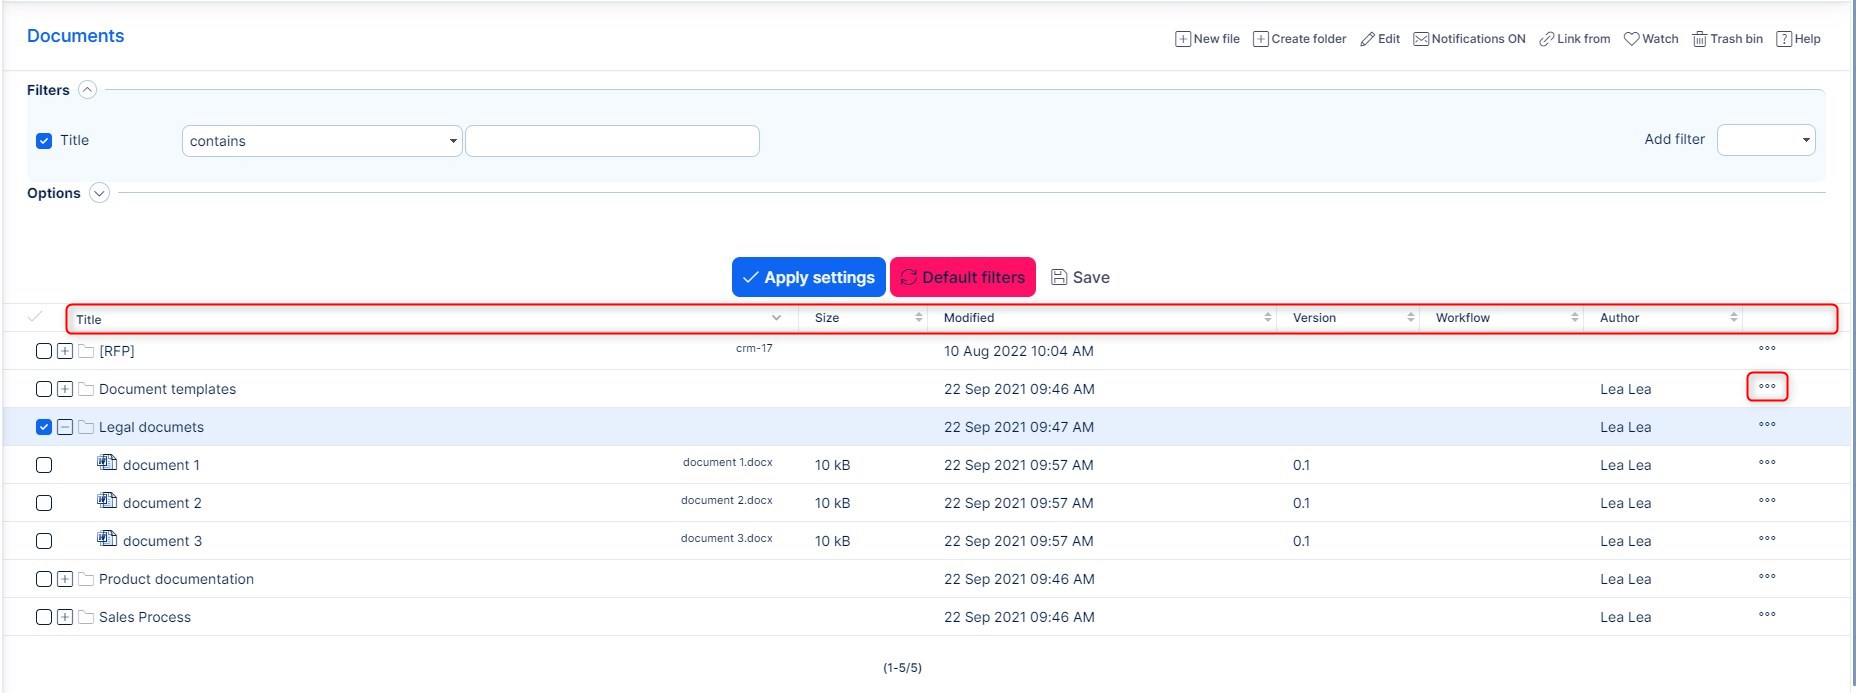
Document management tools
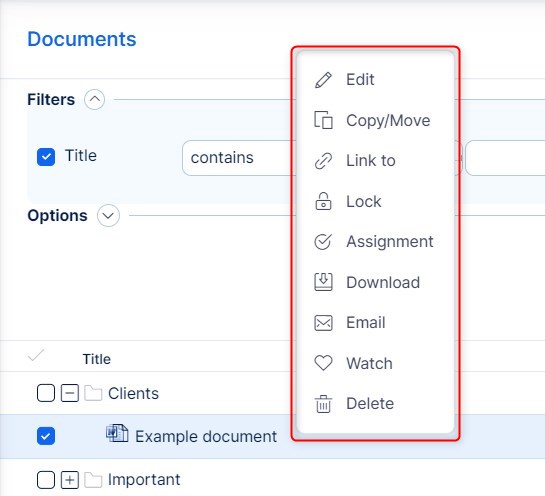
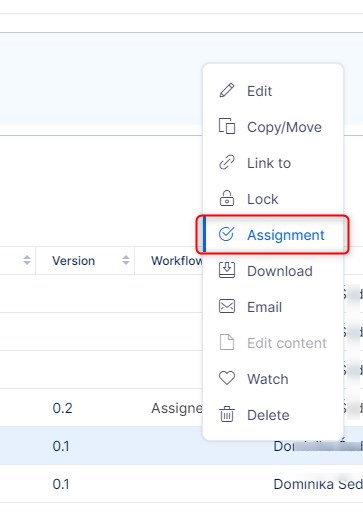
By right-clicking on a particular document in a DMS folder, a context menu appears with the following options: Edit, Copy/Move, Link to, Lock, Turn on notifications, Assignment, Download, Email, Edit content, Delete. To edit the document online in real-time, it is necessary to have Microsoft Office installed as the feature is not compatible with other office applications (including LibreOffice).
Filtering
If you are unsure of what the name of the folder is, you can try applying a keyword. Go to the Filter field, located in the upper right corner, and begin to type the keyword.
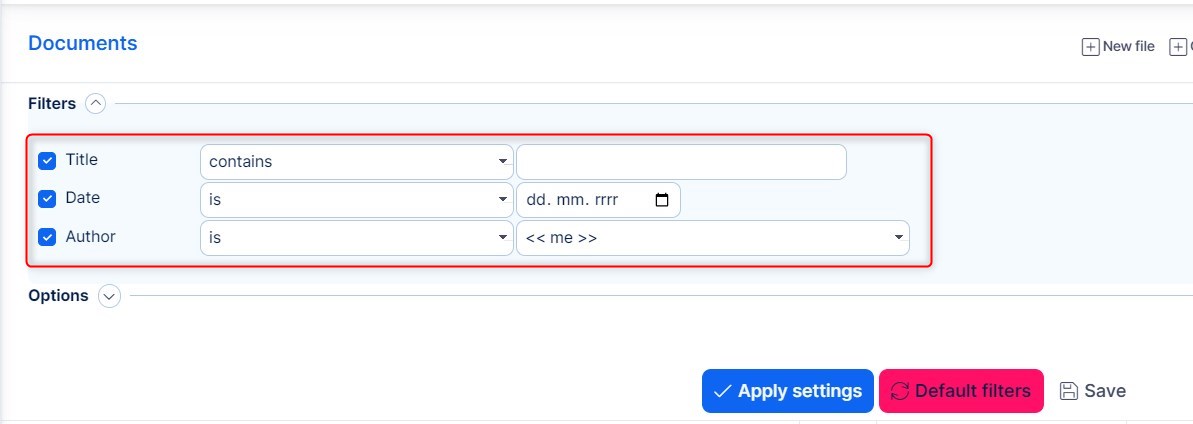
Only those folders with titles that contain the given sequence of letters will be displayed. As you continue typing, fewer folders remain.
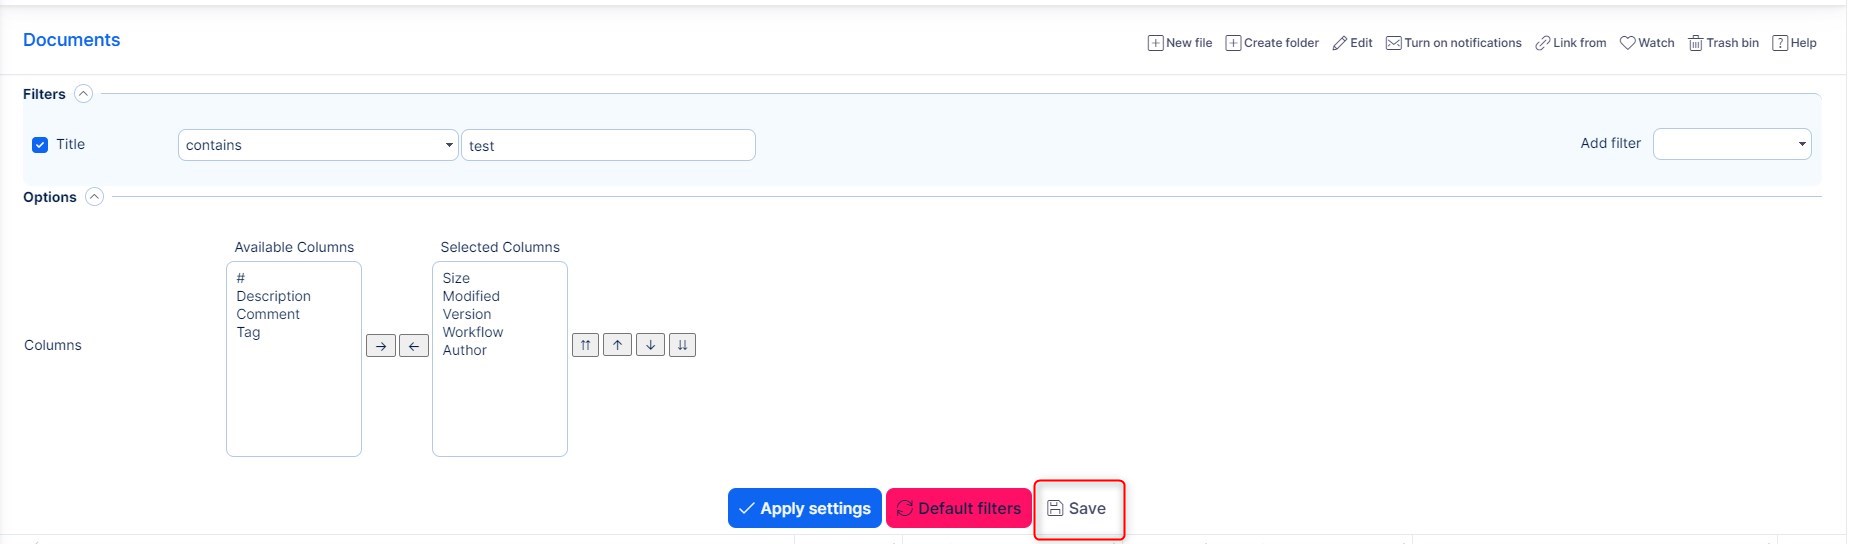
Available filters contain the following options: Author, Locked(approved)?, Workflow, Tag, Date, Title
Available columns contain the following options: #, Description, Comment, Tag, Size, Modified, Version, Workflow, Author.
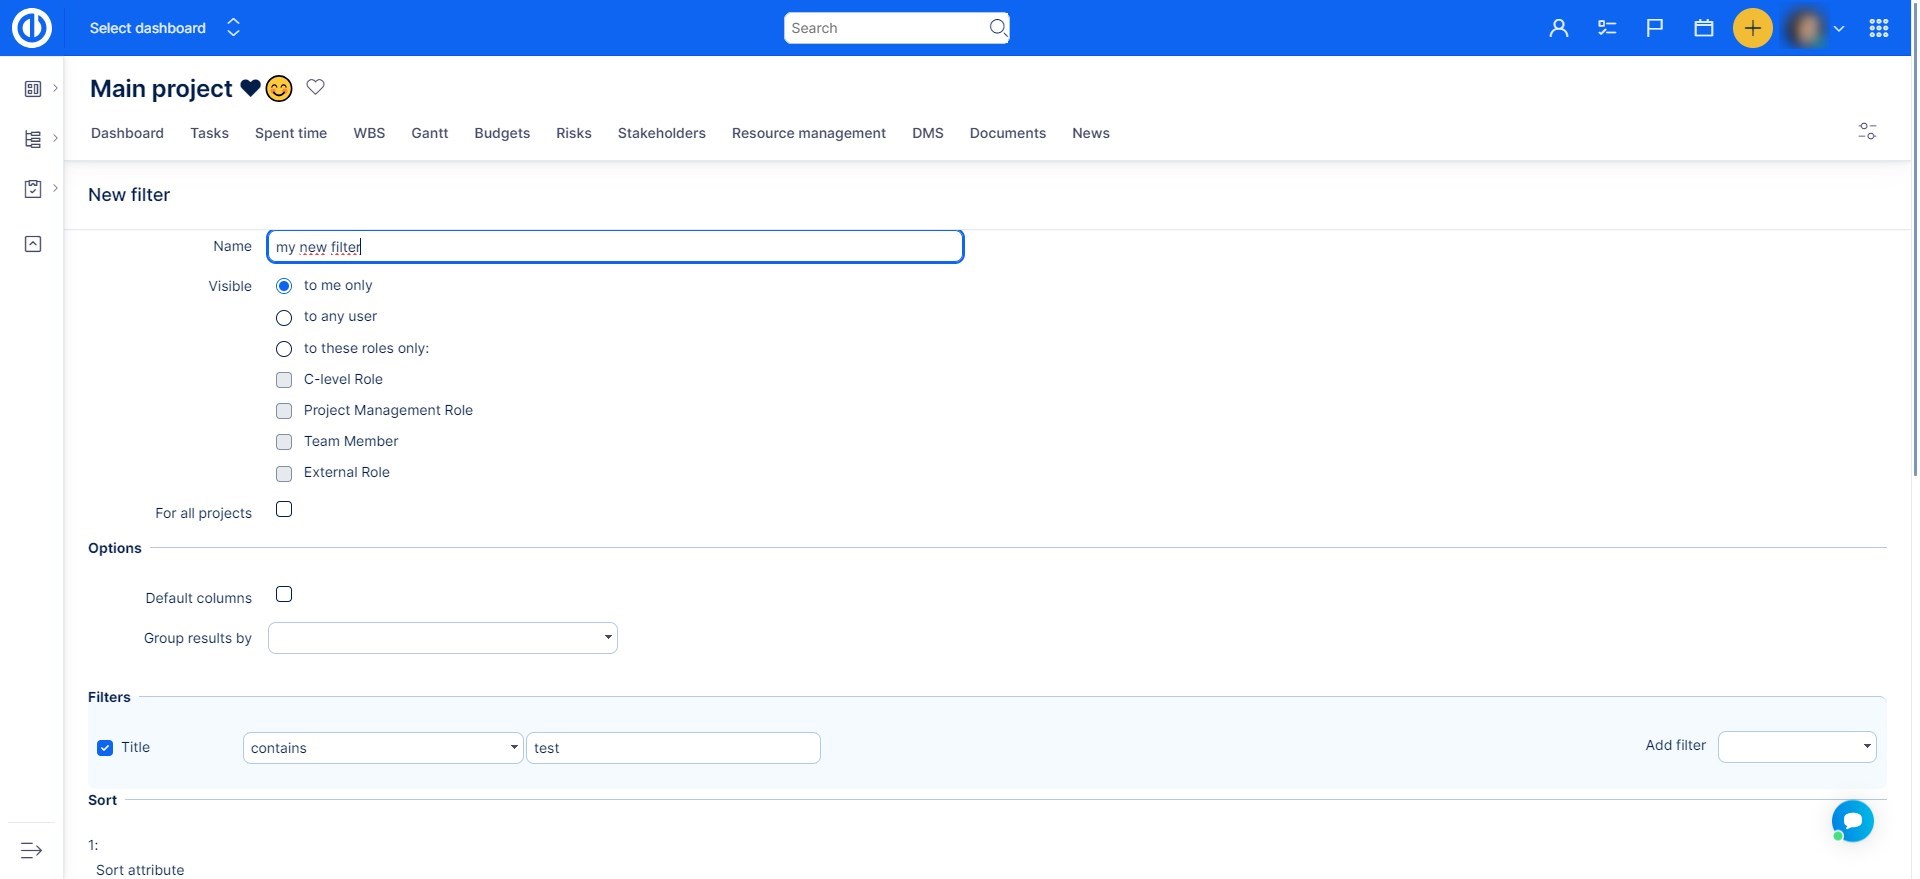
You will be able to set default filters per user, project or globally. Set a filter and click the "save" button. you will be redirected to a setting page,where you may select the details.
Download
Let's say you want to download all contents of a folder called “Training”. Check the check box in front of the folder title and then click the Download button (can be called up with the right mouse button or over the menu at the end of the folder line): The whole content of the folder will be zipped into one file and saved on your hard-drive.
You can e-mail the folder content to your partner. Check the check box in front of the folder title and then click the Email button. All contents of the folder will be zipped into one file. You will be asked to fill in the recipient's e-mail address, subject and you can add a piece of text explaining what are you sending. The zipped files are included automatically. However, be careful with sending the whole content of a folder as its size can exceed the e-mailing limits and your e-mail may not be delivered!
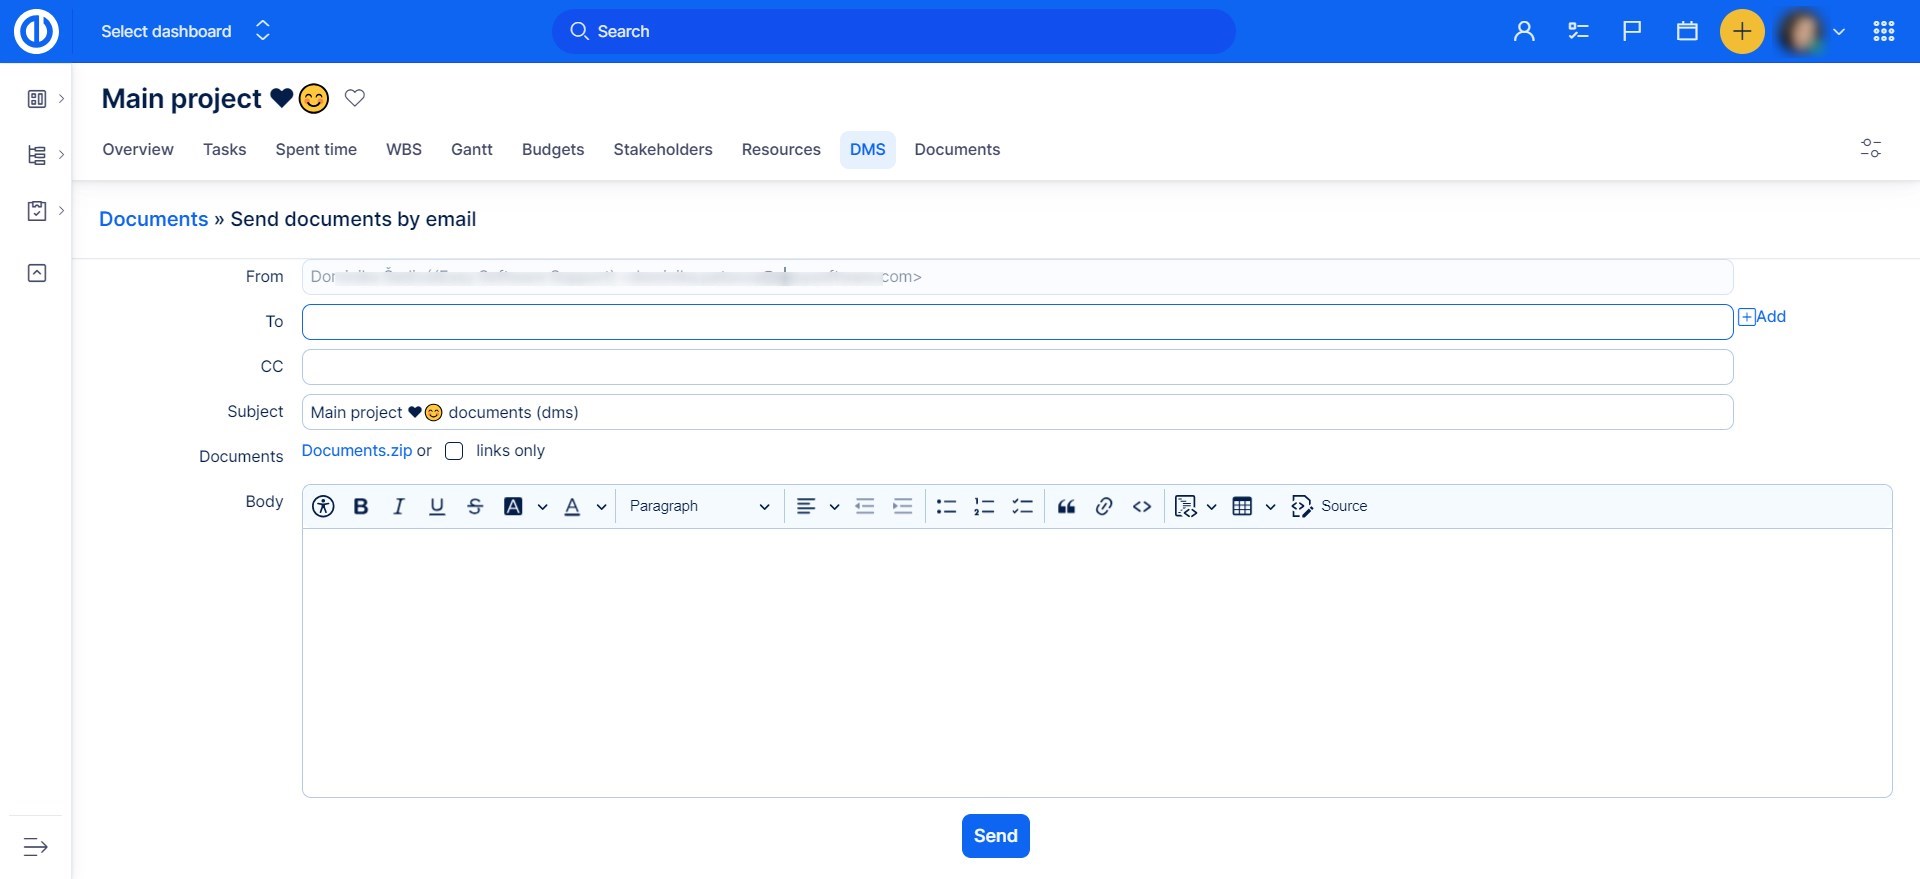
Before sending you can check the attachment by clicking on the URL link Documents.zip. If the checkbox links only is checked, URL links of attached documents will be appended to the email body instead.
Delete folder
You can erase a folder by clicking the Delete button in the right menu (or by right-clicking). To delete more folders at once, tick the checkboxes in front of the folder titles, then click the Delete button in the context menu (by right-clicking). It is also possible to delete a folder with documents, i.e. a non-empty folder. It is also possible to delete a folder with documents, i.e. a non-empty folder.
Add documents
Once you have your folder structure set up, you can start filling it with files. You can, of course, add a new folder any time later.
New files can be added in two ways:
- using drag & drop method – you drag & drop the files you wish to add into the area called Upload; only for files with size < 100MB; does not work for Internet Explorer, it opens the document instead of adding it into the list
- click the "New file" button located in the upper right corner, then browse for the file
You see a list of all ready-to-be-added files. Each line contains:
- the name of the file
- status
- file size
- possibility to remove the file from the list

You can add up to 20 files within one upload. For files over 2GB you need to have a 64b browser. If you don't have a 64b browser, use you archiving tool such as ZIP or RAR and compress and then split your original file into more smaller archives before uploading. When all the files are ready for upload into the folder, click the Start Upload button. You will see the upload status changing. If needed, you can stop the upload by clicking the Stop Upload button.
You can adjust the area size by dragging the bottom line up and down.

When the files are uploaded, a similar screen appears:
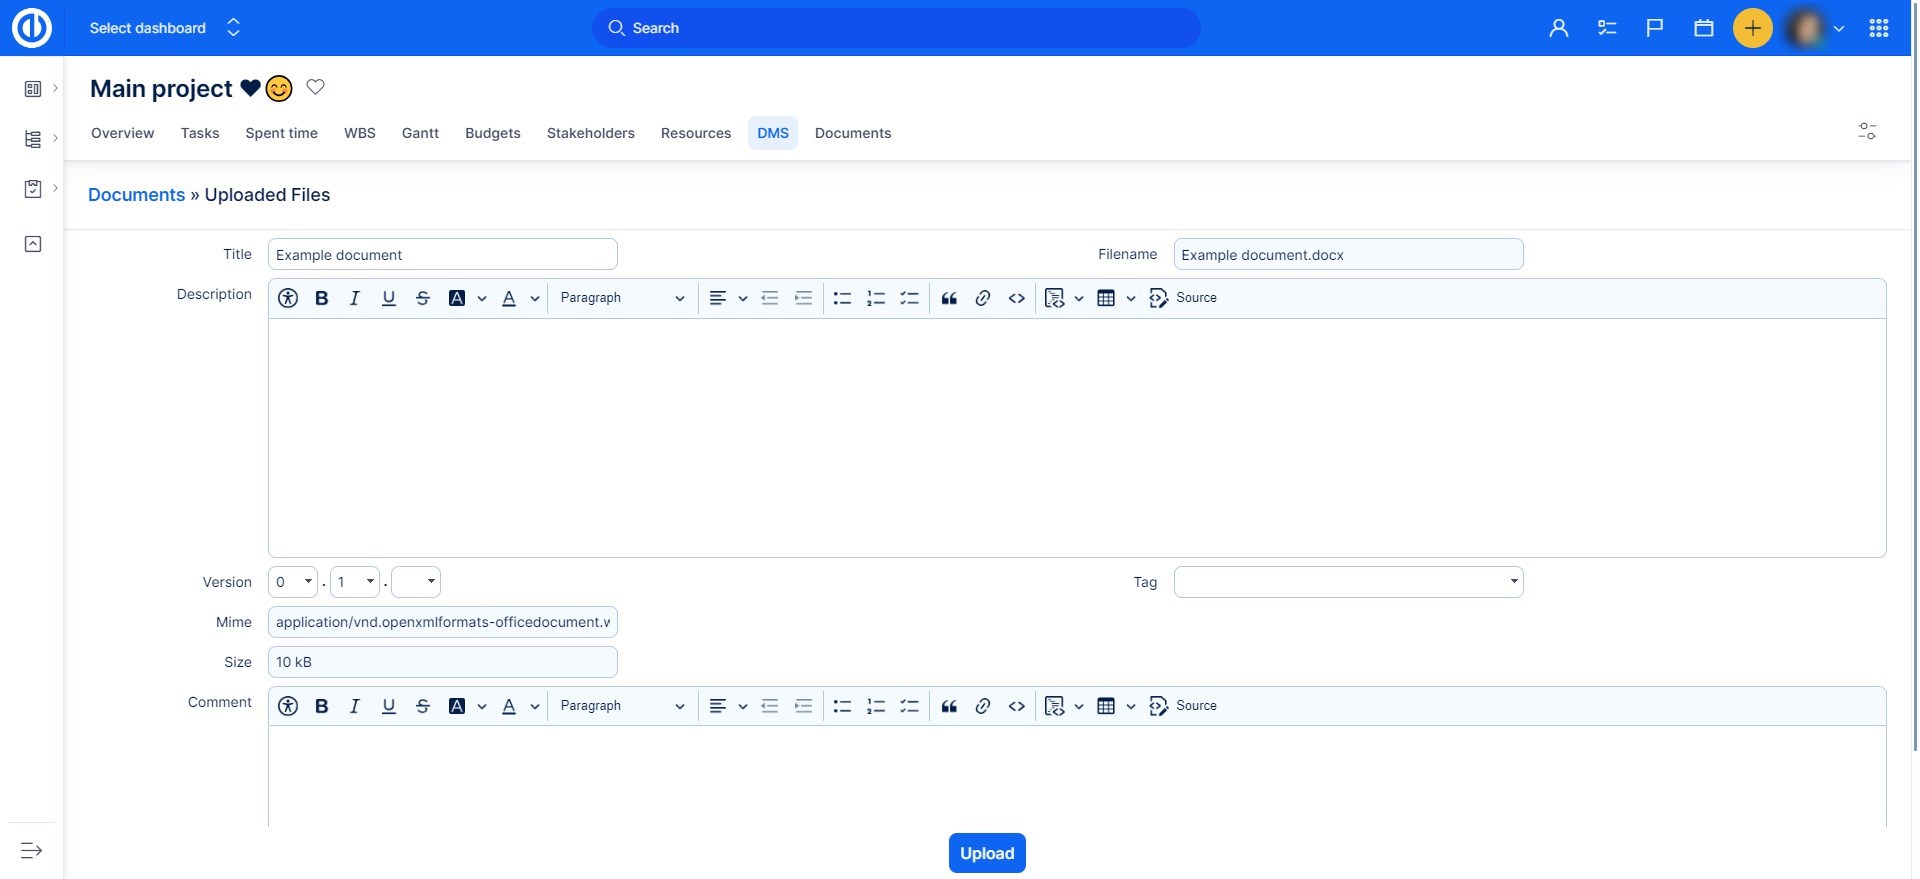
Here you can change the file title, add a description and comment, and assign an appropriate version. You can also select a corresponding tag from the pre-defined list. When satisfied, click the Commit button. If a document of the same file name already exists in the current folder you are offered a new revision of the document automatically.
Invalid characters in document names: ' \ [ \ ] \ / \ \ \ ? " : < > # % \ * '
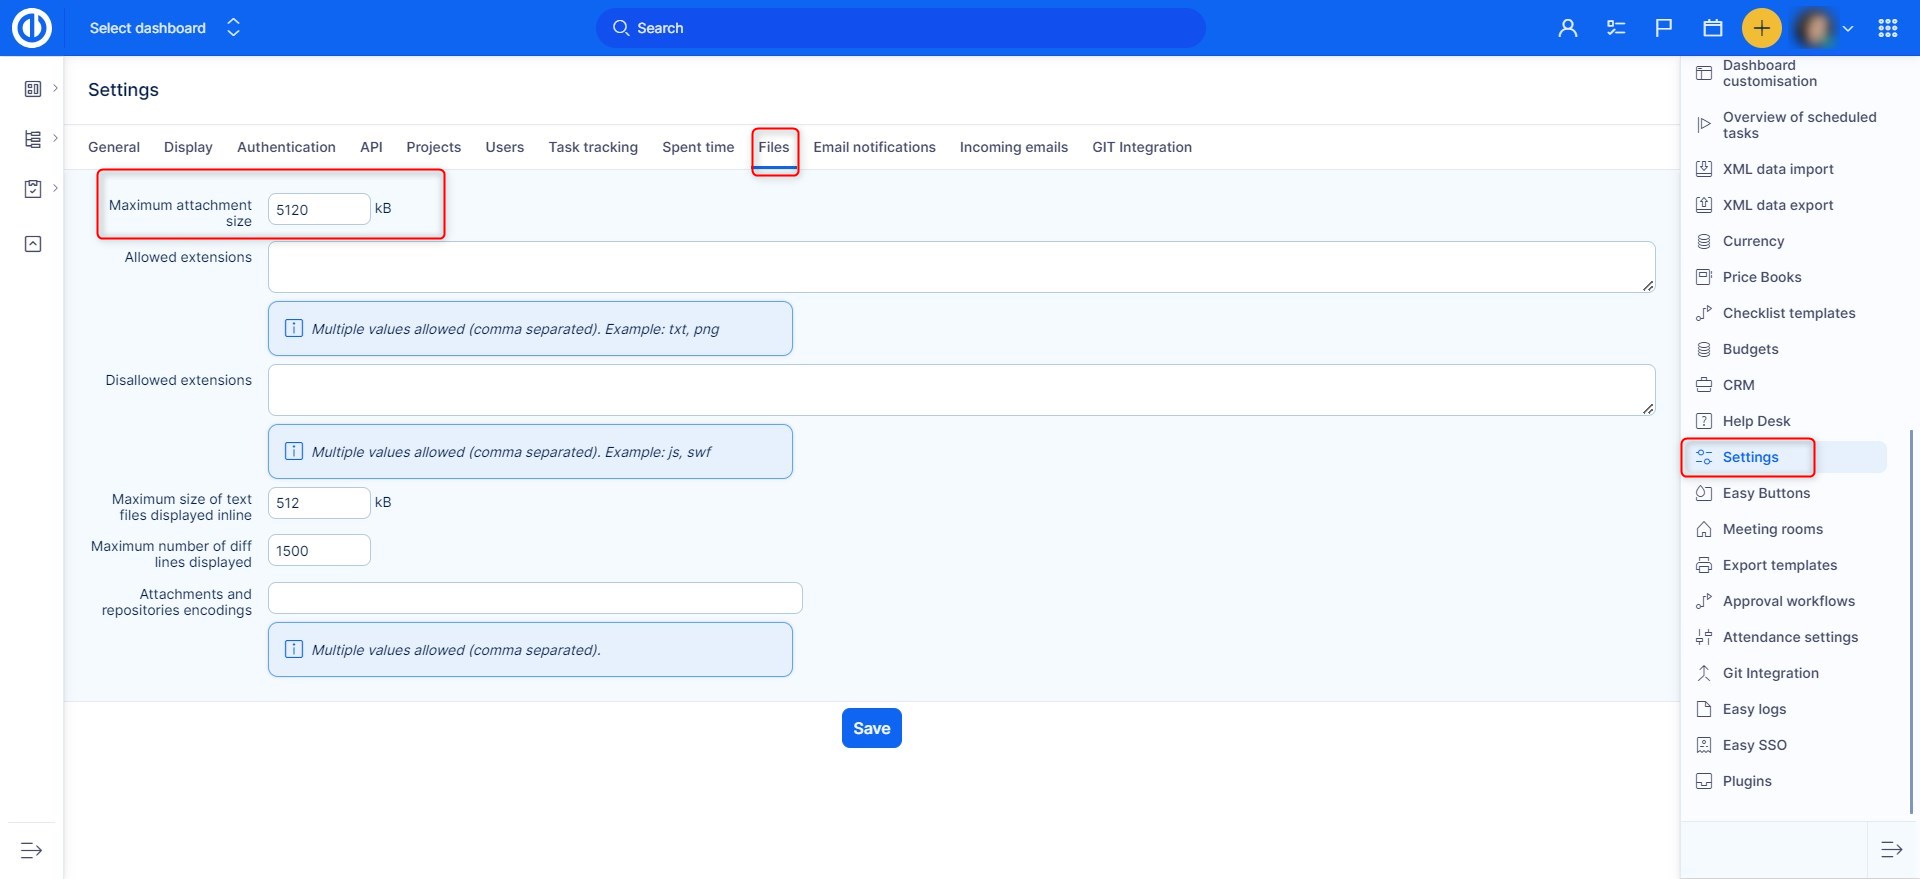
The maximum document attachment size is limited by setting the maximum attachment size in the menu Global menu >> Administration >> Settings >> Files - Maximum attachment size.
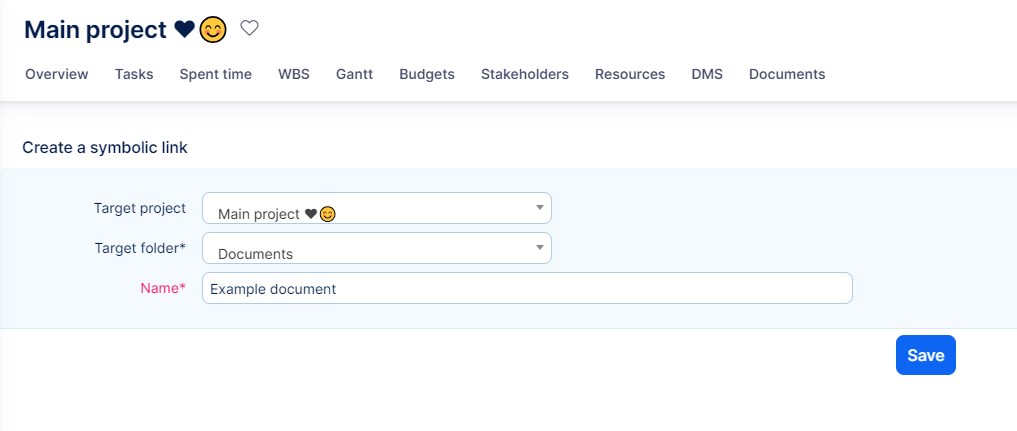
Documents links
There is possible to create a link to another document or folder from the same or another folder of the same or another project. Links behave as if operating directly on the target document or folder. It means for example that if you download or email a link, the referenced file is sent to the user.
If the target document is going to be removed or moved the user will be warned about existing links and these links will be automatically removed.
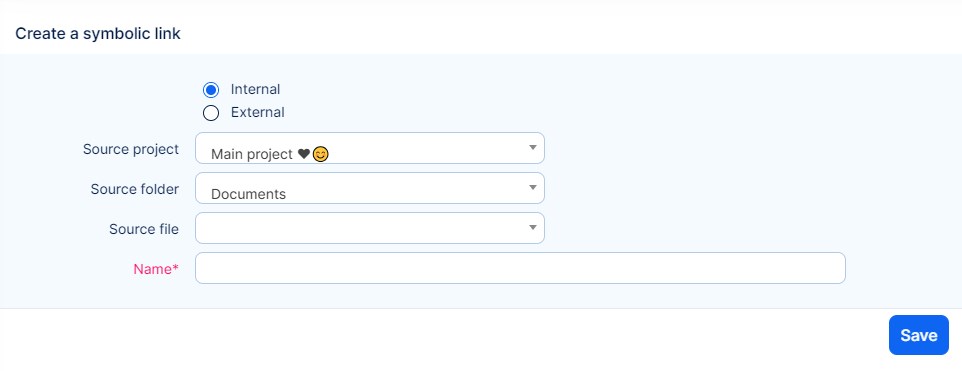
Create a link in the current location to another file or folder
There is a command "Link from" in the command toolbar in the document or folder details form. After a click on that icon a new form New document link appears. The user is expected to choose a source project, folder and optionally document as the target of the link just being created.
Internal
Allow to create links to DMS objects.
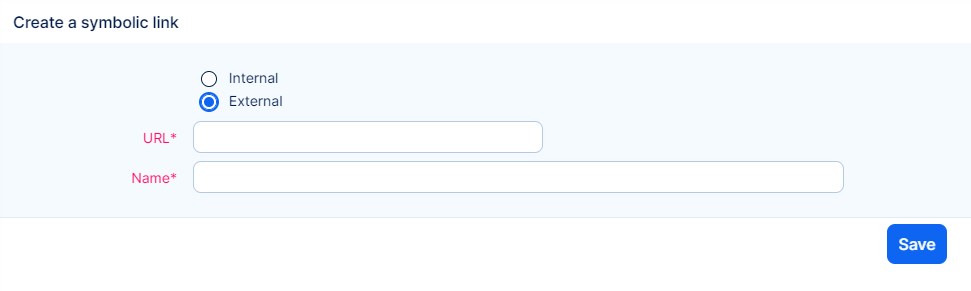
External
Allow to create links to external object using their URL.
Create a link from the current file or folder to another folder
There will be a new command "Link to" in the command toolbar of the main view. After a click on that icon a new form New document link appears. The user is expected to choose a target project and folder where the link just being created will be located.
List of documents
Your files are added into the folder:
You see the file titles and names, their size, last modification date, version, workflow state and who added them (the author). Furthermore, you can lock or delete files. A movement of a document creates a new revision whose author is the user who moved the document. Therefore, the document's author is changed to the current user according to the last revision.
Document details
If you click the edit icon, you get to the page with detailed information about the file.

You see the file history, its versions and workflow. You can download older revisions by clicking the corresponding icon. You can show/hide download and email entries by clicking the icon. You can delete a particular revision by clicking on icon. The file can be copied or moved to another folder or even project by clicking on icon. Then you are expected to select a target folder and project. The file is copied or moved by a click on a corresponding button Copy or Move.
As a project manager you also see statistics about who, when and how many times has downloaded individual versions.
You can add new revision by clicking the plus + sign next to the New Revision title at the top of the page. Following screen appears:
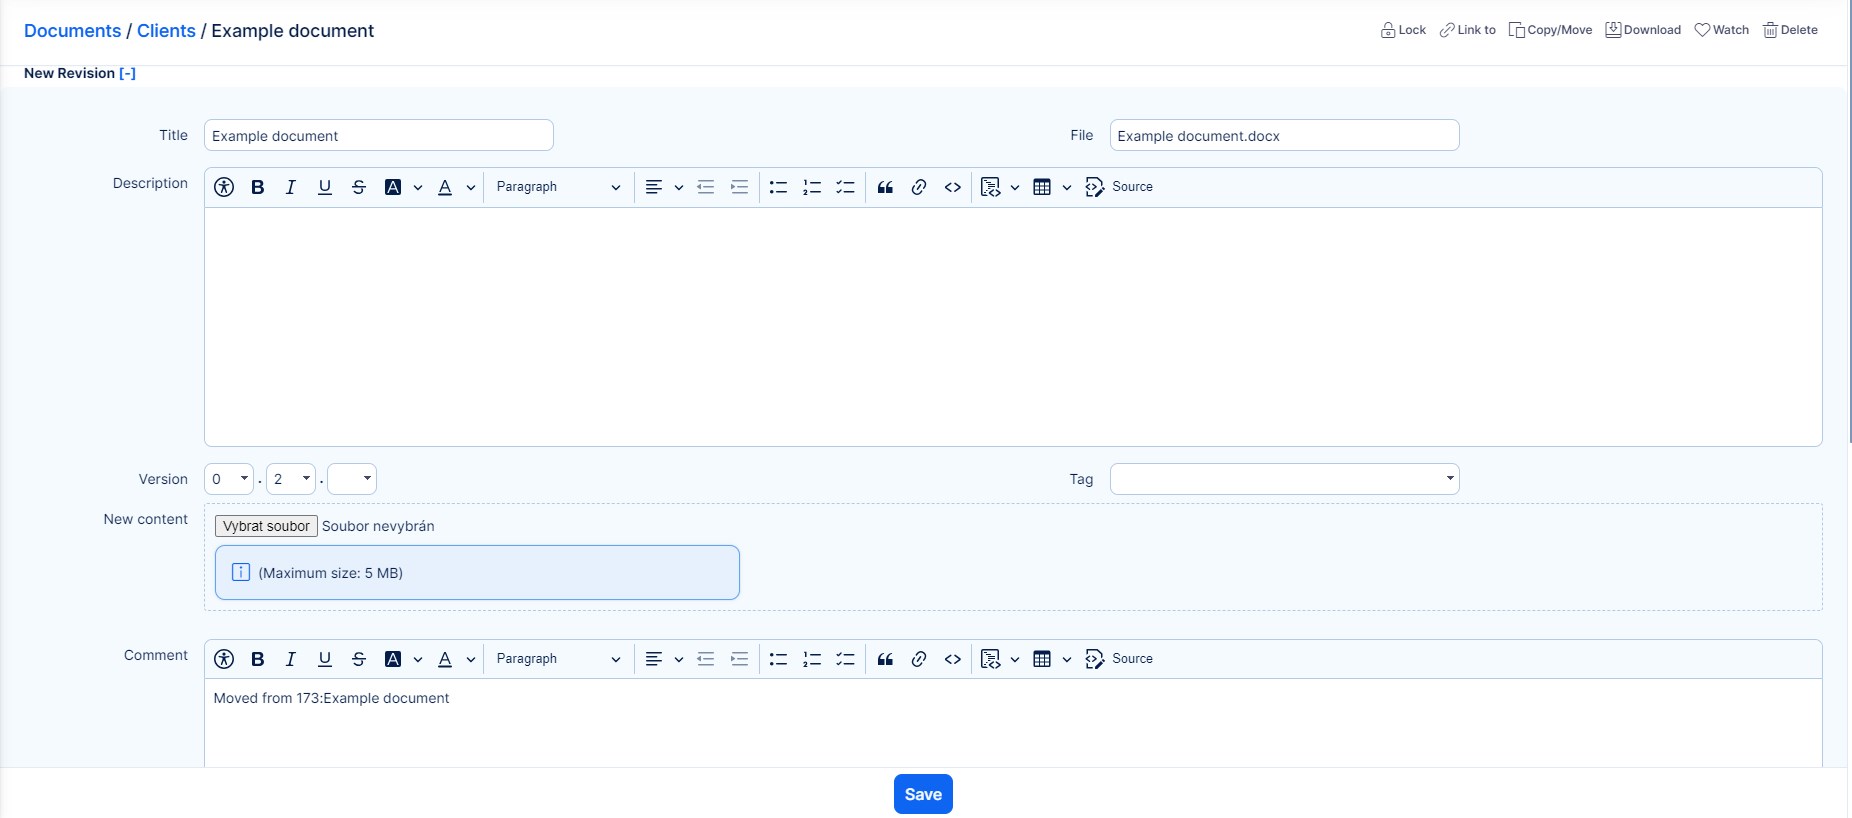
You can change the title, description and add a new comment. If you add a new file (New content), a new version will be automatically assigned to it. It can be either a minor version (if the previous version was x.1, the new version will be x.2; usually for minor changes in the document), or a major version (if the previous version was 1.x, the new version will be 2.0; usually for extensive changes in the document).
When you finished all document settings, click the Create button and a new revision is added.
Notifications
It is possible for the Project Manager or the Administrator to enable/disable notifications for each document or document folder. If the notification flag is on, a notification e-mail is sent to all e-mail recipients after the document state has changed (creation, change, approval). The e-mail recipients are taken from the list of project members. E-mail notification settings of individual users are taken into account.
If the notification flag is set on a folder, notification e-mails are sent if any document state changed within the folder sub-hierarchy.
Please note that all email notifications related to Easy DMS are sent both for planned projects and projects in realization. On the contrary, email notifications related to other entities in Easy Project are not sent for planned projects.
There are several ways to enable/disable e-mail notifications from DMS:
- Plugin settings - In the plugin settings, you can specify whether the notifications are enabled or disabled for newly created directories. This is the "File default notifications" option that can be set to Activated X Deactivated.
- Project settings - In the project settings, there is Documents tab and inside it is the option Notifications: Default (no change) X Activated (I want to get notifications even when they are off) X Deactivated (I don't want to receive notifications even when they are turned on). This is the setting for the currently logged-in project member.
- Address book settings - For each directory, there is an icon for activating, and deactivating notifications.
- Document settings - For each document, there is an icon for activating, respectively deactivating notifications.
-
User settings - In the user profile, everyone can set which notifications they want to receive. including recieving a notification about a downloaded document.

- Global setting - Administration >> Settings >> Email notifications - Dmsf legacy notifications, Approval workflow
Approval workflow
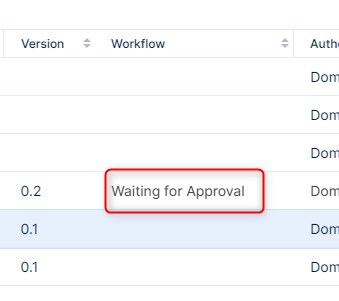
The approval workflow state is indicated by workflow status in the Workflow column. The initial state is None, after the assignment of approval workflow the status is changed to Assigned.
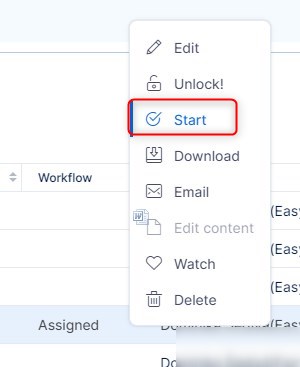
To start the already assigned approval workflow, click the Start button in the context menu.
In case of the workflow state there are listed next approvers.

Approval workflow process
The process itself is clearly described on the diagram below.

And now step by step:
1. Assign an existing approval workflow to the selected document by selecting Assignment from the toolbar.
Then a workflow assignment form appears:
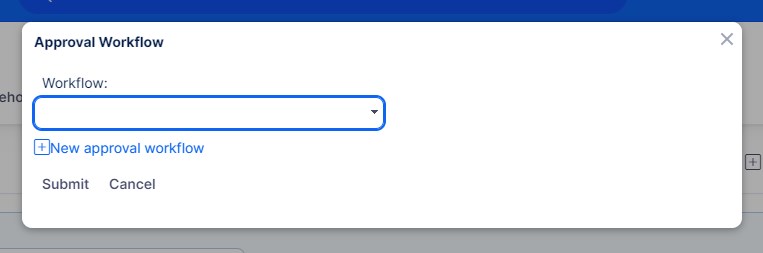
All project and global approval workflows are selectable. Select a workflow and click on Submit button. The selected workflow is assigned to the document.
2. In the next step the assigned workflow must be started by selecting Start from the toolbar.
3. When the workflow is started, all approvers in particular steps are expected to do an approval. The document is locked to prevent all changes.
If you are one of the approvers of the current approval step, you will find Approval option in the toolbar. Then the approval form appears:
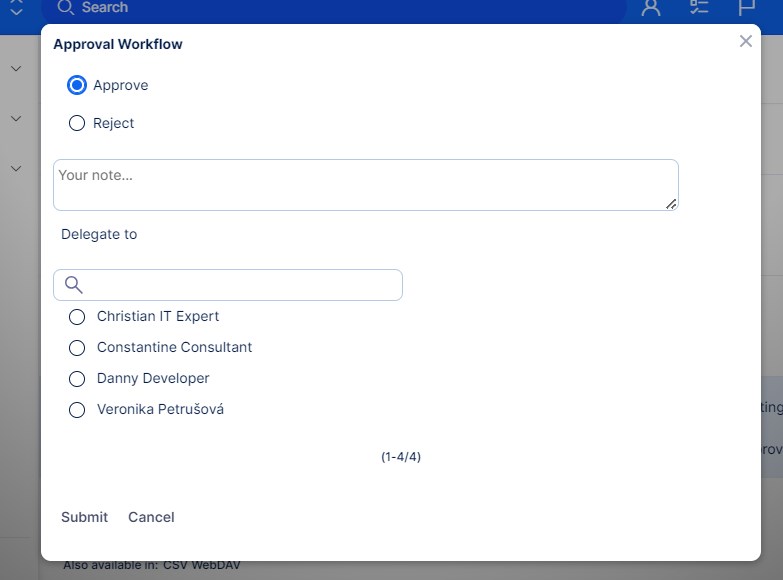
You have three options here, either approve, reject or delegate the current approval step. In case of rejection or delegation you are obliged to comment it in the text field “Your note...”. Only members of the project are offered for delegation. Your decision will be confirmed by clicking the Submit button.
4. If you has just approved the document and you are the last person of the approval chain. The document is approved as a consequence of your approval. The status is changed to “Approved”.
5. If you has just rejected the document. The approval chain is finished immediately and the document is in the state Rejected.
6. If you approve it and you are not the last approver or you delegate your approval to someone else, the workflow approval continues.
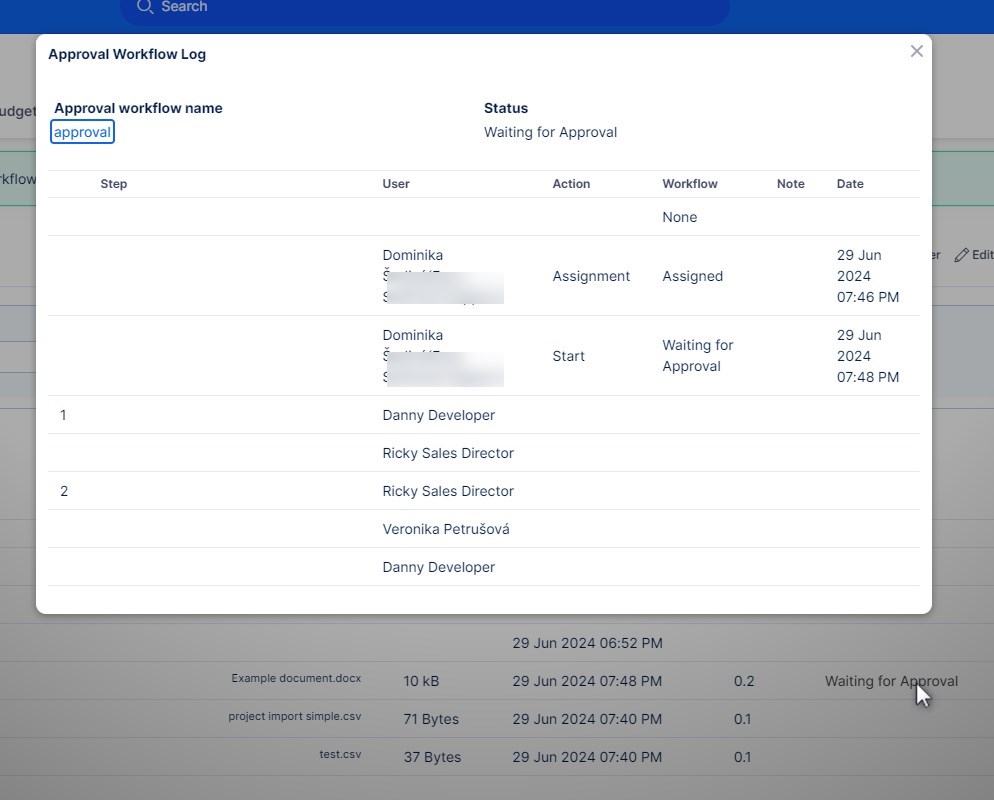
Log
All workflow approvals are stored and are available in the log. You can open the popup by clicking the workflow status text:
Email notifications
Email notifications are sent according to the table as follows:
|
Event |
Receiver(s) |
|
The approval workflow is started |
All approvers of the first step |
|
An approval workflow step is finished |
All approvers of the next step and workflow owner |
|
The document has been approved |
All members of the project |
|
The document has been rejected |
All participants of the workflow and the workflow owner |
|
An approval step has been delegated |
The delegate |
|
Due date has been reached |
All approvers in the given step who haven't approved yet. These notifications are resent every working day. |
NOTE : Notifications can be enabled or disabled in the global settings. ( Administration >> Settings >> Email notifications - Approval workflow)
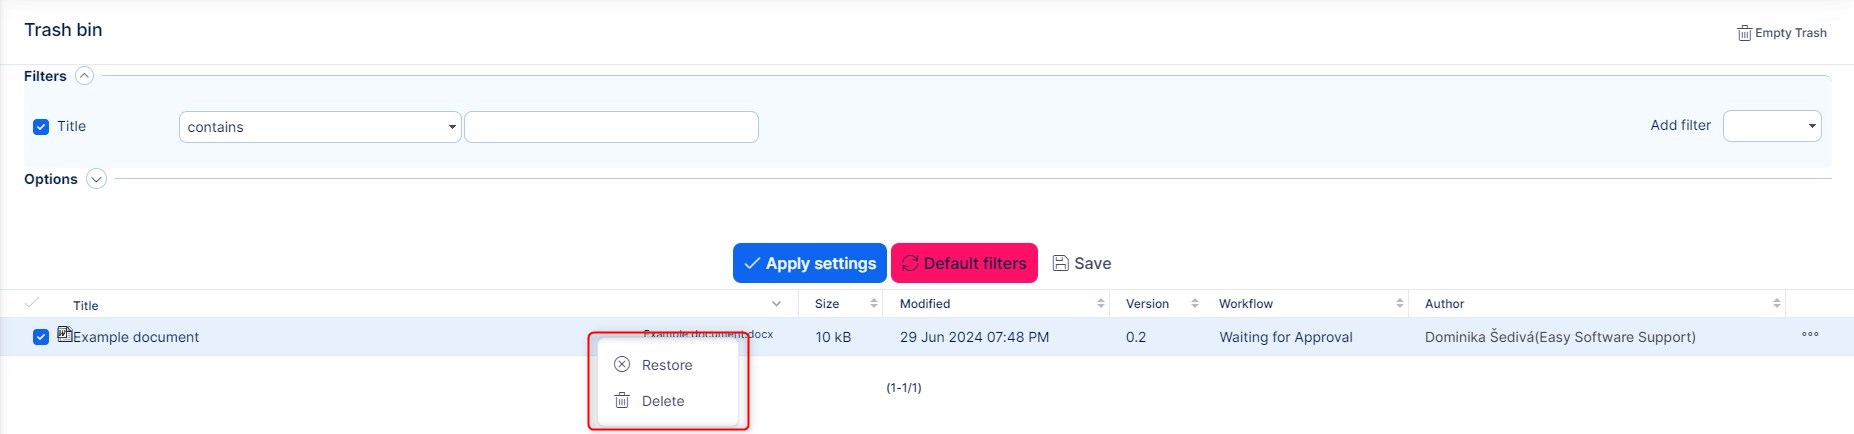
Trash bin
If documents or folders are deleted by a user, they are moved into the Trash bin only in fact and can be restored again or definitively removed from the Trash bin with Delete documents permission. The Trash bin is available from the main DMS menu. The user interface of the Trash bin is very similar to the documents view except command icons. New command icons for restore and delete a folder or document are next to the deleted folders a documents. Once a document or folder is deleted from the Trash bin there is no way back!
Personal settings
Every project member is allowed to customize the DMS module behavior as follows:
Default filter
User can select a public filter
Act as attachable
Files & Documents – You can attach Files and Document to issues.
Files – You can attach Files only to issues.
This feature provides a possibility to attach documents to tasks. The new/edit task form contains a Drag&Drop area for uploading documents. It’s also possible to link existing documents using the button Link from. Attached documents are stored in system folders visible from the user interface depending on permissions.
How to configure WebDAV
The document module of the project can be mounted as a web folder. In a mounted folder is available a complete document and folder structure then. When a user does an operation such as download/upload a document or creating a new folder it is automatically recorded in DMS and it has the same effect as the operation would be done in the web interface of DMS.

In order to mount a project documents in MS Windows system open Documents, right click on the Computer item in the tree and select Mount network drive. Fill-in URL of the project documents module in the following format:
https://[your domain]/dmsf/webdav/[project identifier]
In the next step you are asked to login and in case of a successful login a new folder with the project documents appears.

WebDAV troubleshooting
Despite the fact that the WebDAV protocol is a standard used to access network locations, the client might face several problems especially in MS Windows. Here are a few tips how to deal with errors raised during mapping a network drive via WebDAV.
Microsoft Windows
This is dependent on what update level you are on windows. Please refer to this article for more information.
Windows 10, 8.1, 8 and 7
Windows 10, 8.1 and 8 use the WebClient Services to connect to a WebDAV Servers, by default the WebClient service is disabled, so we need to enable it, and also change the service to start automatically when Microsoft Windows starts:

Then Start it and change the startup type to Automatically:

Using the CMD
Check if the WebClient Service is running and set to "Start Automatically". From a command prompt, you can start WebClient Services by typing
net start webclient
You need to run cmd.exe with elevated privileges if you have UAC enabled. BasicAuthLevel
Fulltext DMS search
DMS full-text search is readily accessible in the documents by simply clicking the "Documents DMS" checkbox at the advanced search menu.