Gantt chart
Overview
What is the global level of Gantt chart
How to work with multiple projects (Gantt over Projects)
What is the project level of Gantt chart
How to set up permissions for Gantt chart
How milestones are displayed in Gantt chart
How to work with project baselines
How to work with critical path of the project
Color Coding of Tasks in the Gantt
How to work with parent-child tasks visualization
How to create tasks relations with delay
Types of task relations (links) in Gantt chart
How to create new task and milestone right from Gantt
How to update tasks' timing (start date, due date, duration, completion)
How to update milestones' timing
How to sort tasks to milestones
How to work with zoom of project timeline (days, weeks, months)
How to work with step back button (Undo)
How to work with tasks filters & options above Gantt
How to work with exporting options
How to show holidays on the Gantt chart
How to show resource allocations in Gantt chart
How to use Tools
How to show cash flow on the Gantt chart
How to use Problems button
How tasks are sorted in Gantt chart
Gantt chart legend
How to guard the desired delivery date in Gantt chart
Gantt chart on the personal home page
Corner situations
Overview
Gantt chart is a specialized bar chart used to provide a graphical overview and schedule of all tasks (issues) or to indicate the work elements and dependencies of the project. This is a chart with rectangular bars. The length of each bar is proportional to the time value necessary for each task on the work breakdown structure (WBS). You can compare two or more task durations very easily on the Gantt chart. The final product illustrates the schedule of a project. Gantt chart is fully compliant with IPMA & PMI Project Management methodology standards.
Gantt chart is intended to be used mostly by:
- Project Managers
- Line Managers
- IT Managers
- Small Business Owners
- Project Portfolio Managers
Why is Gantt chart important
The project's summary and terminal elements, which combine to form the project's internal structure, are shown in the Gantt chart. It will also depict the dependencies of various tasks (issues) within the project. The chart can illustrate the start and finish project terminal elements in project management. It can also show summary elements and terminal dependencies. The smallest task tracked as part of the project effort is known as a terminal element. Gantt chart represents the tasks in most modern project scheduling packages.
The way to create this chart begins by determining and listing the necessary activities (tasks, issues). In the next step, customize your chart with specific columns, timeline units, filters etc. Then list which items depend on others and what activities take place when. For each activity, list how many man-hours it will require (estimated time) and who is responsible (assignee). Lastly, determine the throughput time (start date, due date). This technique's primary advantage is its good graphical overview that is easy to understand for nearly all project participants and stakeholders. Its primary disadvantage is its limited applicability for many projects since projects are often more complex than can be effectively communicated (visualized) with this chart.
What are the main benefits of Gantt chart
- The easiest way for planning projects including all the associated tasks, milestones, relations, delays etc.
- The best visualization of the whole project or multiple project management
- Huge time savings during project planning phase
- Great overview of progress during project execution phase
- Broad customization abilities (filters, columns, timeline, custom views such as default, baselines, critical path and resource management - requires separate plugin)
- Large involvement of drag & drop feature reduces the need for keyboard control (you can move tasks, projects and milestones on a timeline and thus plan them, you can also create relations between the entities just with your mouse)
For proper working with the Gantt chart, it is necessary to have start dates and due dates entered on both tasks and projects unless the projects' dates are counted from the tasks. Tasks with either or both empty will appear on the current date.
Global level of Gantt chart
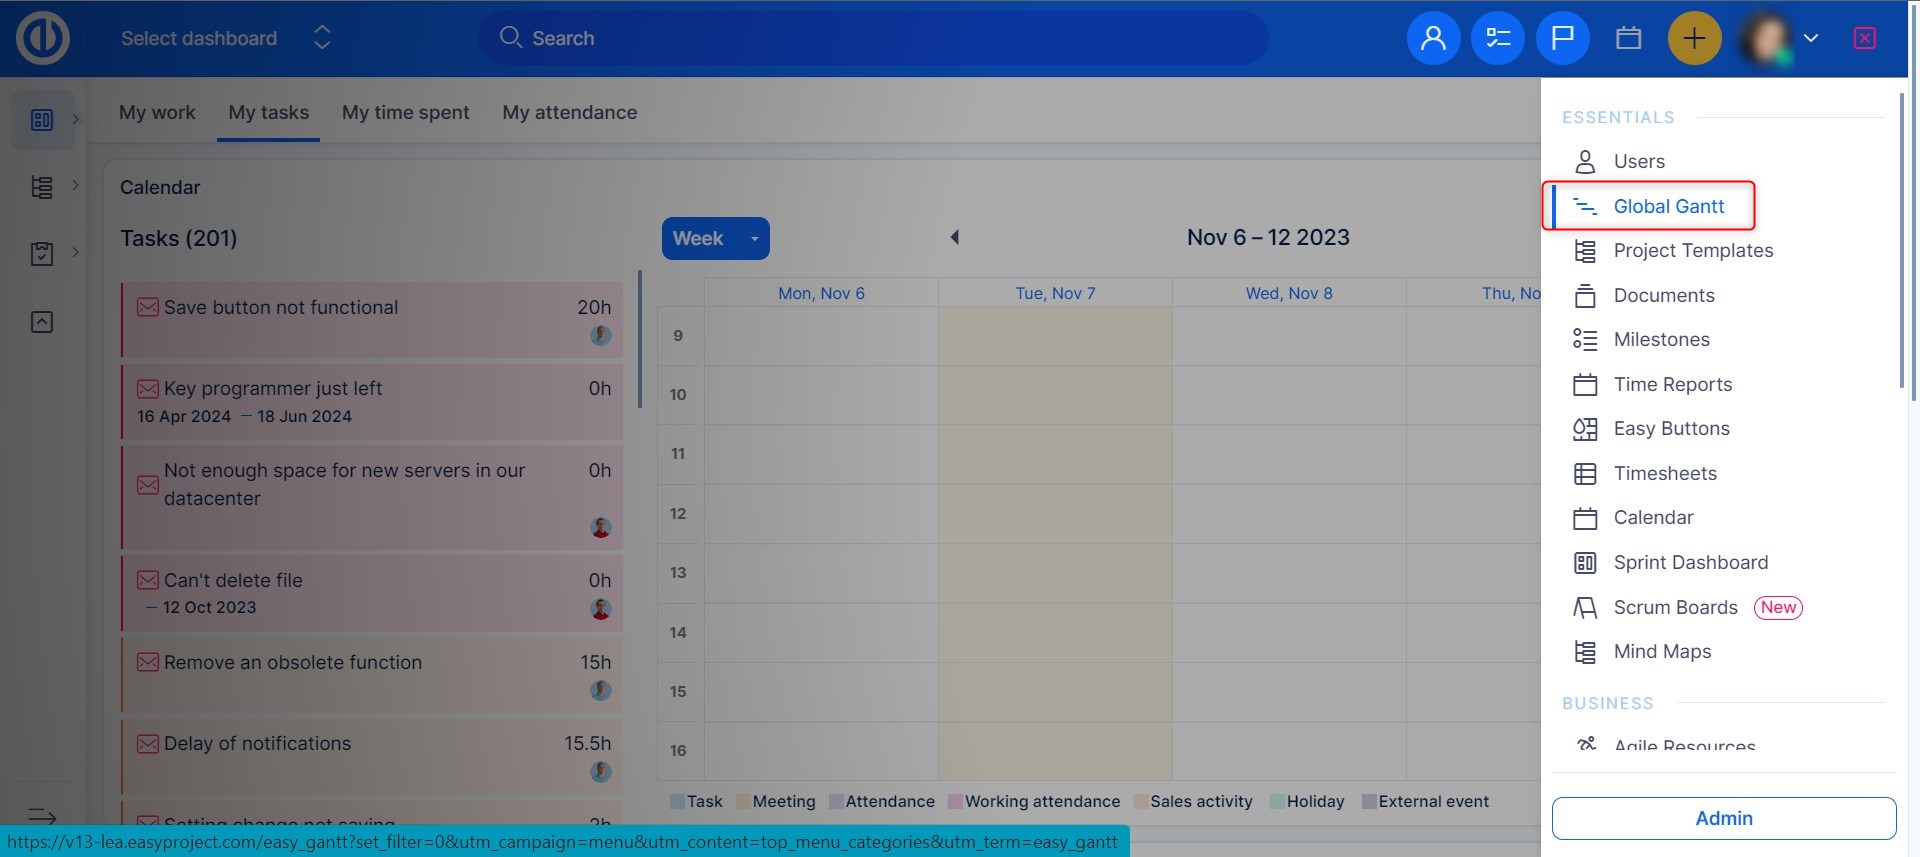
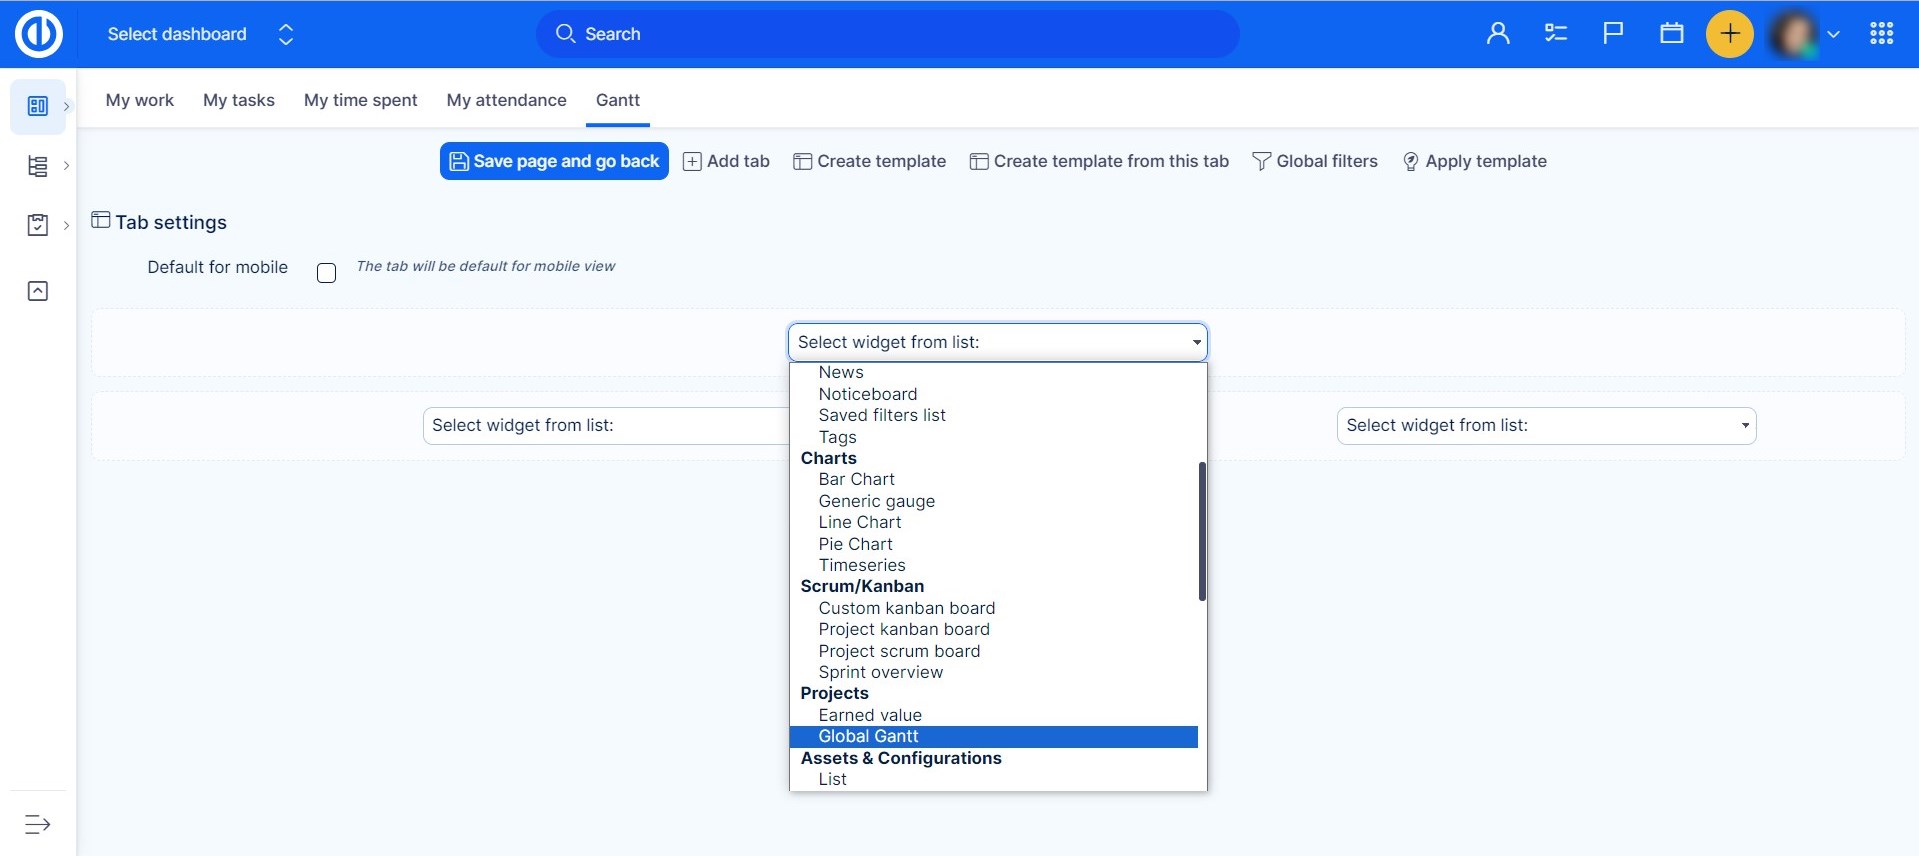
Gantt chart is available both on the global level and the project level. To access it from the global level, go to More > Gantt chart as shown on the image below.
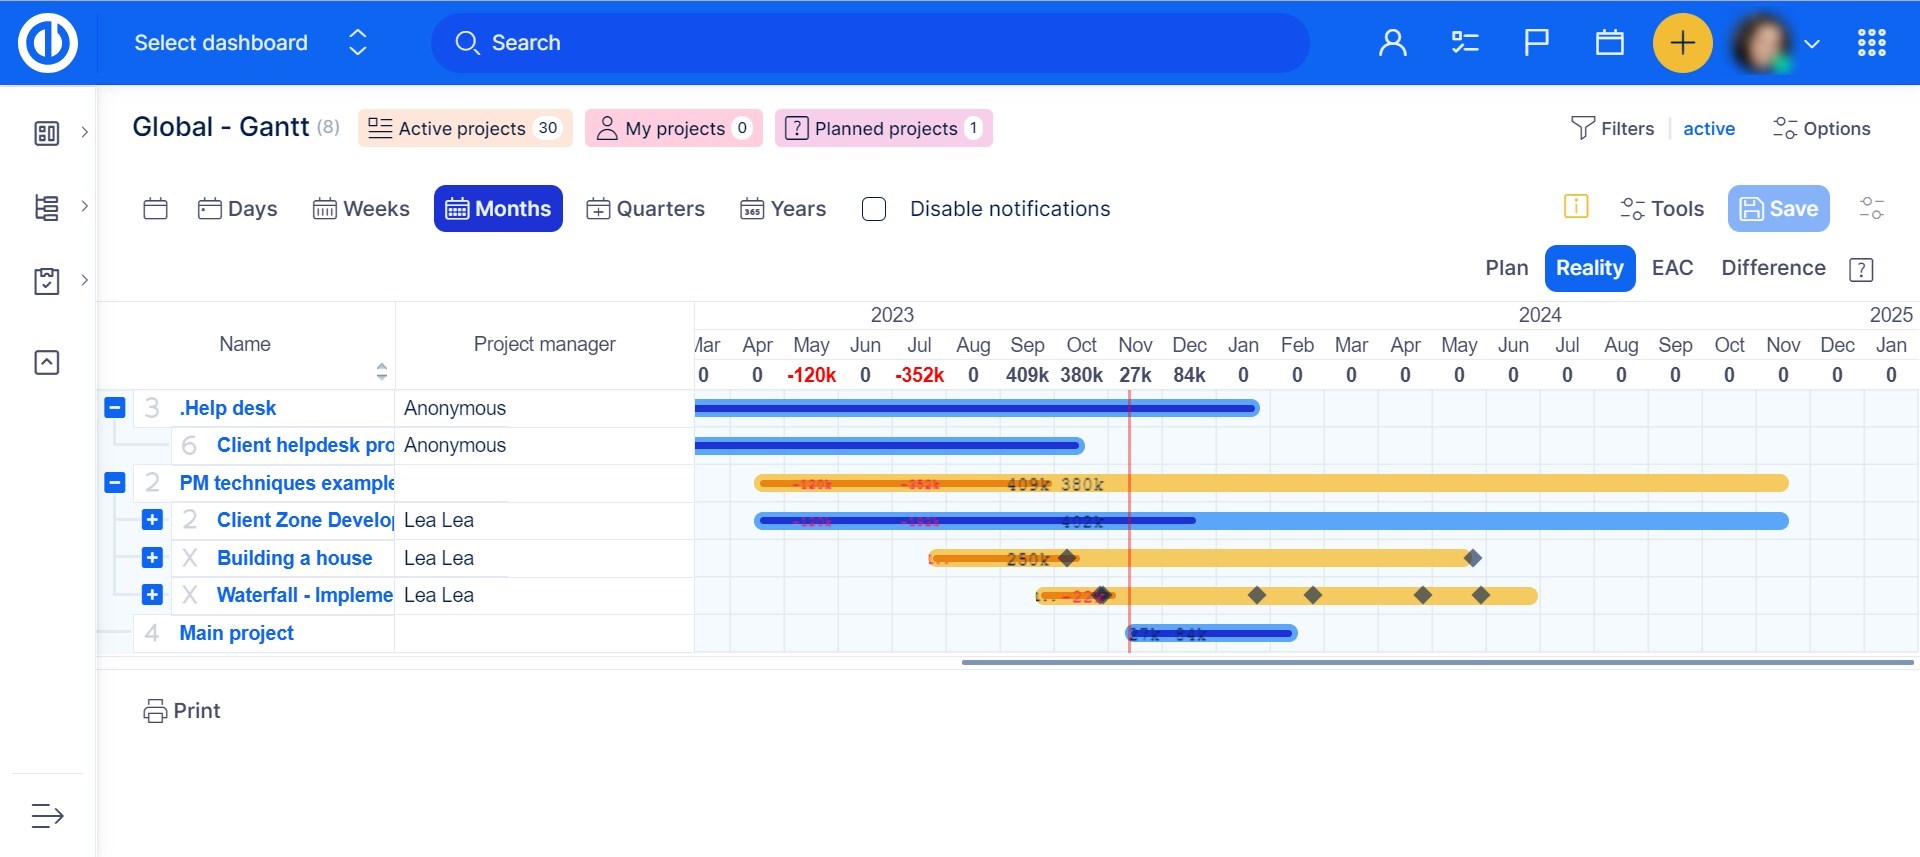
Gantt chart on the global level will most suit the users who need to work with entire project tree of Easy Project including all the associated tasks, milestones, relations, delays etc. on a single screen. The main advantage is, therefore, the unnecessity to switch between individual projects when need to work with (or have an overview of) multiple ones in the same time. On the other hand, a certain disadvantage may be the complexity that may act to the detriment of clarity and speed so it's recommended to use the global view only when necessary.
Working with multiple projects (Gantt over Projects)
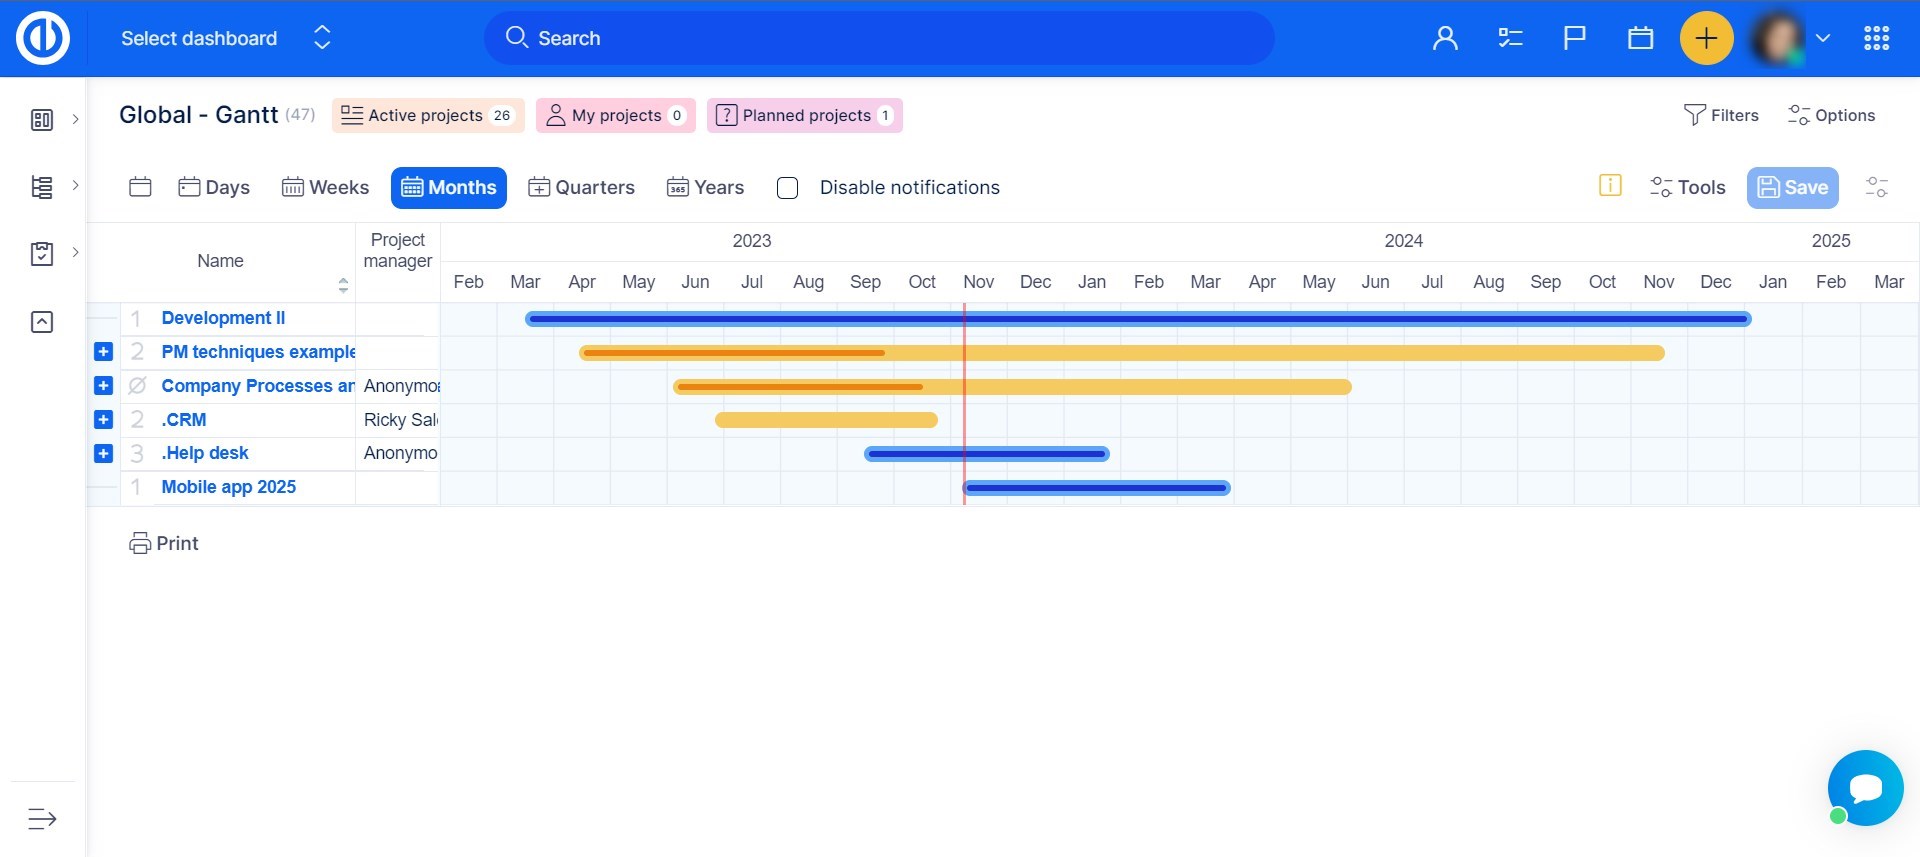
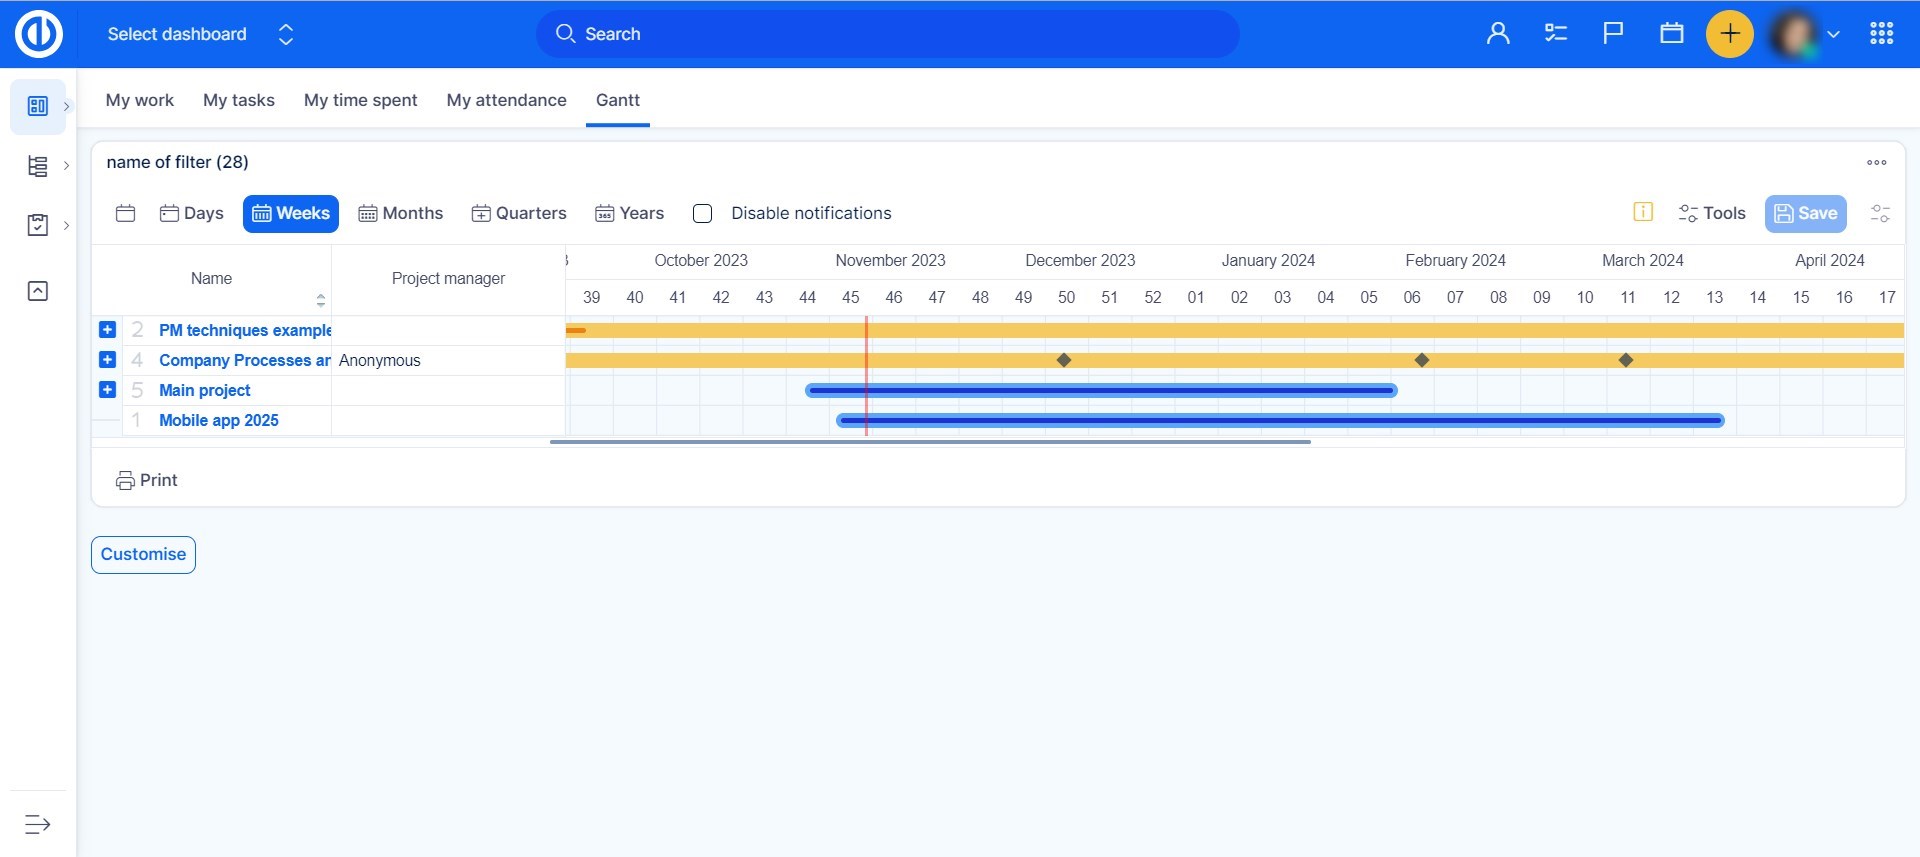
The global level of Gantt chart provides you with a unique opportunity to manage your entire project portfolio from one screen. Gantt over Projects shows whole projects as individual bars so you can drag & drop them and thus change the timing of the projects. Naturally, the beginning and end of each project bar represent the start date and due date of the particular project on the Gantt chart, which is calculated from the entire project tree composed of the parent project and its subprojects, each of which may have different own start date and due date. You can also drill projects into detail from here. Just click on "+" icon next to the project name and see all the tasks (issues) and milestones (versions) - you can drag & drop these too. Gantt over Projects also shows you weighted project completion (as the colored pieces of bars) based on real weight (estimated duration) of the tasks (issues) and their % completion. As you can see, some project bars are darker than others. The darker ones represent project templates, while the lighter ones are standard projects. Settings of project and task visibility can be modified in Gantt settings (upper right button) as illustrated below. The length of a project bar on the timeline of the Gantt chart at the global level is determined by the start date and due date of open (visible) tasks belonging to that project, regardless of the start date and due date of the project itself.
% of project completion in the global Gantt
Why doesn't the % Done ratio shown in the left column of the global Gantt match the % of completion shown in the project horizontal bar on the timeline?
In case of project with 2 tasks: % of project completion = ((% completion of T1 * estimated time of T1) + (% completion of T2 * estimated time of T2)) / sum of estimated hours.
Example: Task 1 has 10 estimated hours completed from 20%. Task 2 has 1 estimated hour and is done = completed from 100%. The bar in global Gantt will show project completion at 27% because the bigger (more significant) task is just in the early stages of completion.
This is the only way how % of completion is shown in horizontal bars in the global Gantt. Due to performance and stability obstacles - which would have a noticeable effect on the rest of the application - there is no setting for this behavior.
On the other hand, the column % Done in the project table next to the global Gantt is calculated based on setting Administration » Settings » Projects – Project completion calculation formula. To show consistent values in the table and in the global Gantt bar, it needs to be set to Weighted average of % done with weights on estimated time.
This option also defines what is displayed as % Done/Progress on the Project overview page (module Project controls) and in the project list's column.
Why the % of completion displayed in the project horizontal bar is 100 % when tasks are not completed yet?
If there is 0 estimated time on all open (remaining) tasks in the project, it practically means that there is no work left to be done on the project (work = time of a worker). If you are using global Gantt to monitor project completion, using estimated time on tasks is essential. If a project has no tasks whatsoever, it also means there is no work left (=100% completed).
Notes:
- In the global Gantt settings, there is an option Show task spent time ratio. This setting defines progress shown in horizontal bars representing tasks, not the project bars.
- The red color of project bars in the global Gantt: When the % of completion displayed in a project bar is not long enough to reach the actual date (red line), the project is colored in red. The same applies to projects where progress is less than 100 % and their due date is in the past.
What "Disable notifications" checkbox does
The "Disable notification" option in a Gantt chart typically works by preventing the system from sending out notifications related to changes or updates in the Gantt chart. This can be useful if you are making multiple changes and do not want to flood users with notifications for each individual update. Once you disable notifications, users will not receive alerts about task assignments, deadline changes, or other modifications until you re-enable notifications.
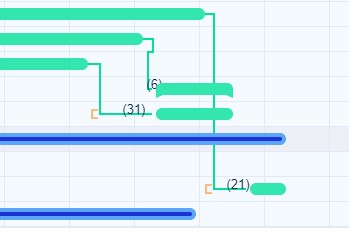
What "Show soonest start" checkbox does
When ticked, this option shows lowest valid dates for tasks defined by relations or parent. As illustrated below, the square bracket indicates the lowest date you can move the task to, but not any further because it's related to another task that precedes it. This function is visible only on the Global Gantt view. Brackets will not appear in project Gantt.
What "Show task spent time ratio" checkbox does
By enabling this, you will see the spent/estimated time ratio on the taskbar in the Gantt. This value can be changed only by logging time or editing the estimated time on the task. Therefore, you can't change it directly in Gantt as you can when showing %done.
What happens if a project is moved in global Gantt chart
Moving with a whole project in global Gantt chart will cause all associated tasks, milestones and subprojects change their dates accordingly. Tasks are shifted to the end of the associated milestones. No cross-project relations are affected, such as precedes-follows or parent-child. Shared milestones are not affected as well, therefore, they might become invalid if they stay outside the range of the moved project. No system notifications are created nor any change can be found in journals.
Project level of Gantt chart
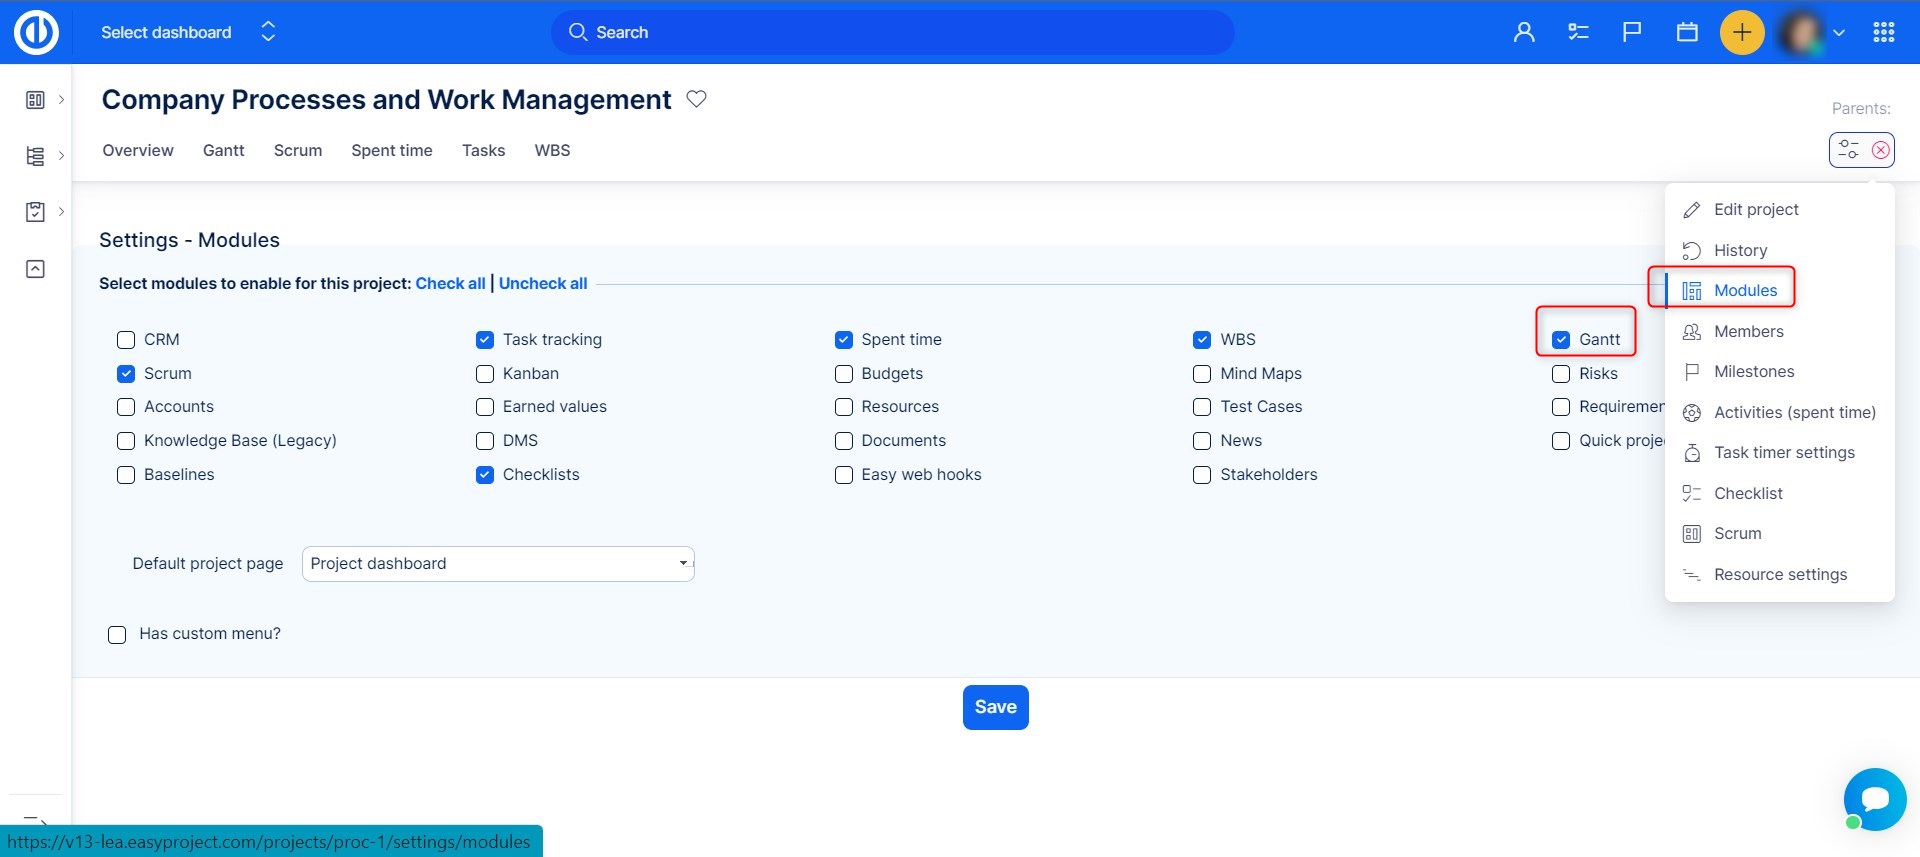
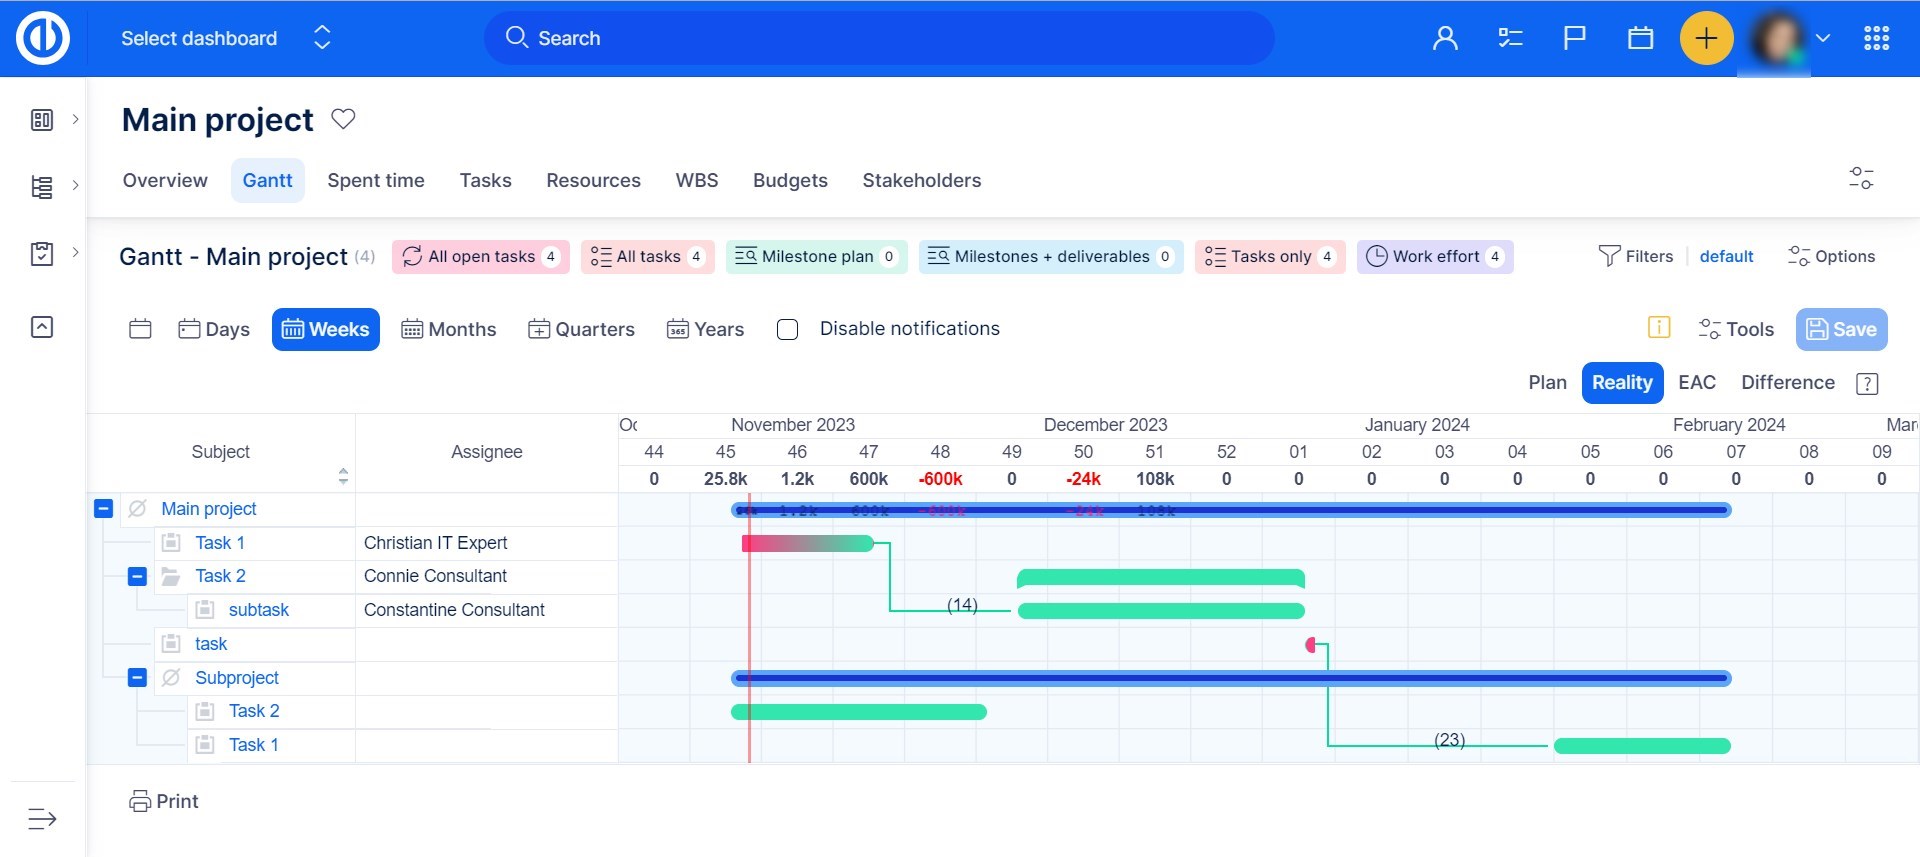
Now, let's have a look at Gantt chart on the project level. Before you can access it from a project, you need to activate the particular module in project's settings as shown in the image below.
Immediately after activating the module, Gantt chart tab will appear in the top menu of the particular project. Click on it and Gantt chart will open. Using the functionality on the project level is a better choice for the users who need to work on the particular project only so there is no need to see entire project tree as on the global level. Another difference is that Gantt chart on the project level is more customizable as you can easily switch between various types of view such as default, baselines and critical path, which is not possible on the global level. If you open a parent project in Gantt chart, also its subprojects and their tasks are displayed in addition to the selected project.
The length of the project bar on the timeline of the Gantt chart at the project level is determined by the start date and due date of the project itself, regardless of the start date and due date of the tasks belonging to that project.
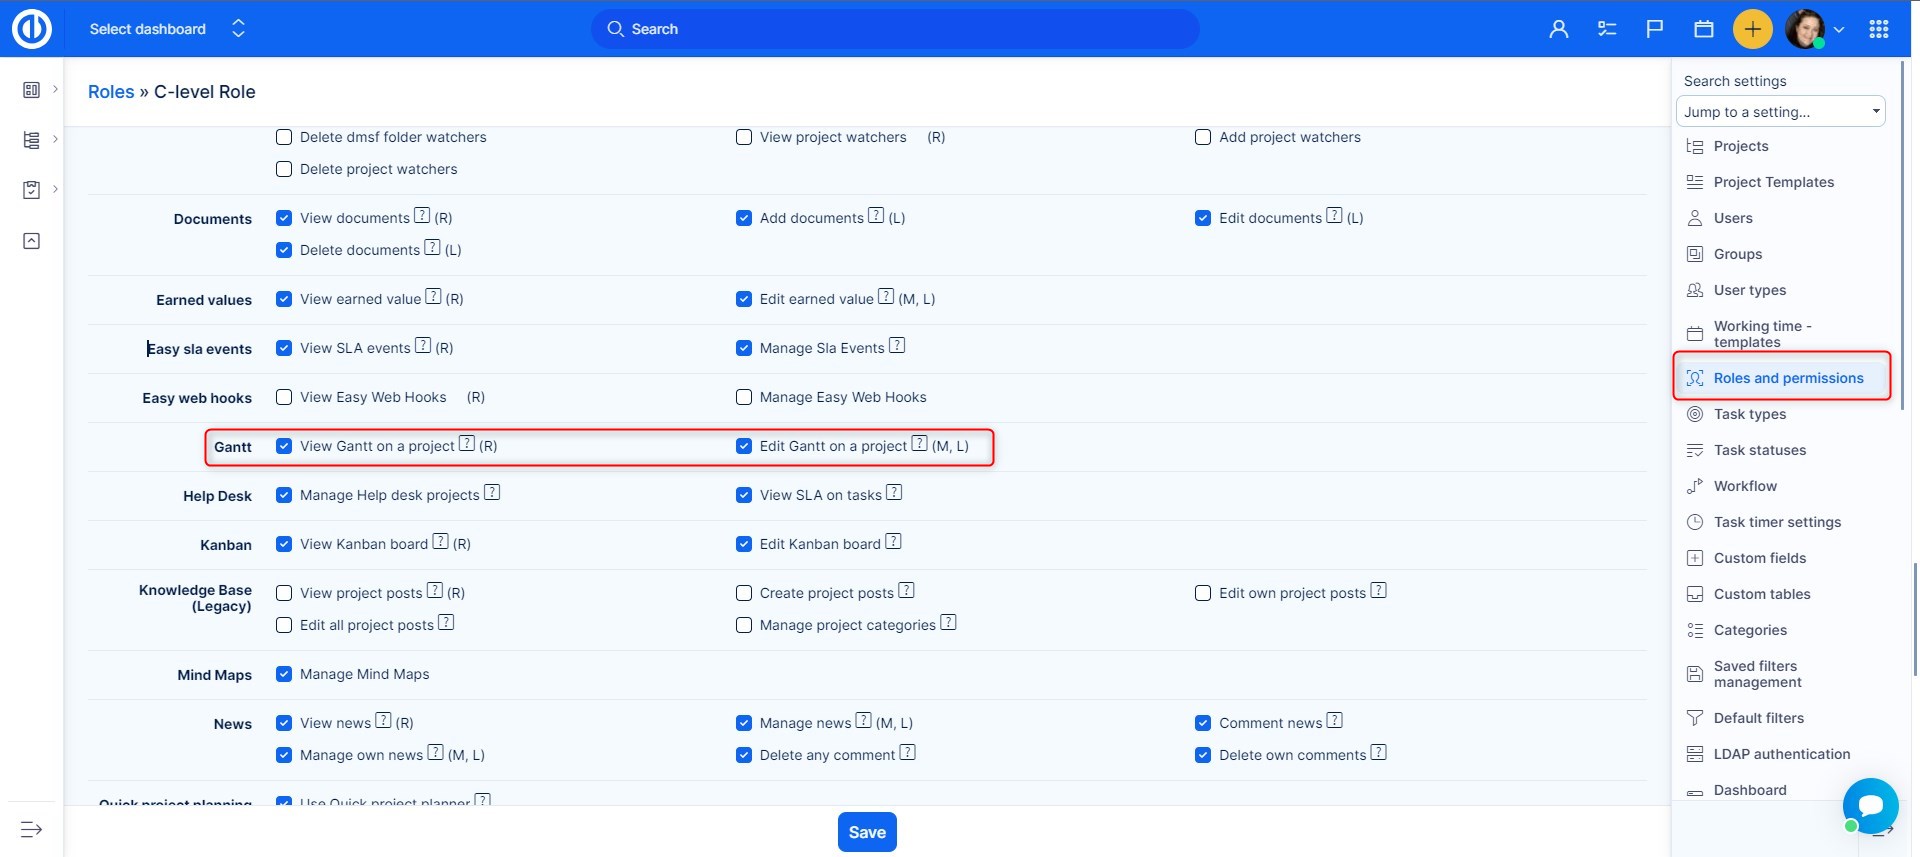
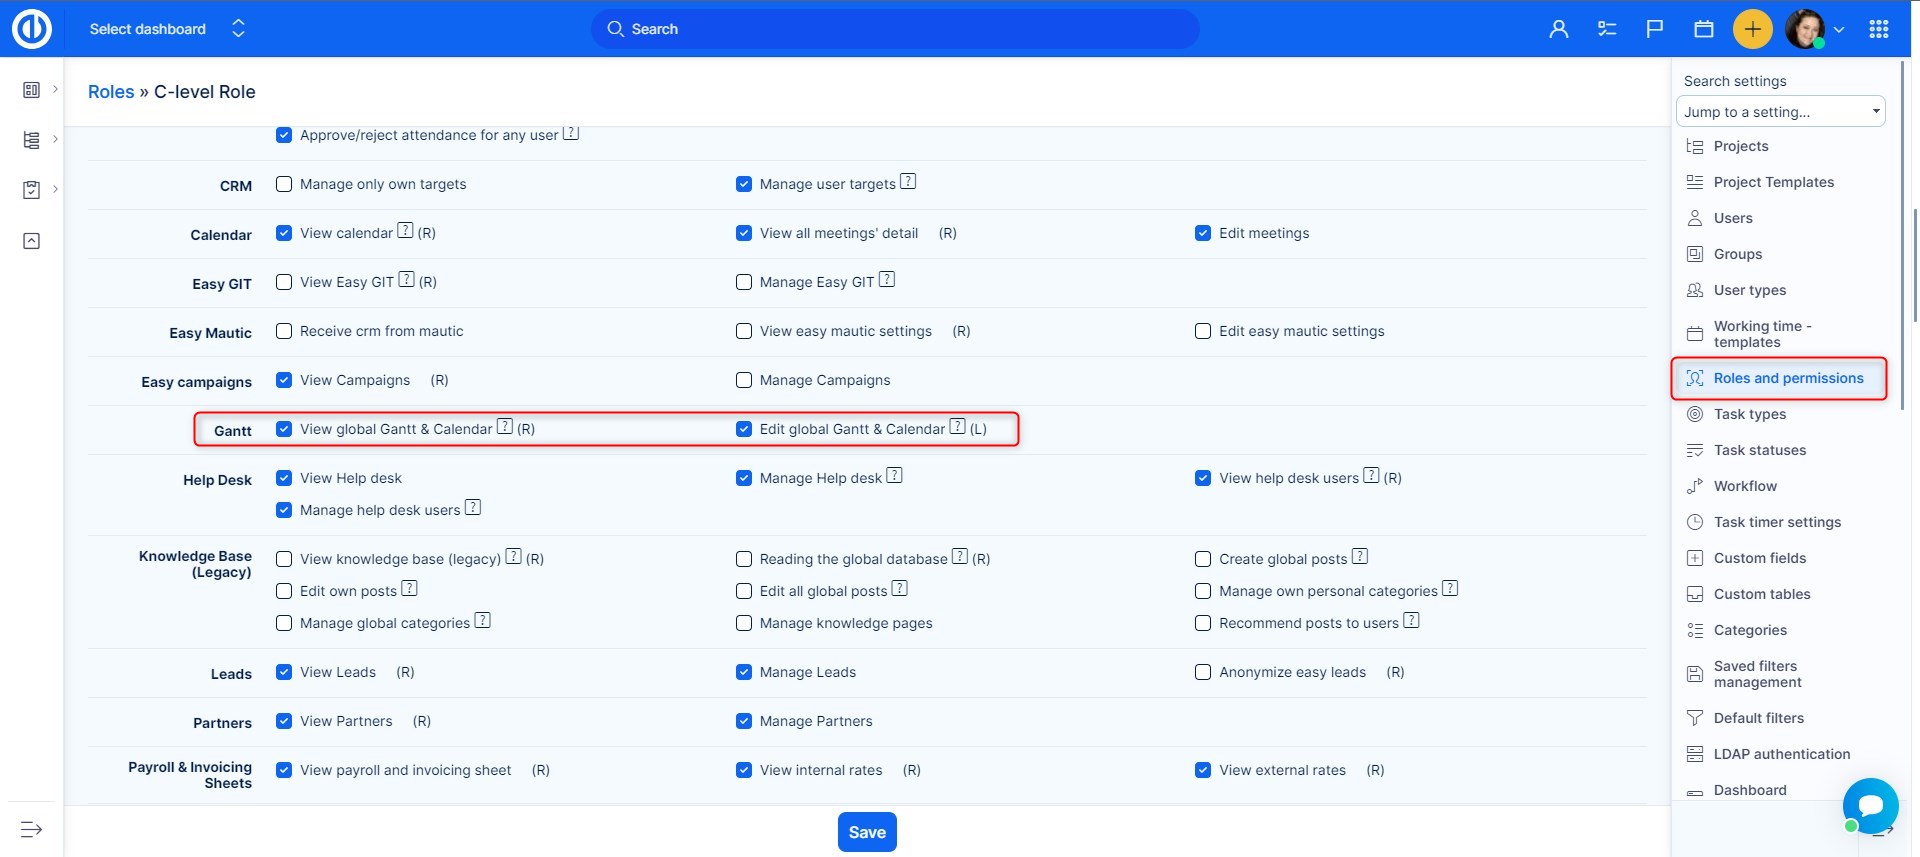
How to set up permissions for Gantt chart
The permissions for Easy Gantt can be set up in Global menu >> Administration >> Roles and permissions >> Gantt (both in global permissions and project permissions). Moreover, the Edit button (enabling you to work with Gantt) is only available when the permission "Manage tasks relations" is enabled (can be found under Roles and permissions >> Project permissions >> Task tracking - Manage task's relations).
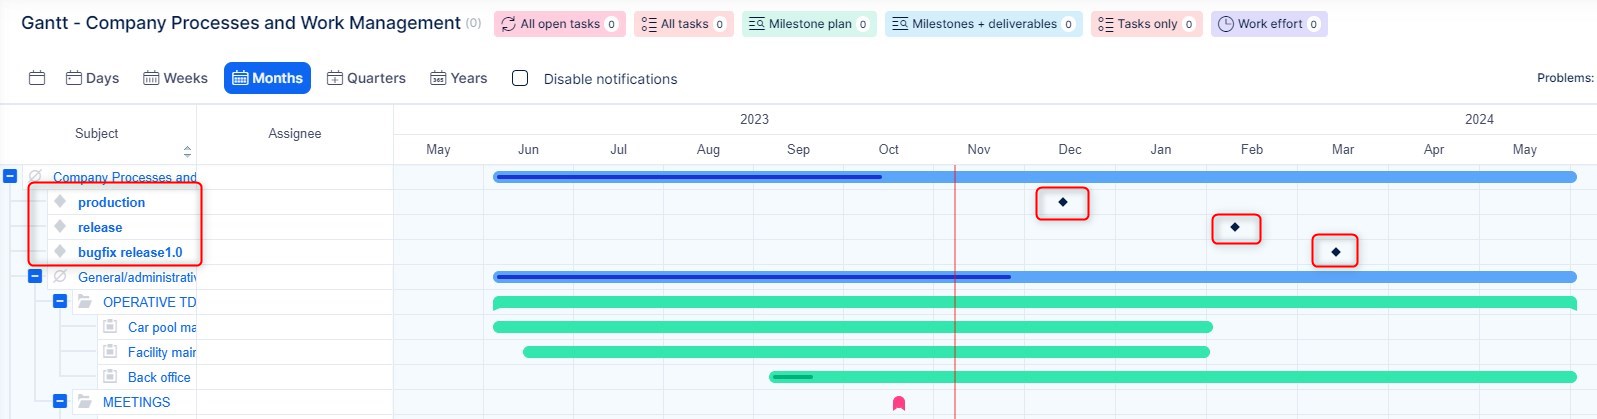
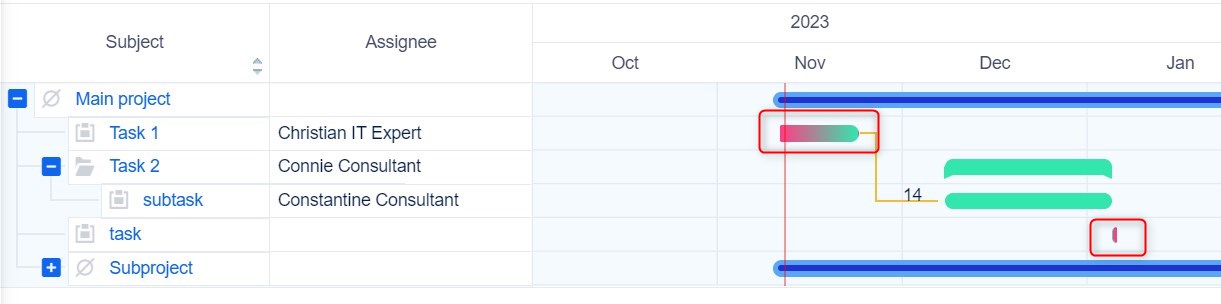
How milestones are displayed in Gantt chart
An open milestone is always shown under the particular project where it's defined. Moreover, an open milestone is displayed above visible tasks that are linked to the milestone. This also concerns the situation when a milestone is shared with more projects which include tasks linked to the milestone on another project. Closed milestones can be found only in project's Settings >> Milestones.
When a shared milestone is displayed on a non-home project in Gantt chart, you will see it twice and in a slightly different color than standard milestones – under the task list is the original shared milestone (can be moved by drag and drop) and below the project name is its mirror linked to the particular task of the project (cannot be moved by drag and drop).
Users can be allowed or prevented from moving tasks beyond the associated milestones. To configure this setting, go to More: Administration: Settings: Task tracking: (un)tick the checkbox "Allow to set task due date after milestone date (milestone will be moved accordingly)". After moving a task beyond its milestone and saving the change, the milestone will move to the task's new due date.
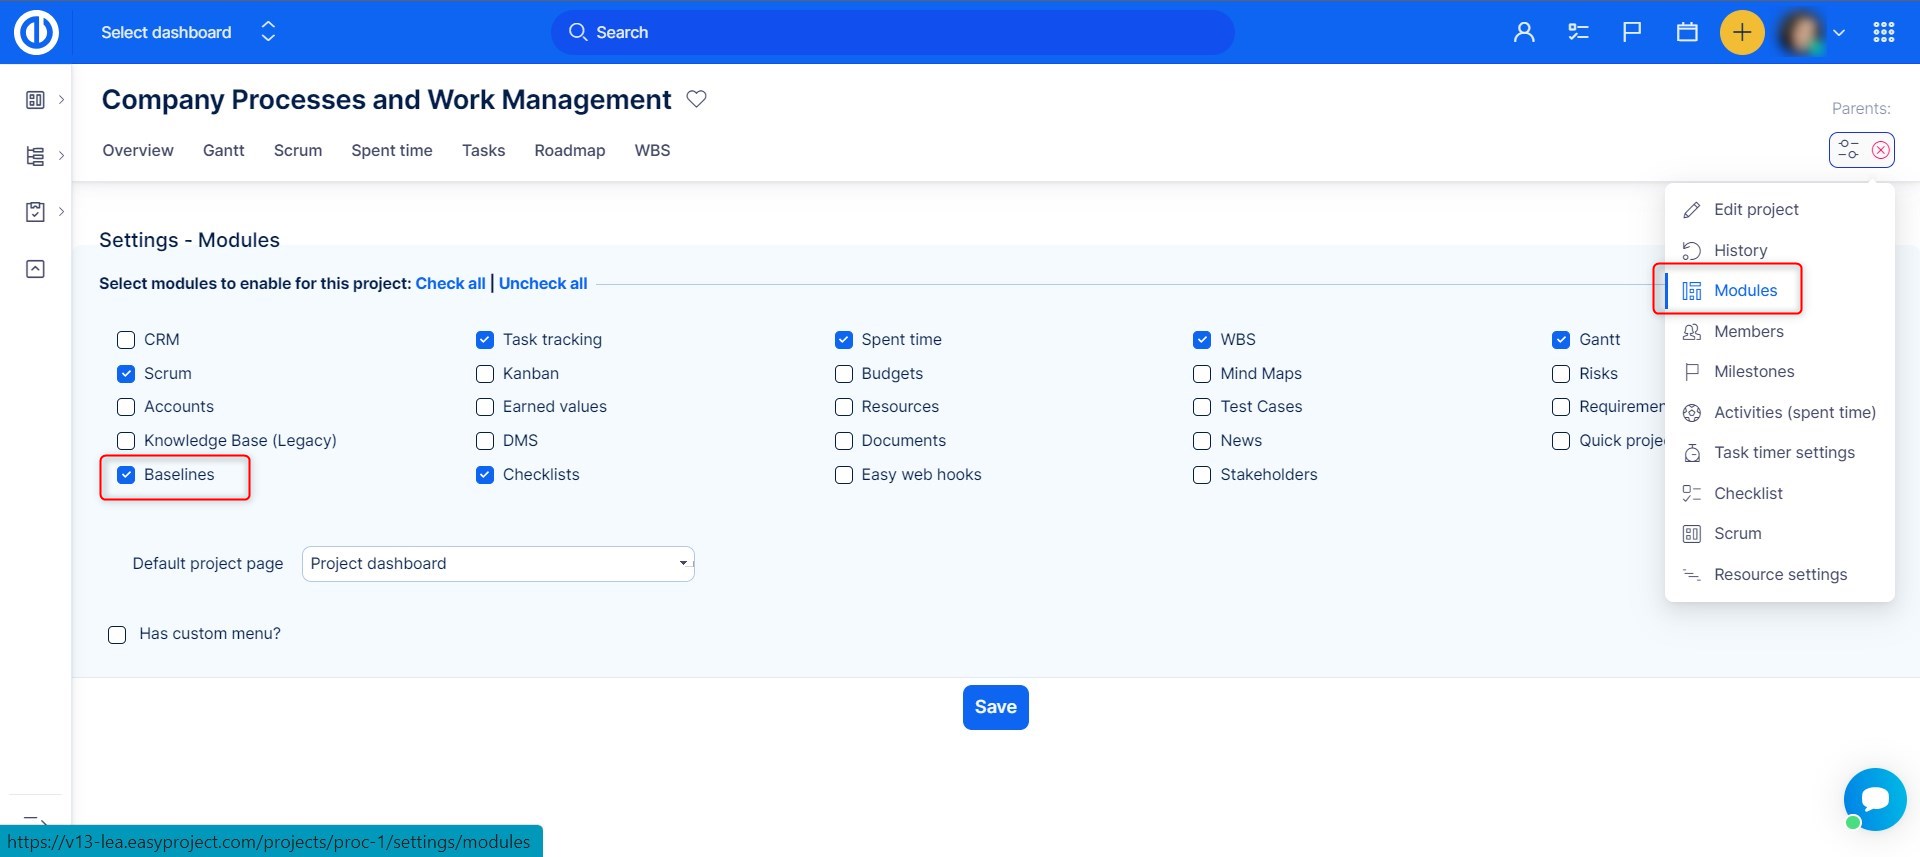
Project baselines
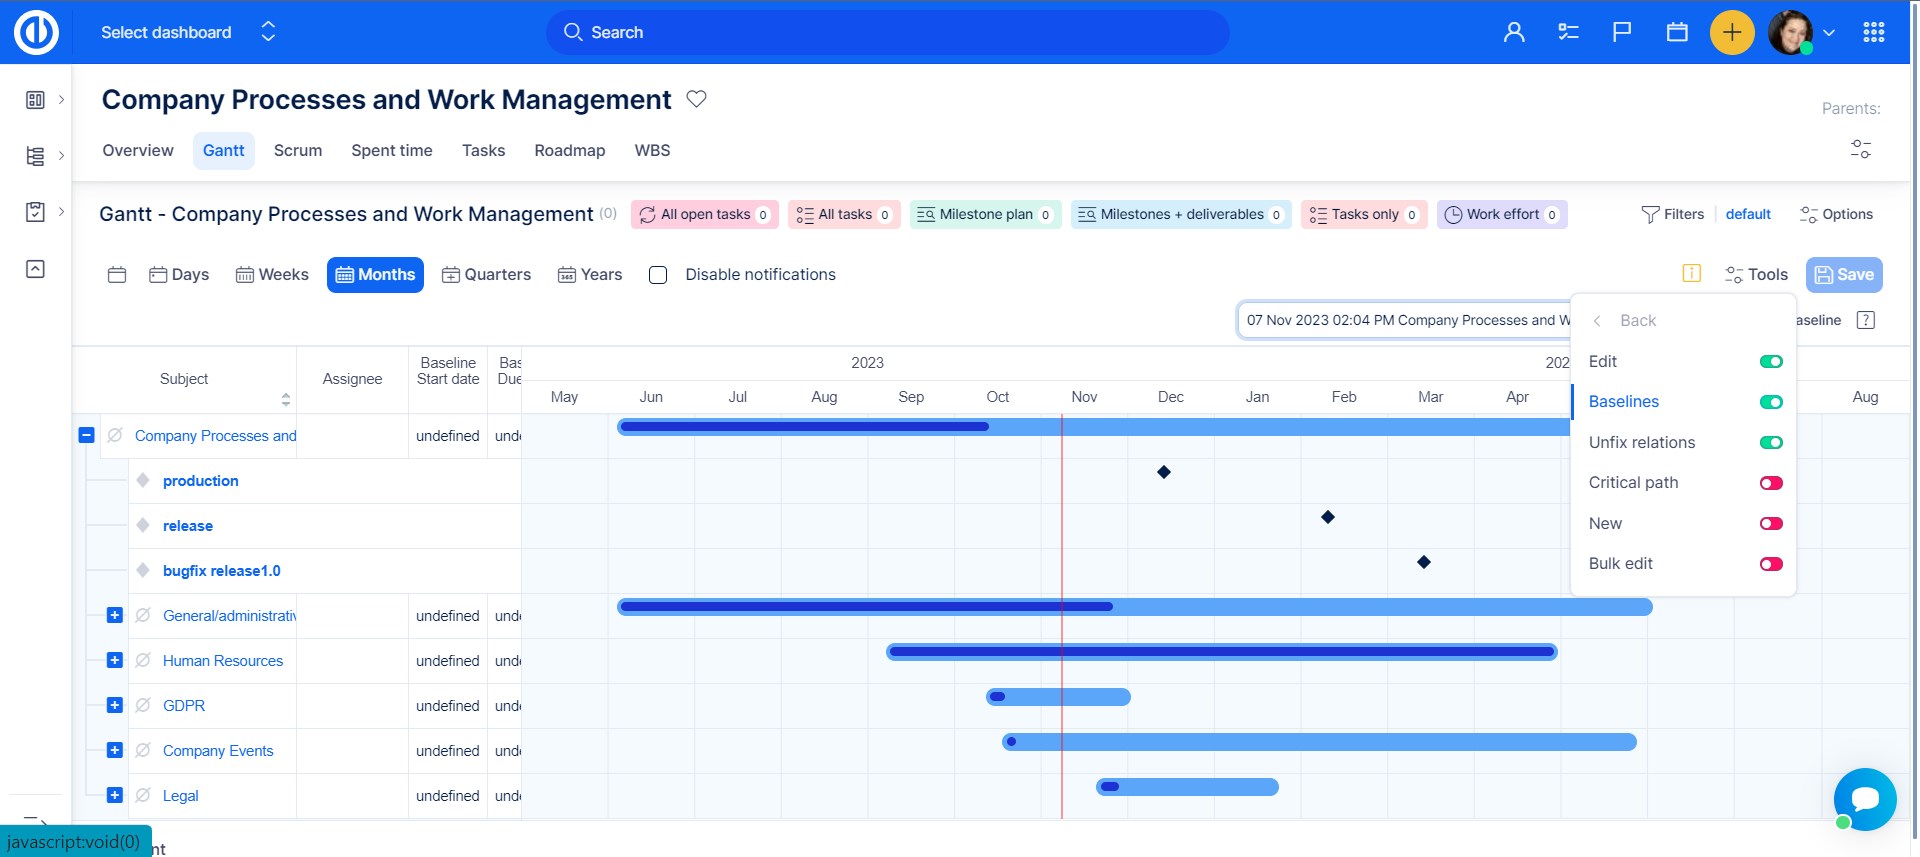
In project management, a baseline is the project's original plan. This original plan is visualized in order to compare it to the current project plan. Gantt chart offers this feature of highlighting the baseline plan. Baseline plan does not change when the schedule is edited. Gantt chart chart allows you to create more baselines which thus work as the snapshots of the project plan. Before start using Baselines, you need to have the module enabled in your project settings as shown in the image below.
Now, go back to Easy Gantt and in Tools enabe the baselines toggle. Once enabled, you will find the Create Baselines button in the upper right corner of the chart. Click on it, and a popup will appear, where you can enter the name of your baseline. If a baseline exists you will see a box with list of baselines as well as a button to delete a selected baseline.
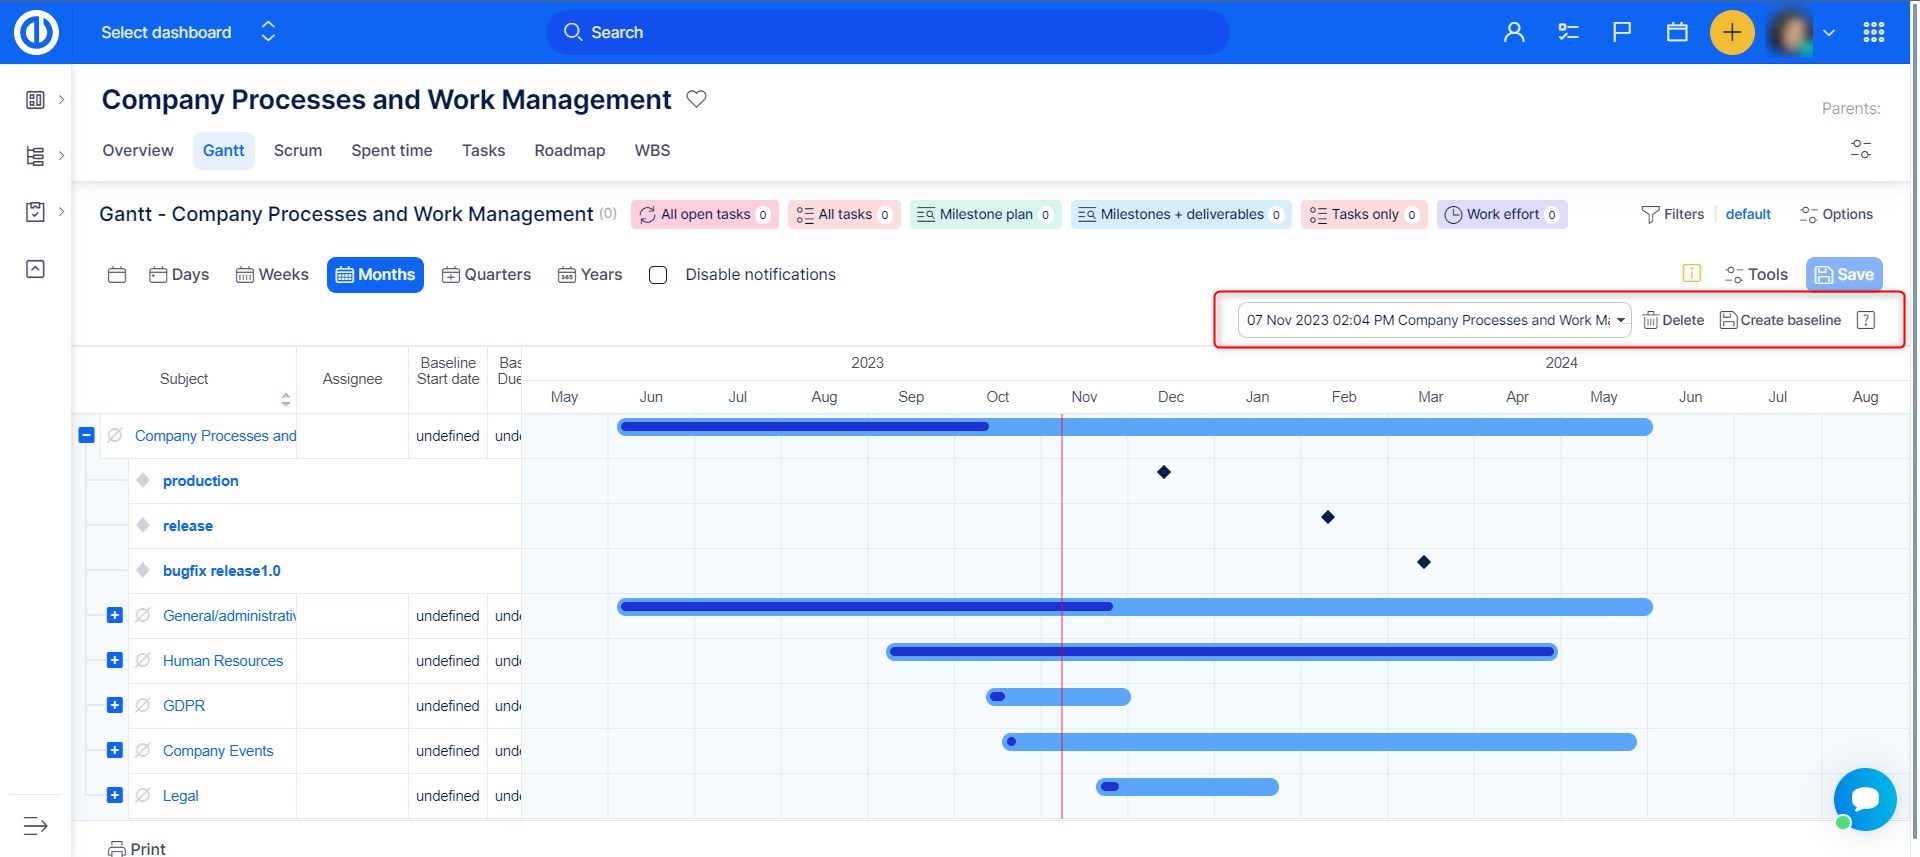
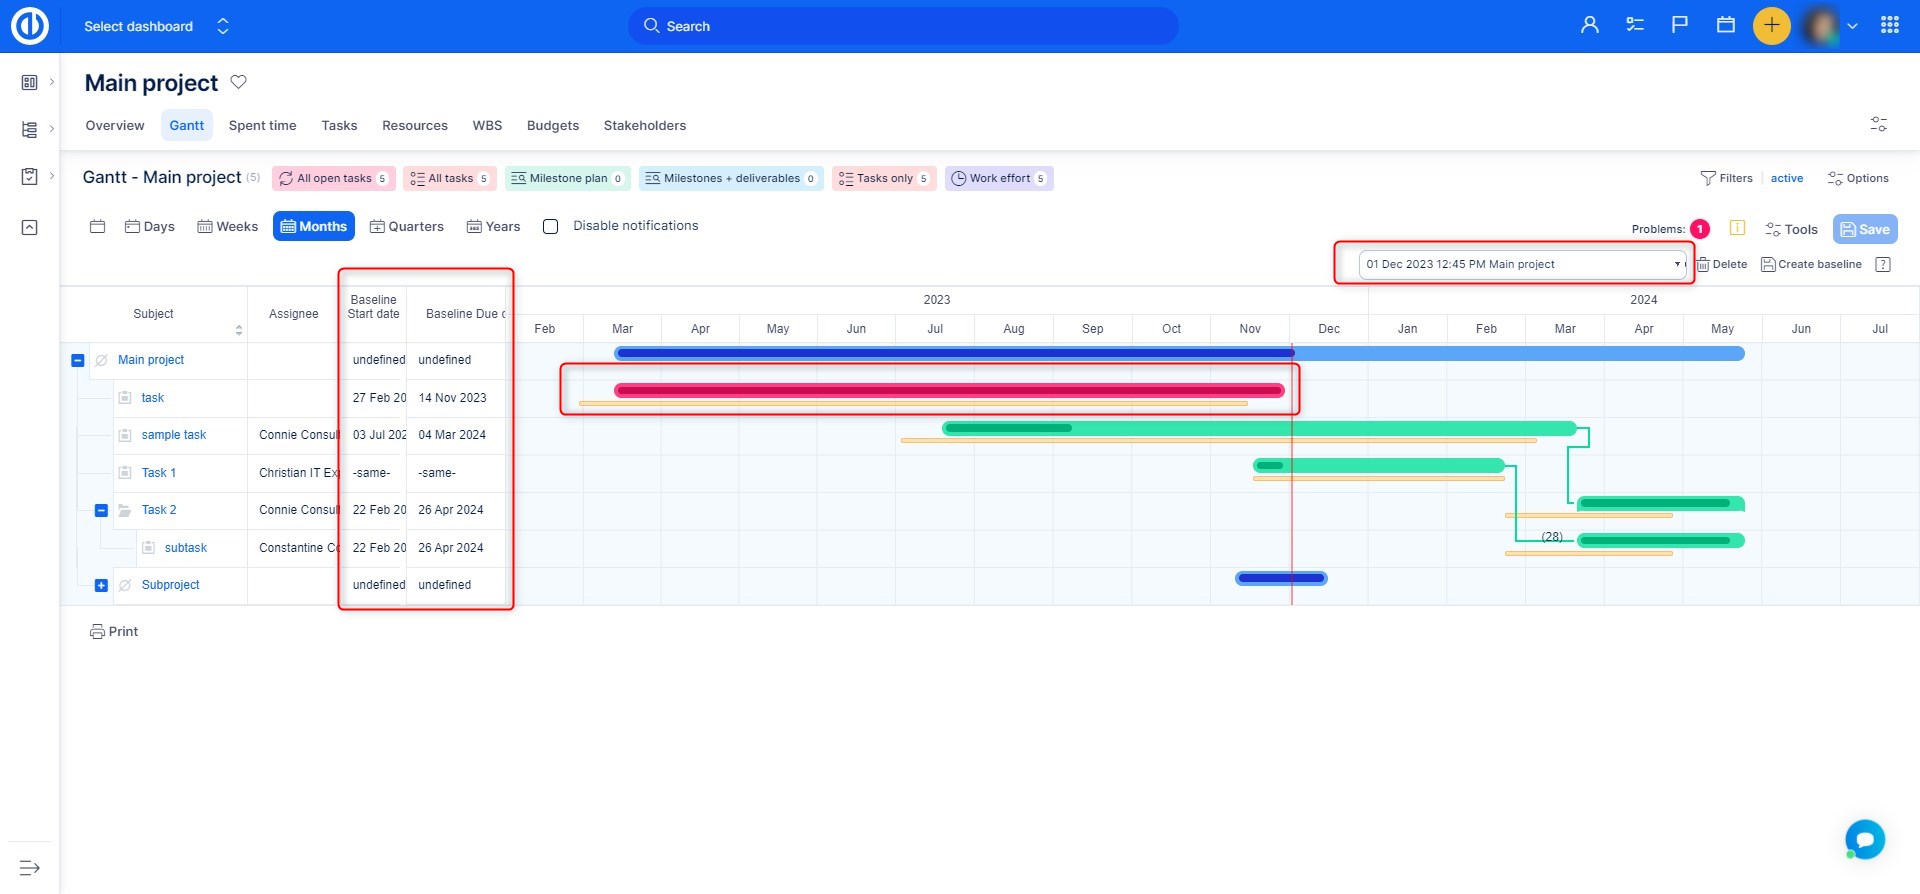
With baseline created you see that all the tasks (issues) on the Gantt chart have split in two, where the upper ones are your current ones and the lower ones are the original ones from the time of creation of the baseline. This way you have a great overview of all the time shifts you made at any point in time. To delete a baseline, click the Delete button next to the Create button.
In addition to the graphical representation of baselines on a timeline, you can also find information about baseline start date and due date within the particular information columns on the left side of the timeline (as illustrated below). This additional information will come in handy when you need to compare the current start dates and due dates with the original plan (baseline).
Critical path of the project
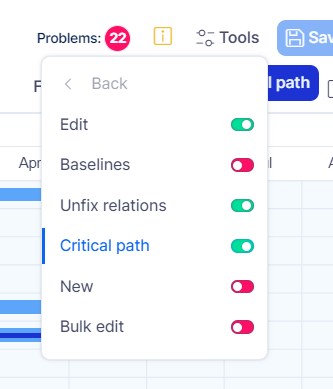
A critical path is a sequence of tasks (issues) that cannot be delayed or else the whole project would be delayed. Also, it shows the shortest time that the project can be completed. A task within the project is considered critical if its due date cannot be delayed since it would directly affect the project completion date. Easy Gantt shows this sequence after clicking the button "Critical Path." this buton will appear when the respective toggle is enabled in Tools.
Activity on the critical path cannot be started until its predecessor activity is complete; if it is delayed for a day, the entire project will be delayed for a day unless the activity following the delayed activity is completed a day earlier. For the proper function of a critical path, the project should have just 1 starting and 1 ending task and the tasks (issues) should be connected with relations.

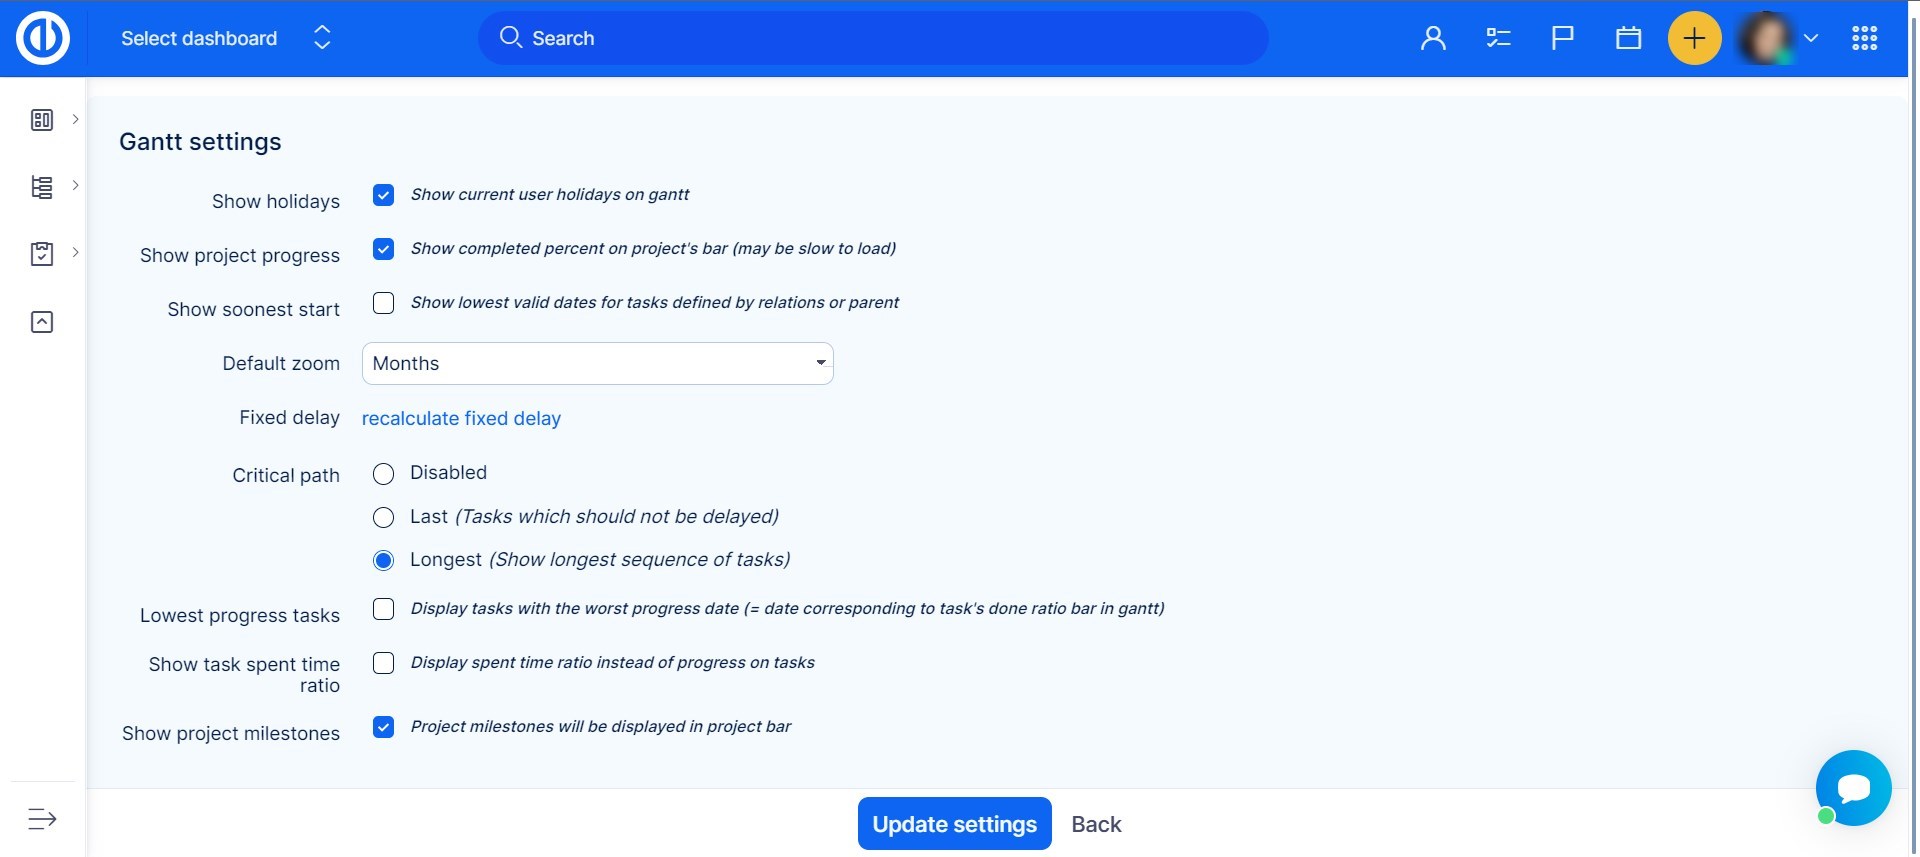
Settings of the Critical path can be modified in global Gantt settings, which is accessible via a small toothed wheel at the top right. The following options are available.
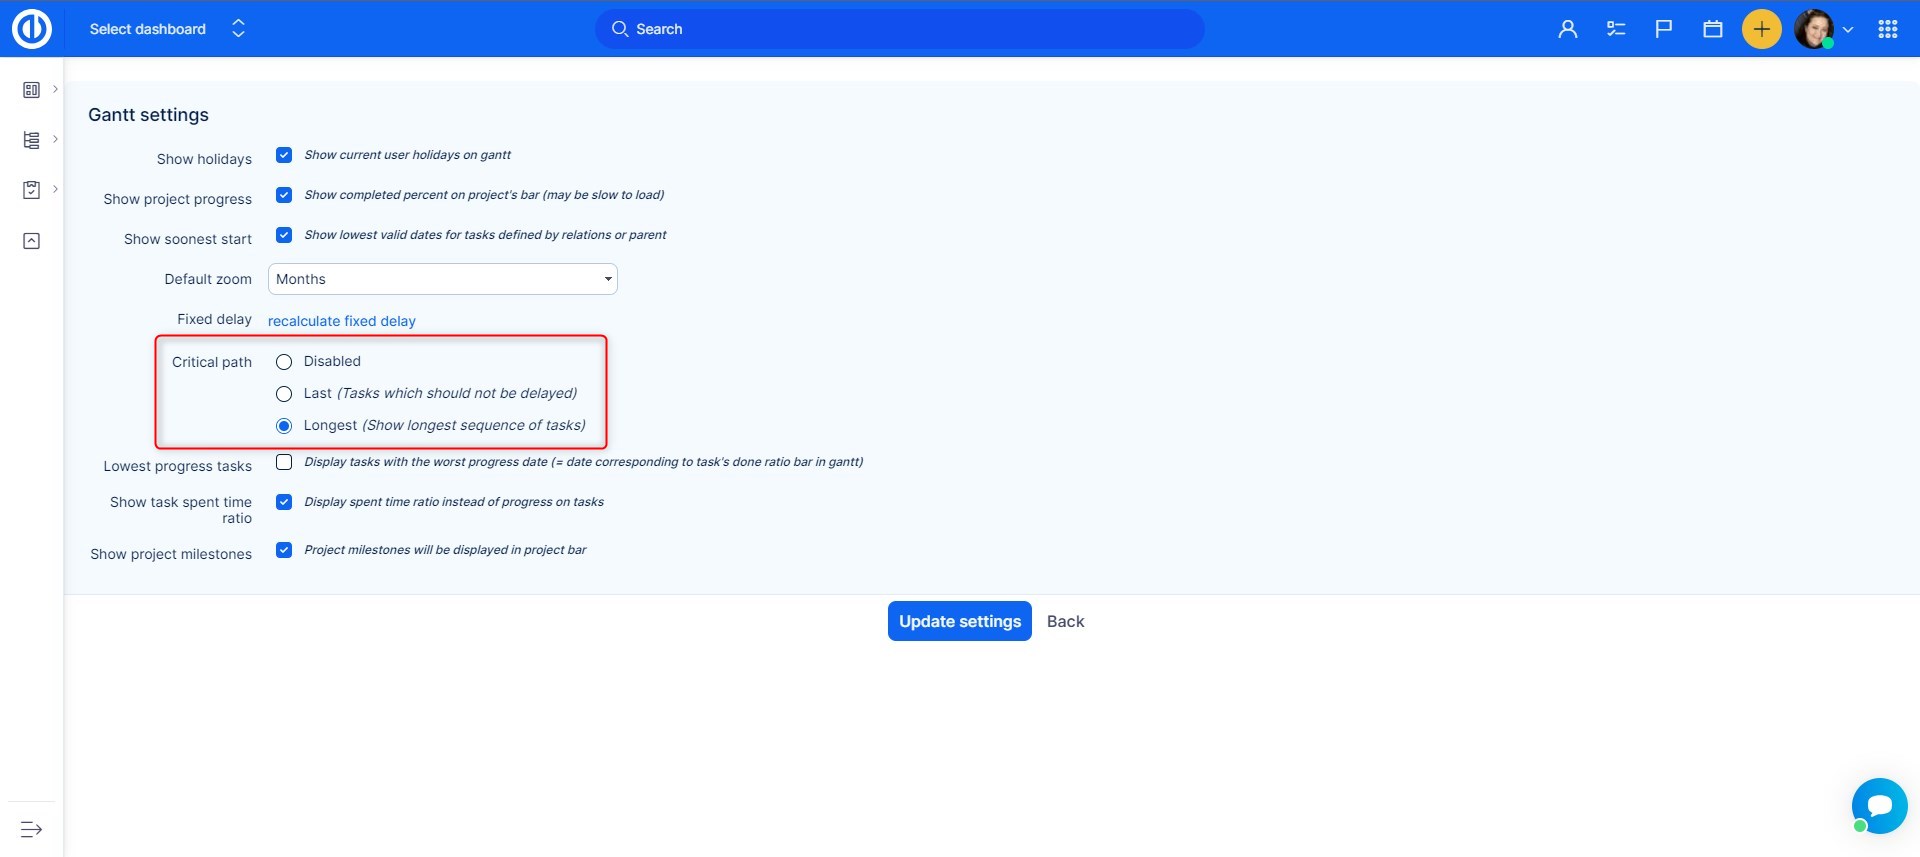
Let's explain the difference between the two options of the setting of Critical path in the Gantt chart.
Option Last (Task which should not be delayed)
- is based on the definition of the critical path according to project management methodology
- the application identifies the last task and follows the relations towards the past; the sequence of tasks that is found is displayed as a critical path
Option Longest (Show longest sequence of tasks)
- this option offers supportive information for the project manager and is not based on PM methodology
- length (duration) of relations and tasks is summed up and the longest sequence of related tasks is displayed
In consequence, as you can compare, for the same project the two options show completely different critical paths.
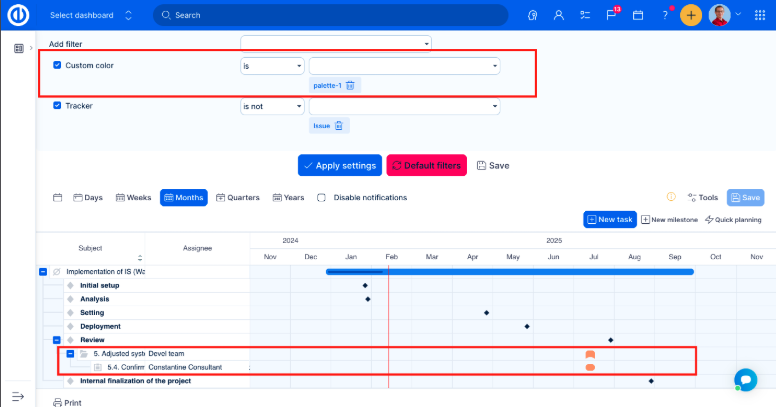
Color Coding of Tasks in the Gantt
The Color Coding feature in the Gantt chart allows users to visually distinguish tasks using custom colors, enhancing clarity and organization.
How to Use
- Select Custom Color: Right-click on your task to choose a custom color.
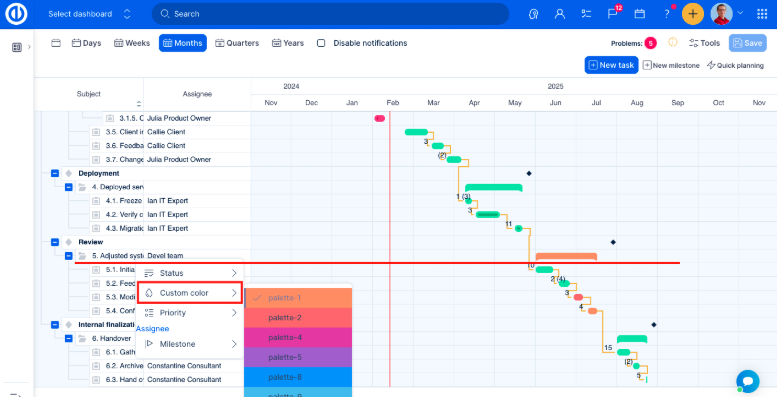
- Filter by Color: Apply filters to view tasks based on their custom colors.
Notes
- Custom colors do not transfer from the Gantt chart to the WBS or the Global Gantt.
- Custom colors are only visible within the Gantt chart.
- Access to this feature depends on user permissions:
- "Edit tasks" permission.
- "Edit tasks where user is the author" permission.
This feature helps users quickly identify and organize tasks within the Gantt chart, improving project visualization and management.
Parent-child tasks visualization
Making parent-child relationship was never so easy. Just drag a task by clicking on its arrow symbol and drop it on any other task, immediately making it a subtask of the selected task. Moreover, this way you can quickly move tasks (issues) from one project or milestone (version) to another one. Parent tasks are visualized on the Gantt chart with their characteristic breakpoints.
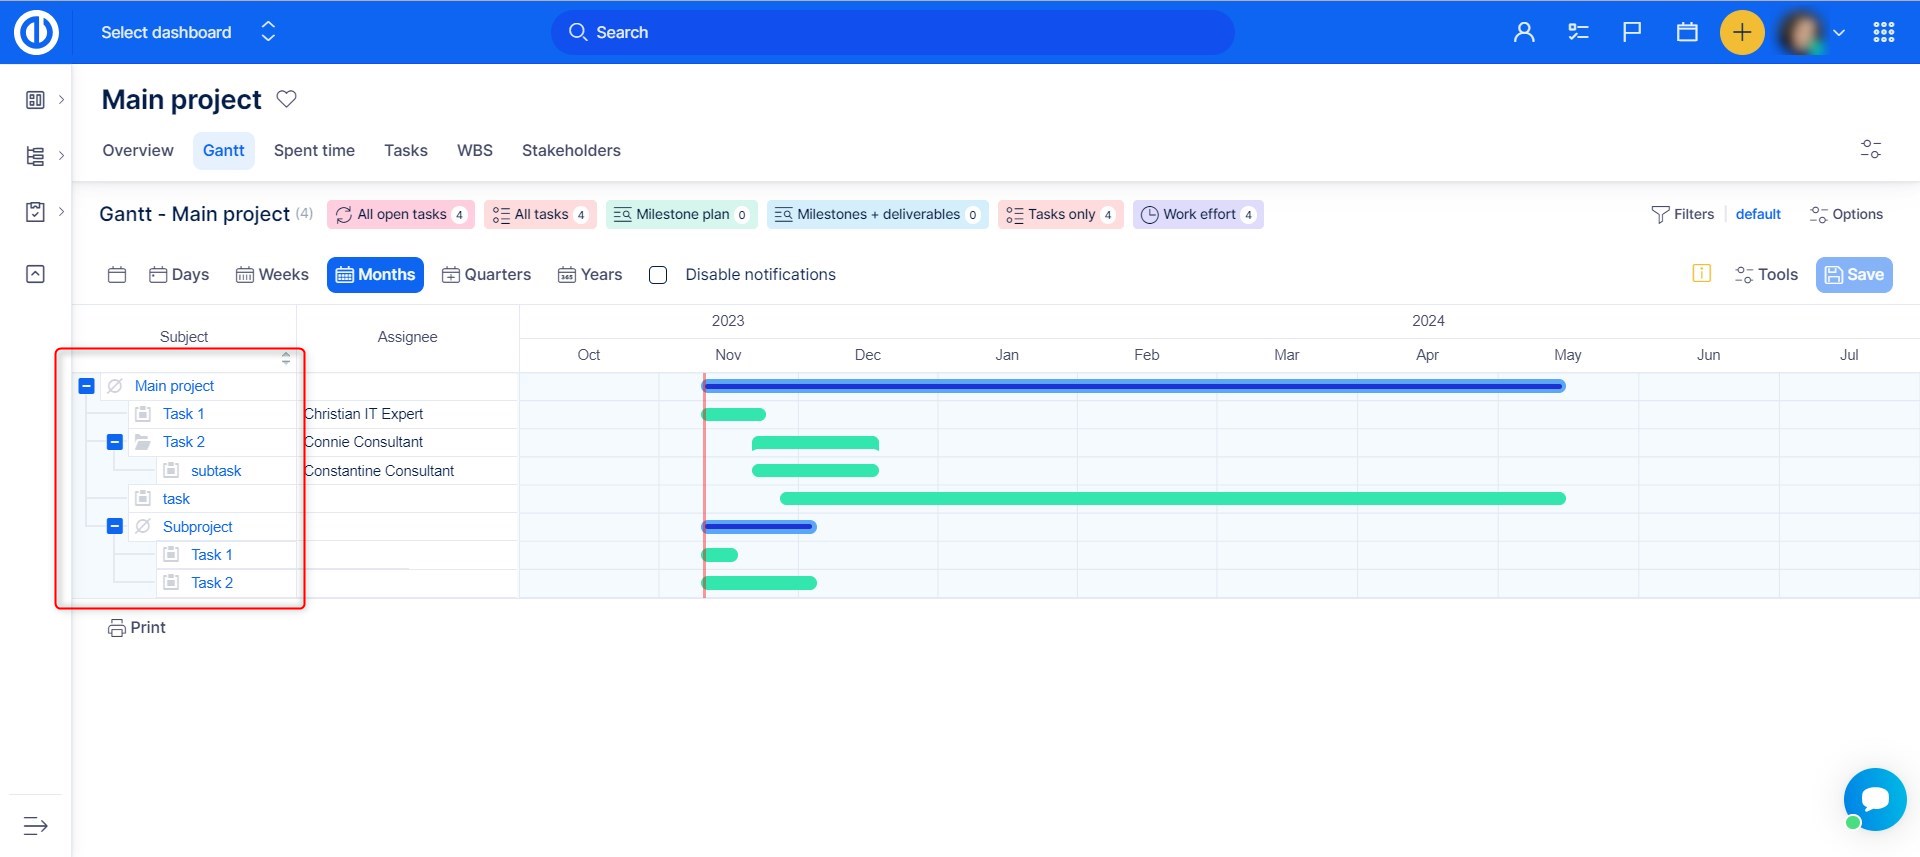
Moving parent task with/without subtasks
Moving tasks and subtasks (drag and drop on a timeline) in Easy Gantt can be done for entire parent task's tree structure at once (i.e. parent task with its subtask), or you can move parent independently on its subtasks. The first case occurs when a parent task's tree structure (or milestone with associated tasks) is collapsed so you cannot see the list of its subtasks. When moving a collapsed parent task (or milestone with associated tasks), its subtasks are moved accordingly. The second case occurs when a parent task (or milestone with associated tasks) is expanded so you can see the list of subtasks and move parent independently of its subtasks. This case does not apply when parent task's start/due dates are calculated from its subtasks, which can be configured in Administration >> Settings >> Task tracking >> Parent tasks attributes. When moving a parent task with subtasks, a milestone linked to the subtask or a delay of a subtask link is exceeded, a further motion is not allowed.
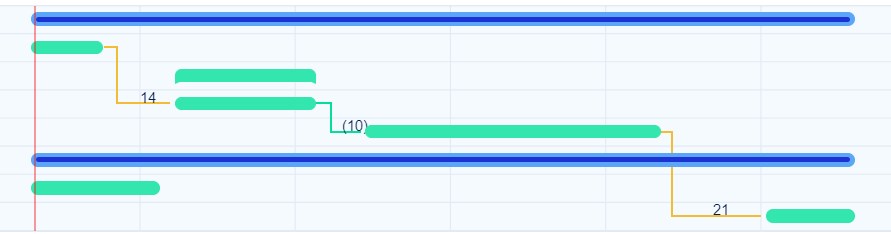
Drag & Drop Tasks Relations with Delay
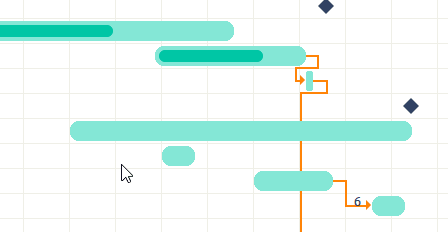
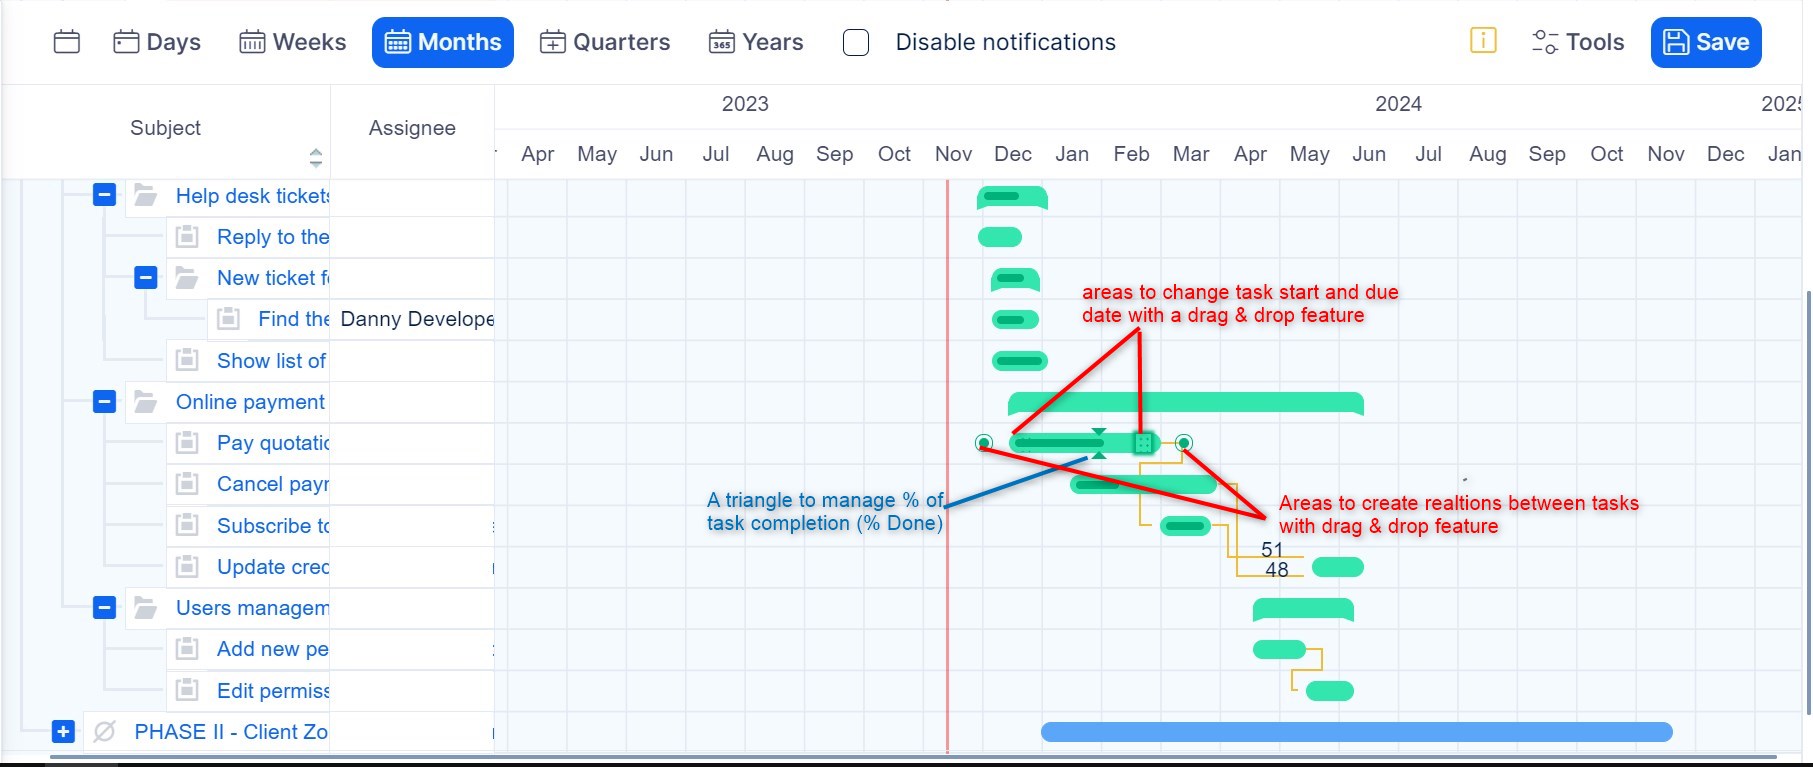
Related tasks (issues) can be simply linked using drag & drop functionality. Just switch to edit mode and when moving the cursor over a task, adjustment features appear. Move the mouse to the end of a task, click on the green circle and hold on. Now drag to another task and drop it there. The two different tasks just become related tasks with predecessor/follower type of relation. Delay is normally kept by Gantt as a number of days between tasks. When you move the successor into the future, the delay is increased. To reduce the delay (and move the following task closer to its predecessor at the same time), you can "unlock" the relation by clicking on it and then drag the follower or right-click the relation where you can set the delay directly. If you want to move the predecessor to the future and utilize the reserve of the delay, unlock the relation again and the follower will not move. The number above the relation without brackets is the delay Gantt keeps during motion. It is possible that there is also a number in brackets that corresponds to the actual length of the relation.
Locked (fixed) and unlocked (flexible) delays in task relations
When tasks are connected via a relation with delay, this relation can be either locked (fixed) or unlocked (flexible), which affects dragging tasks in a relation chain. The current status is indicated by the color of the relation line between tasks. You can switch between the two statuses simply by clicking the left mouse button on the relation line itself. This action will make the color of the relation line change from yellow (locked) to green (unlocked) or vice versa.
- Yello color (locked) - When a new relation between tasks is created, it is locked (fixed) by default, which is indicated by yellow color. This status means that dragging a preceding task in a relation chain will automatically move all following related tasks in order to preserve the original delays between them, and their start dates and due dates will move accordingly. However, when moving the following task in a relation chain, the relation remains locked (fixed) in the reverse direction but unlocked (flexible) in the forward direction, meaning that you can extend the delays (yellow lines) freely but you can never shorten them.
- Green color (unlocked) - The unlocked (flexible) delay is colored green and means that moving a task will not affect the position of its related tasks in the Gantt chart, meaning that their start dates and due dates will remain unchanged but the delay will change accordingly. When you change the delay of an unlocked (flexible) relation, it automatically becomes locked (fixed) again, meaning that you have to click on it once again to make it unlocked (flexible).
In large and complex projects with many relations between tasks, when working in Easy Gantt, one single move of a task could cause a chain of shifts in the rest of the project. That may end in various forbidden operations that are reported as errors (tasks moved beyond their milestone, task dates that violate earliest/latest due/start dates based in their relations).
The cause of these situations is that during Gantt edit, the delay in task relations is fixed (delay is the time between the end of the first task and start of the second task, e.g. 3 days). The delay will not be allowed to become shorter, therefore, all tasks will be moved forward.
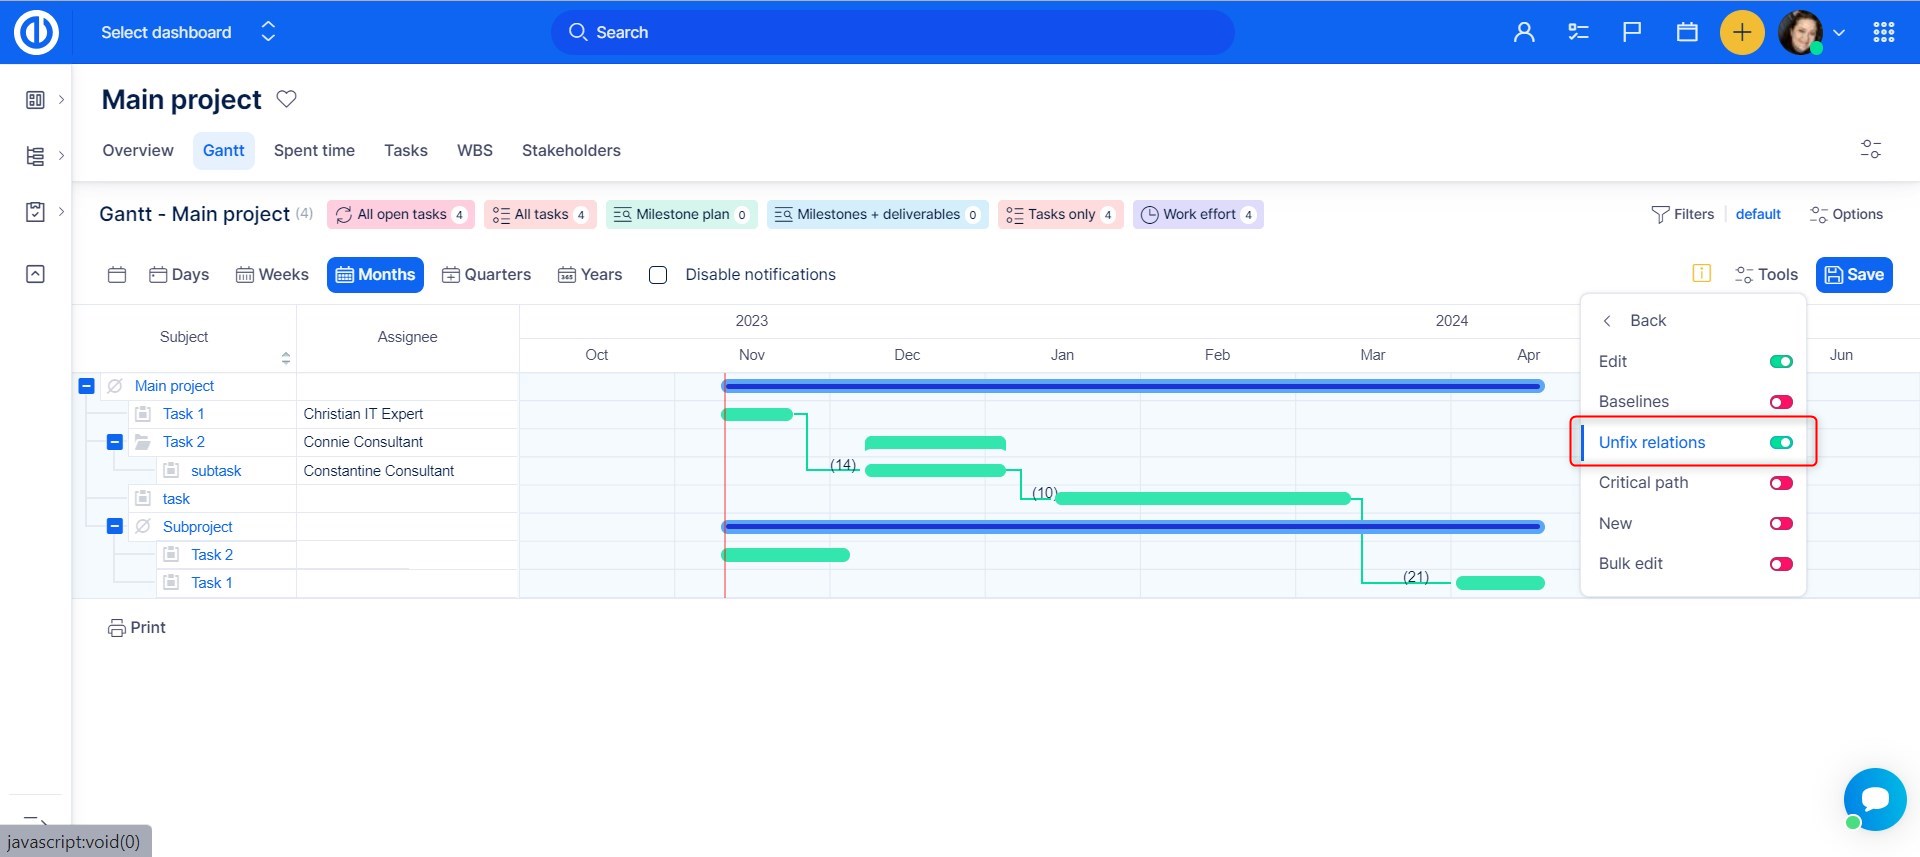
To solve this problem, there is a new option on Gantt called "Unfix relations" under the Tools button. By enabling this option, all relations between tasks will become "flexible" during editing. As a result, moving one task will not cause the movement of the whole following set of tasks. When saving the change, the relation delays will be saved as new, and will not be validated whether they satisfy previously set fixed delays.
As long as the switch is turned on, you can manipulate all relations like the unlocked (green) ones. Once you toggle the switch off, all the relations get back their original status instantly. This can be helpful when more locked delays in task relations need to be shortened or extended.
Types of task relations (links) in Gantt chart
In Gantt chart, you can create and visualize 4 standard types of relations (links) between tasks using the drag and drop feature (analogical procedure as previously). They are as follows:
|
|
Start-to-start (SS) 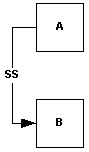 The dependent task (B) cannot begin until the task that it depends (A) on begins. The SS link type does not require that both tasks begin simultaneously. For example, if you have two tasks, "Pour concrete" and "Level concrete," the "Level concrete" task cannot begin until the "Pour concrete" task begins. |
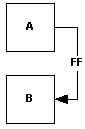 Finish-to-finish (FF) Finish-to-finish (FF)The dependent task (B) cannot be completed until the task that it depends on (A) is completed. The FF link type does not require that both tasks be completed simultaneously. For example, if you have two tasks, "Add wiring" and "Inspect electrical," the "Inspect electrical" task cannot be completed until the "Add wiring" task is completed. |
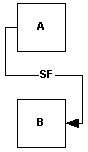 Start-to-finish (SF) Start-to-finish (SF)The dependent task (B) cannot be completed until the task that it depends on (A) begins. The SF link type does not require that the dependent task is completed concurrently with the beginning of the task on which it depends. For example, the roof trusses for your construction project are built offsite. Two of the tasks in your project are "Truss delivery" and "Assemble roof." The "Assemble roof" task cannot be completed until the "Truss delivery" task begins. |
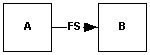 Finish-to-start (FS)
Corner situations of task relations
-
Cross-project relations cannot be visualized.
-
The only types of relations that can be visualized are predecessor/follower (green line) and related/blocked-by (blue line).
-
Start-to-start (SS) relation is correctly preserved only when the relation is created/changed in Gantt chart, not from the task update window.
-
It's not allowed to add a relation between a parent task and its subtask
-
Between two tasks can be no more than 2 relations (start-start, finish-finish)
-
Any combinations of relations leading to a cyclic sequence of tasks (looping) are not allowed. This includes attempting to create a relation with any task that has a parent.
-
When moving a task on the timeline, relation types start-to-start and finish-to-finish can adequately change the start/due dates of a related task only when doing so in Easy Gantt, not by editing the task using any other tool
-
Negative (reversed) types of task relations (links) in the Gantt chart are not possible to set up. In case of such a need, the correct way is to set up a different (more appropriate) type of task relation.
-
When a baseline is created from the Gantt chart with unsaved changes in unlocked (flexible) delays in task relations, those changes are not part of the baseline (is created in the before-change state). In contrast, when a baseline is created from the Gantt chart with unsaved changes in locked (fixed) delays in task relations, those changes are part of the baseline (is created in the post-change state).
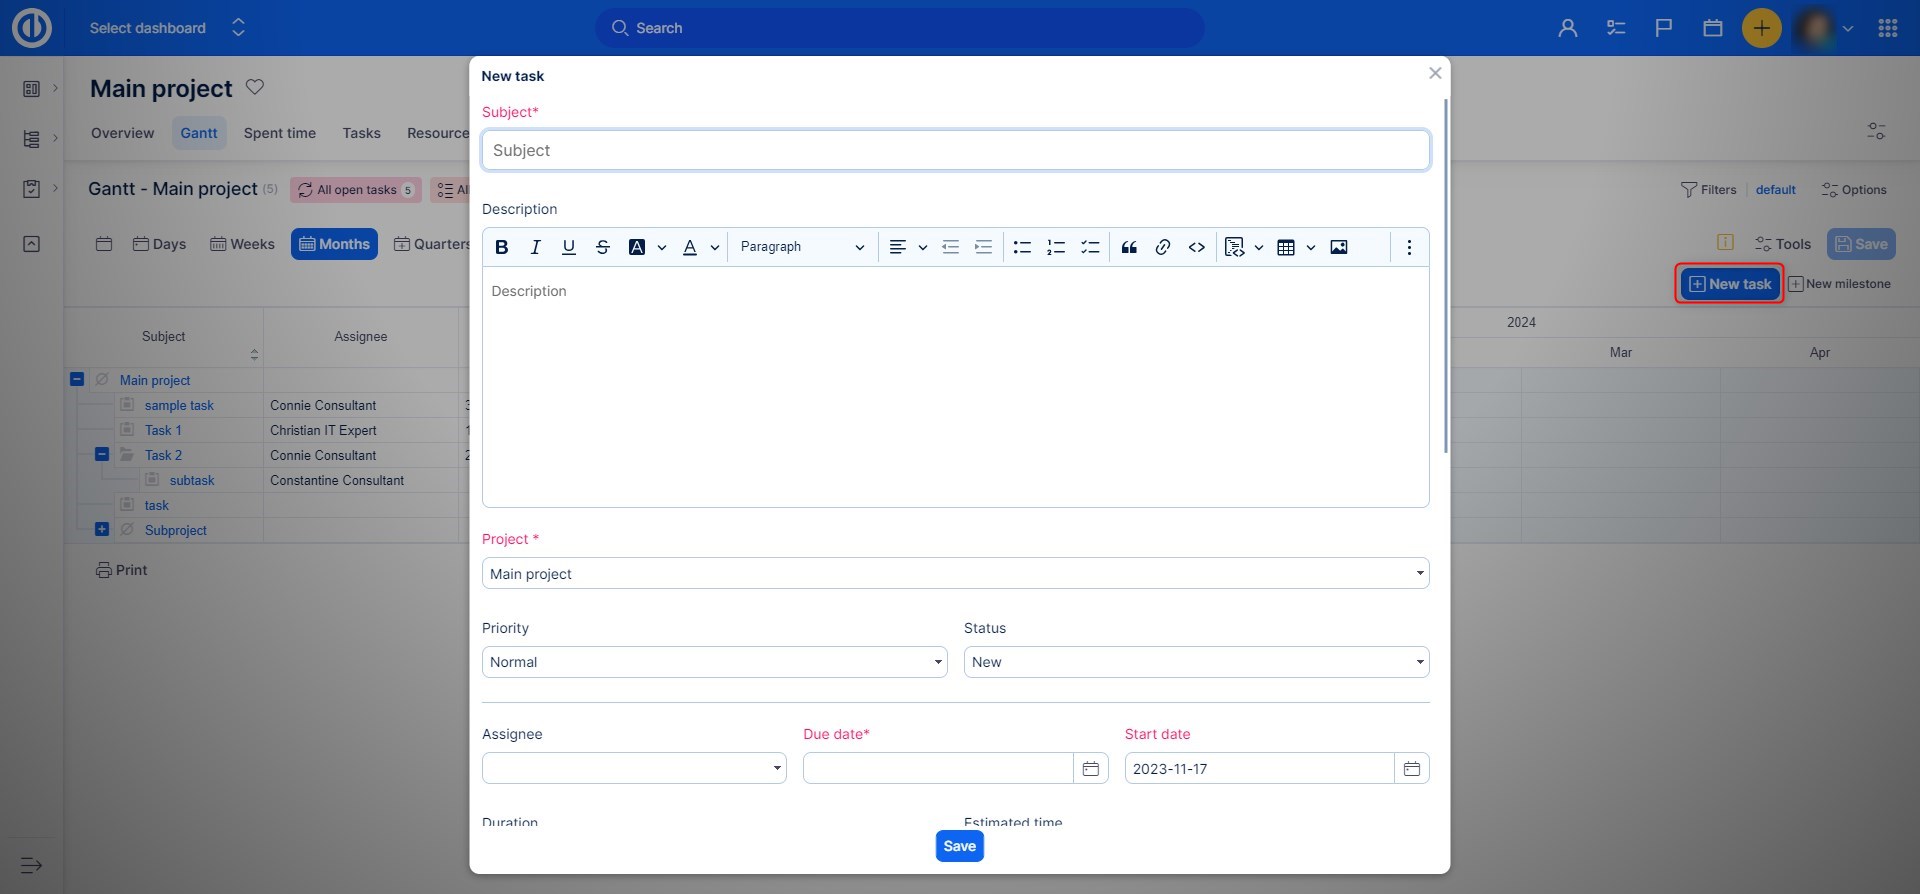
New task and milestone right from Gantt
New task (issue) or milestone (version) can be created the following way. In tools, turn on the new toggle. The buttons to create new task and milestone will appear. After clicking the New task button, a pop-up will appear where you fill all necessary information. To create a new milestone, click on the New milestone button, then click to the timeline where you wish the milestone to be. A pop-up will appear then to fill in the details. Moreover, the New task button is always present in the upper right corner of the screen. In order to preserve good overview of milestones, Easy Gantt shows on the timeline only the milestones that are defined within the currently opened project(s) as well as shared milestones that are used by tasks. Unused shared milestones are not visualized on the Gantt chart.
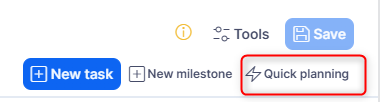
Additionally, you will find the option to use Quick Planning. This option will be available if the Quick planning module is activated on the project.
Drag & Drop Update of Tasks' timing (Start Date, Due Date, Duration, Completion)
Timing attributes of the tasks (issues) can also be edited just by using drag & drop functionality. Switch to edit mode, move cursor over a task and you have several choices to do: 1) move the task on the horizontal line to change its start date and due, 2) stretch or shrink the task to change its duration, or 3) move the rider of the task to change its % completion. It is easy to catch the operational elements such as start date, due date, progress or relation creation. Even in the shorter tasks, you are able to catch the element you need to do your changes. The Gantt chart has also rounded edges to better separate tasks from each other especially when they have a similar duration.
Tasks with missing start/due date
It is quite a common situation that users create tasks manually with missing start or due date. In Gantt, you will notice these tasks at first sight. Naturally, when you drag & drop them in Gantt, both dates will be set accordingly.
- A task without a due date has no clear due date on the timeline.
- A task without a start date has no clear start date on the timeline.
- A task without a start and due date has neither a clear start nor due date on the timeline.
Drag & Drop Update of Milestones' Timing
Just as easy is to change the timing of a milestone. Just drag a milestone, move it across the timeline and drop it on the required due date.
Drag & Drop Sorting of Tasks to Milestones
Gantt chart allows you to link tasks (issues) with milestones (versions) in just a few clicks. Just drag a task from the list and drop it on the milestone to be linked with. Unchecking the option "Allow to set task due date after milestone date" in Global menu >> Administration >> Settings >> Task tracking will cause that when a task is associated with a milestone, you are unable to move the task beyond the milestone on the timeline. If you need to move the task further ahead, you have to move the milestone first. By checking the option, you can move with tasks regardless of milestones.
Here are all the use cases for moving a task that has a milestone:
- Task is moved on its own line (no parent, no milestone) - milestone is removed
- Task is moved into a new project - milestone is removed
- Task is moved directly under a different milestone - milestone is changed
- Task is moved under a parent task - parent task's milestone is used
Zoom of Project Timeline (Days, Weeks, Months...)
The timeline offers various types of view: days, weeks, months, quarters, years. Based on the project length and the necessary level of detail, they can be switched between from the top menu.

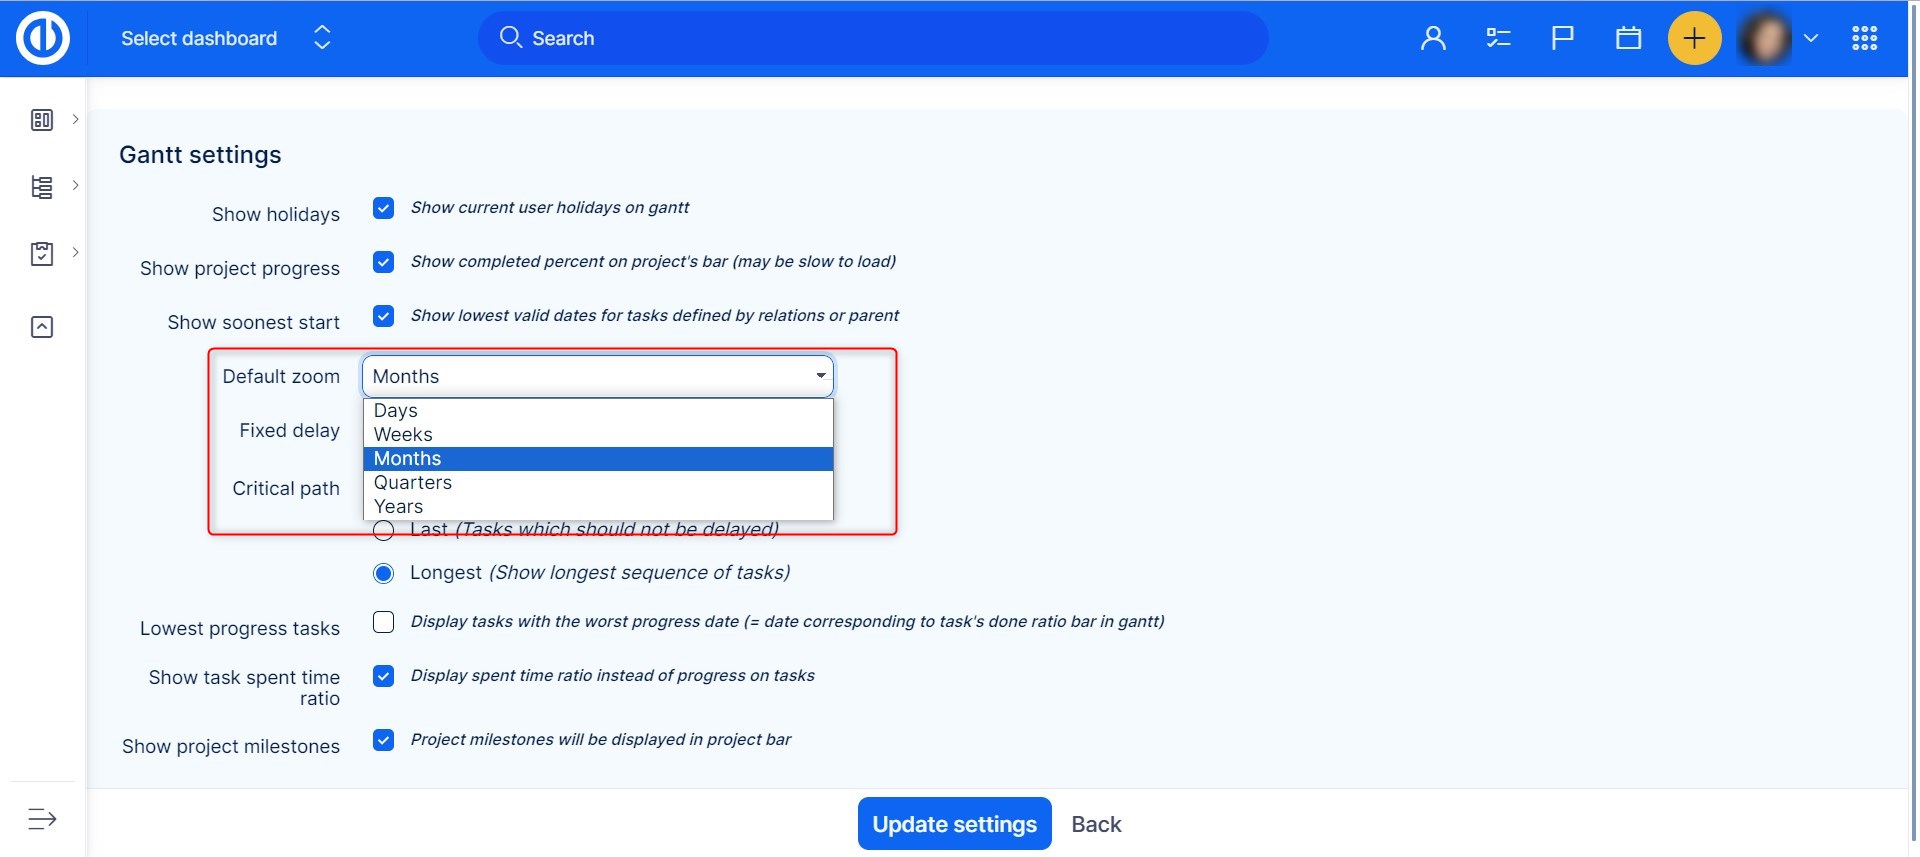
Default zoom of project timeline can be modified in Gantt settings (accessible from global Gantt).
Step Back Button (Undo)
When you accidentally do anything wrong, simply take back an unlimited number of steps you have done just by clicking the "Back" button which is situated in the Tools list on top.
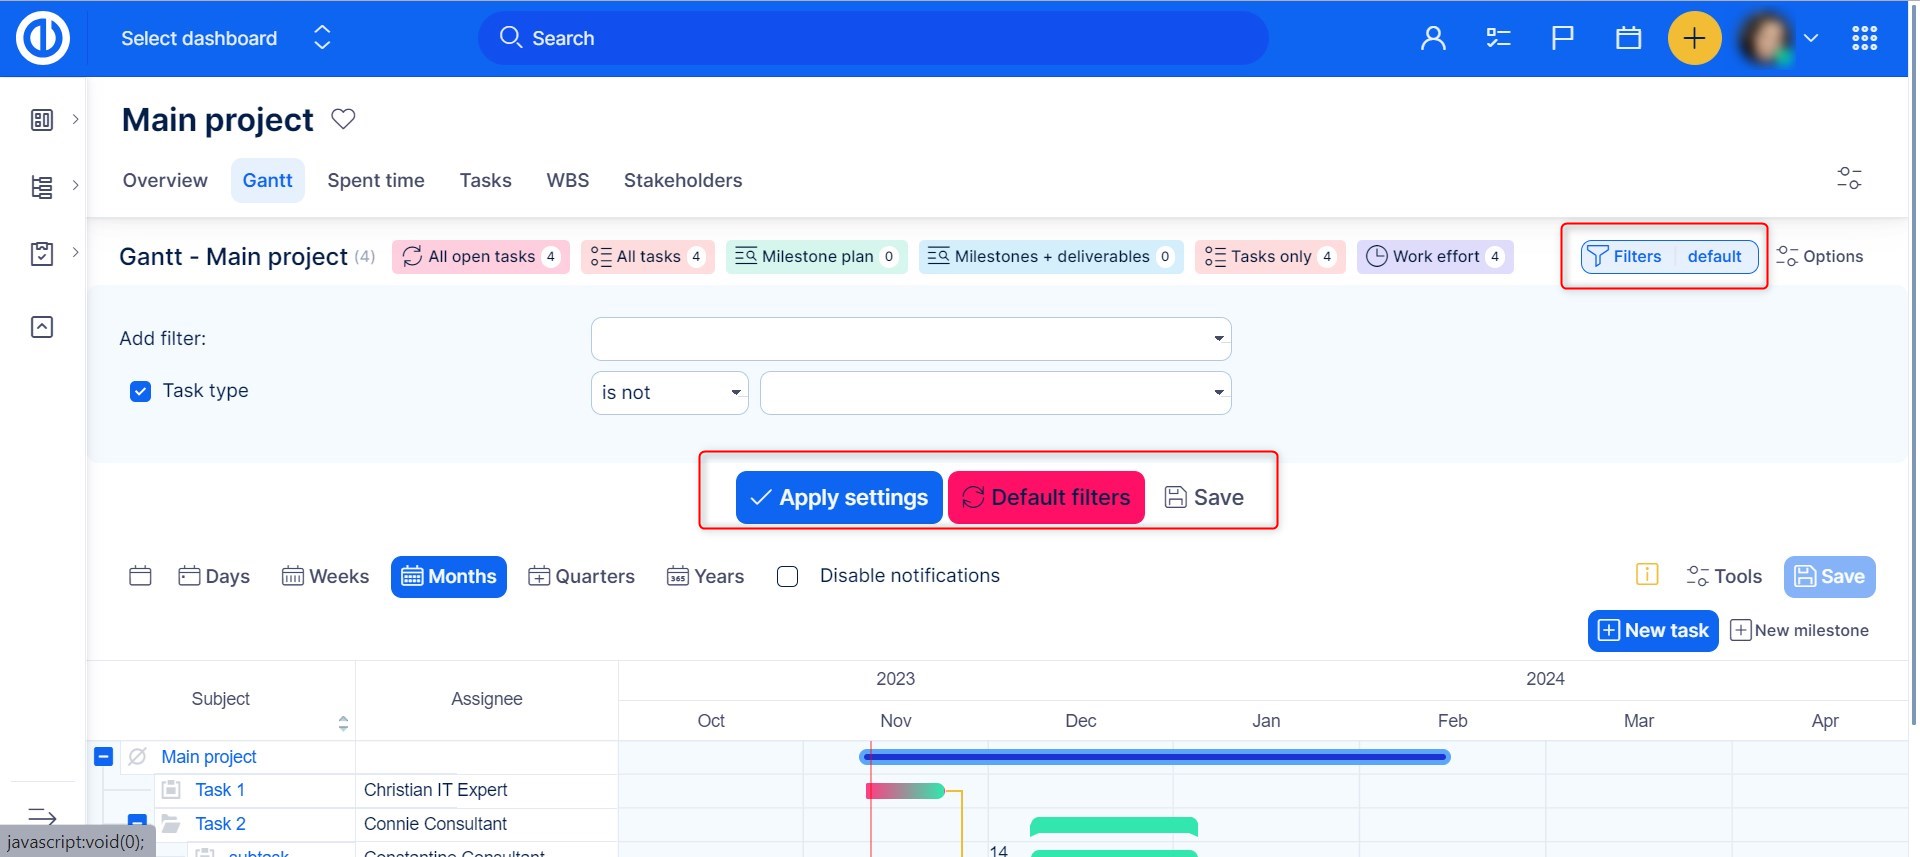
Tasks Filters & Options Above Gantt
Customize your filter settings and visible columns in a moment. Project-level Gantt chart supports both task filters and project filters, while global-level Gantt chart supports project filters only. It's because global Gantt chart is supposed to be used only when working with projects, not with tasks.
Note on estimated time: In the project-level Gantt chart, the column "Estimated time" shows estimated time for tasks, while the column "Estimated time (projects)" shows estimated time for projects. The same logic applies to "Total estimated time" and "Total estimated time (projects)", just including subtasks, resp. subprojects in the totals (sums). In the global-level Gantt chart, only the columns "Estimated time" and "Total estimated time" are available, which show estimated time for projects, resp. projects including subprojects (total), not for tasks.
Export options
You can print your Gantt charts or save them as PDF just by clicking the Print button at the bottom row or pressing CTRL+P, which both open the browser print dialog. Changing or adjusting the export size format is always possible in the printing options. Aternatively, you can use an external PDF creator tool, such as Foxit Reader or PDFCreator.
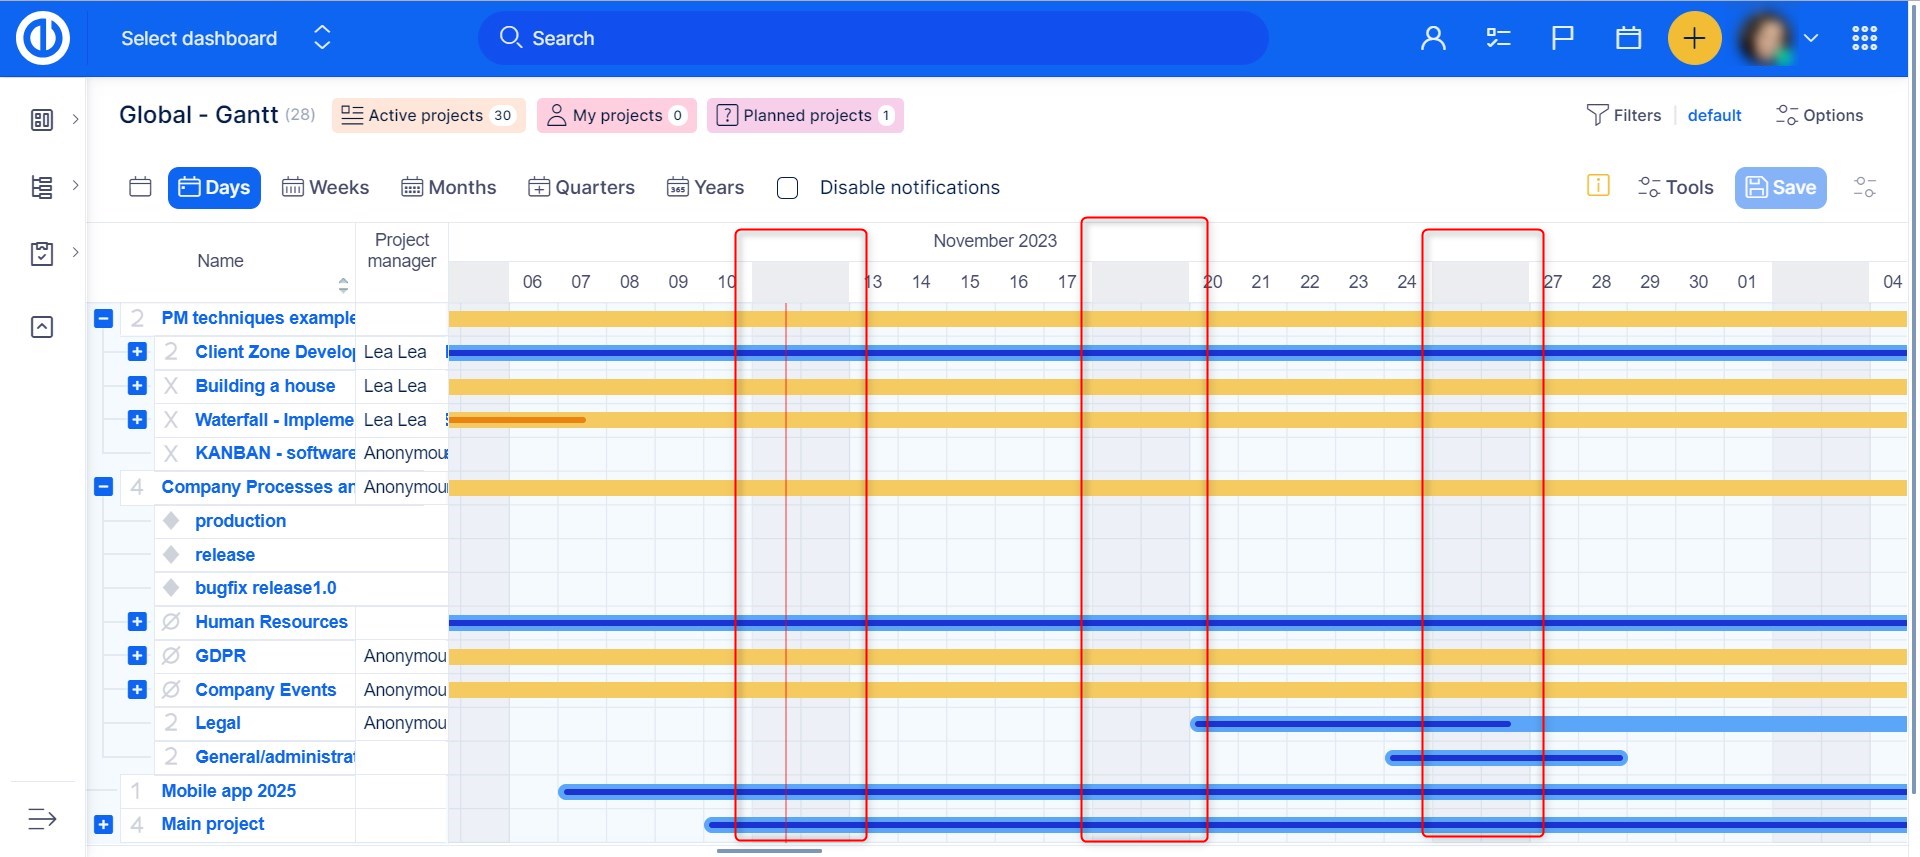
How to show holidays on the Gantt chart
Gantt chart enables to show holidays in the same manner as non-working days, via the gray columns on the timeline. When holidays are displayed on the Gantt chart, tasks don't allocate time to these days just as they don't do on weekends. You can turn this feature on or off in Gantt settings which you can find in the upper right corner.
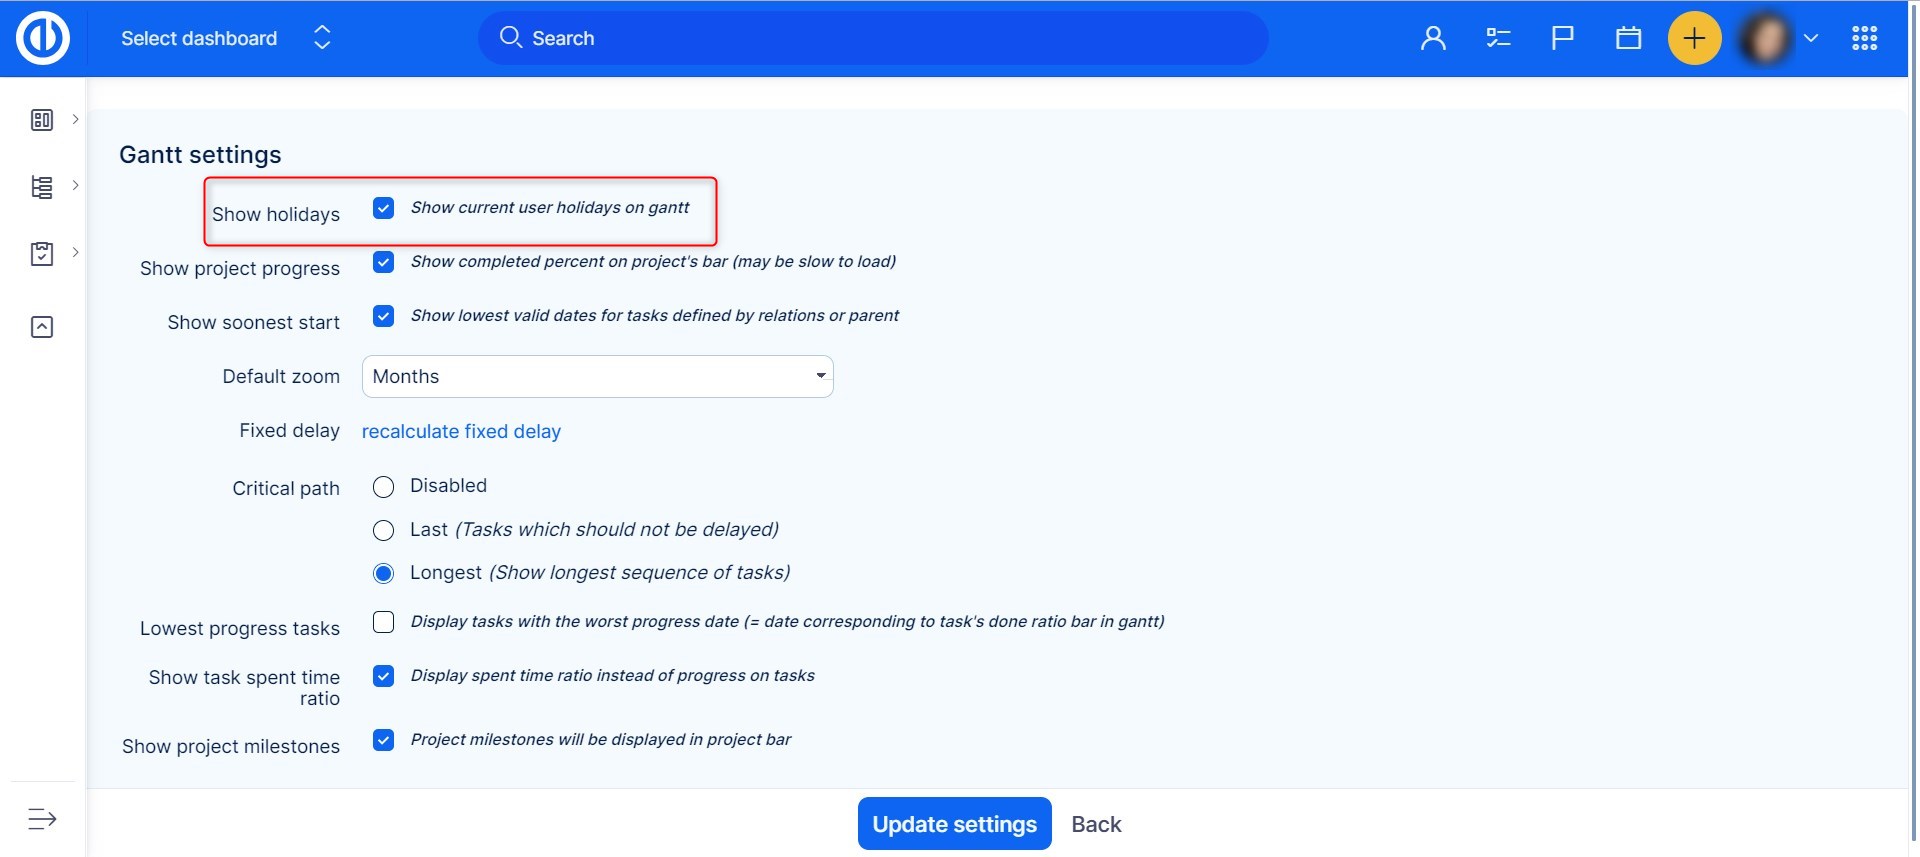
Immediately after ticking the checkbox and saving it via "Update Easy setting" button, holidays will appear greyed in your Gantt chart as illustrated below. Weekends are shown always, holidays are shown according to the setting.
The data about working days and holidays in the Gantt chart are retrieved from the working time calendar of the particular logged-in user, not the task assignees who may use different working time calendars. Working time calendar for each user can be changed on his user profile under Working time tab.
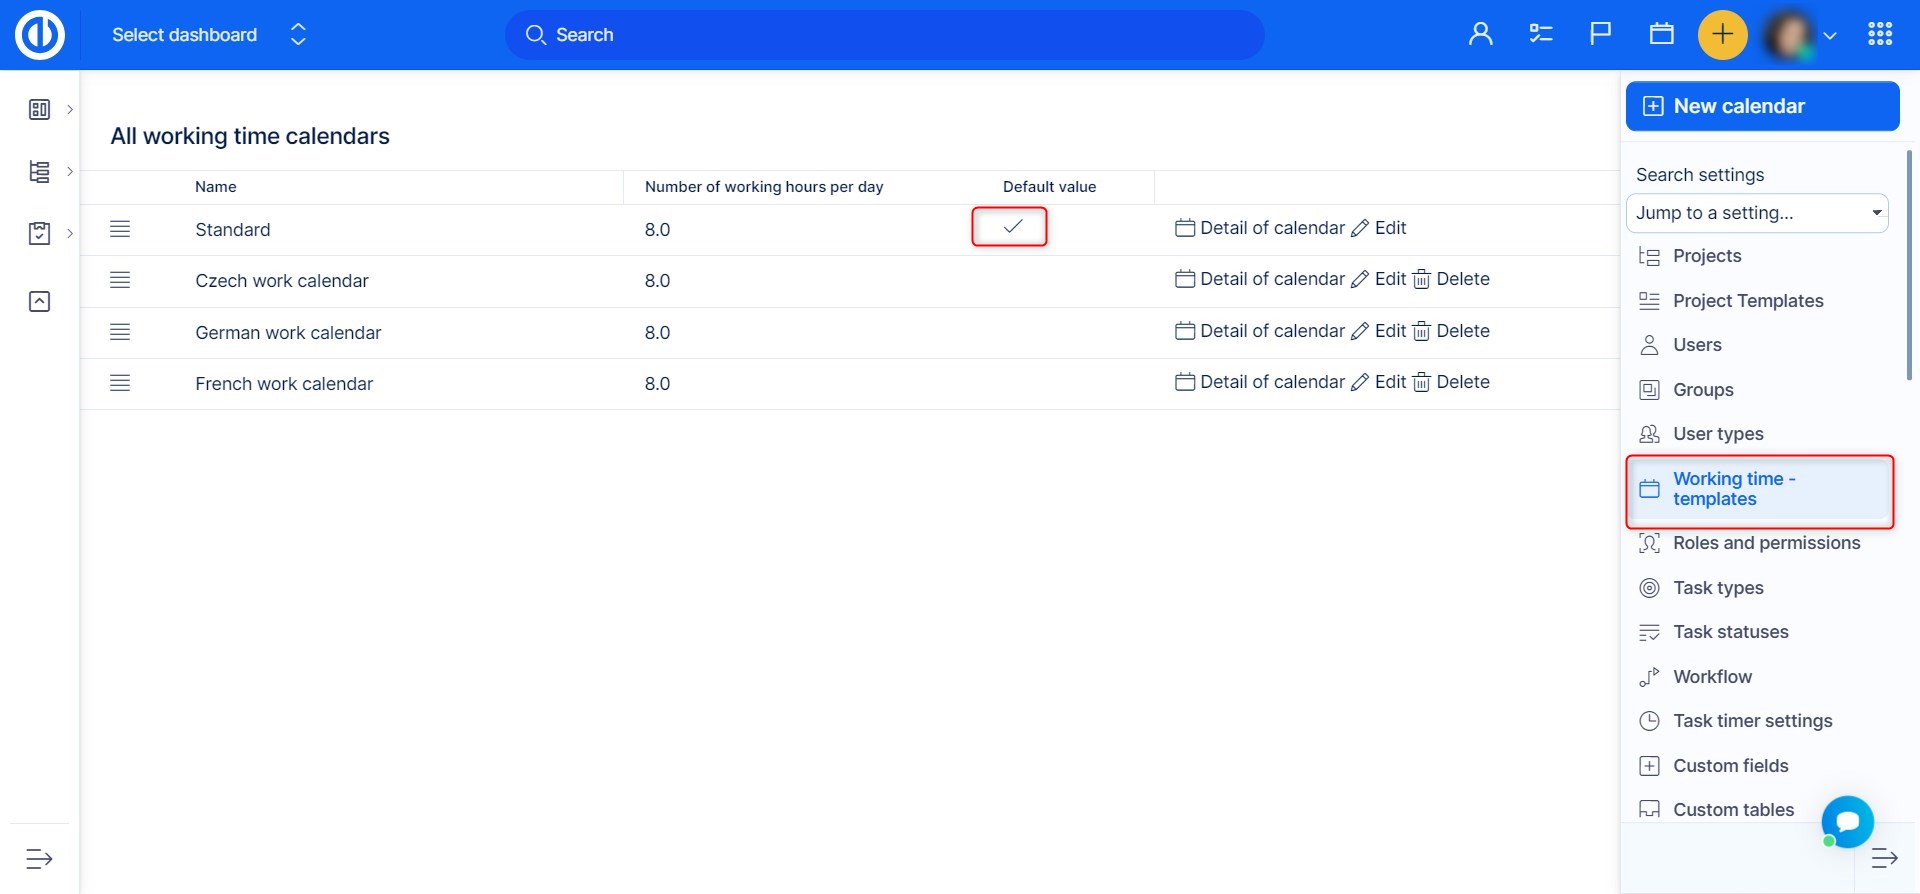
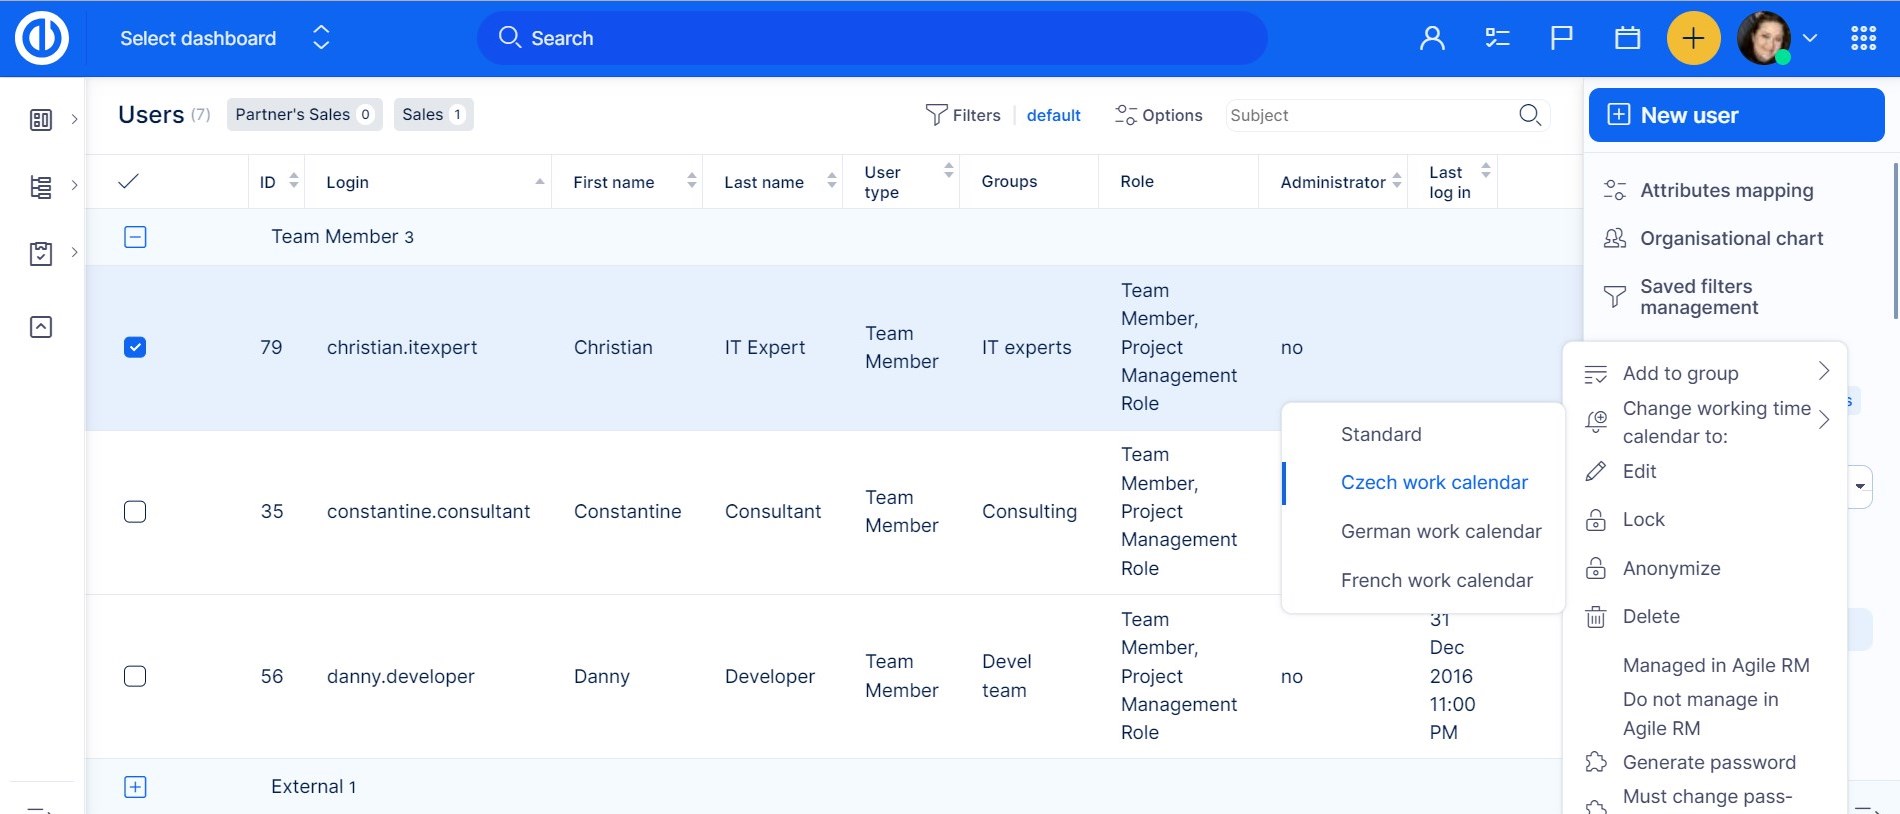
Normally, each newly created user automatically gets a default working time calendar template, which can be found and changed in Global menu >> Administration >> Working time - templates. However, if you make a change in this default template, this change will not apply to already existing users unless you manually reset their personal working time calendars according to this new template. To make the reset, mark the required users on the users' list (More > Users) and select "Change working time calendar to" option from the context menu (right mouse button).
How to show resource allocations in Gantt chart
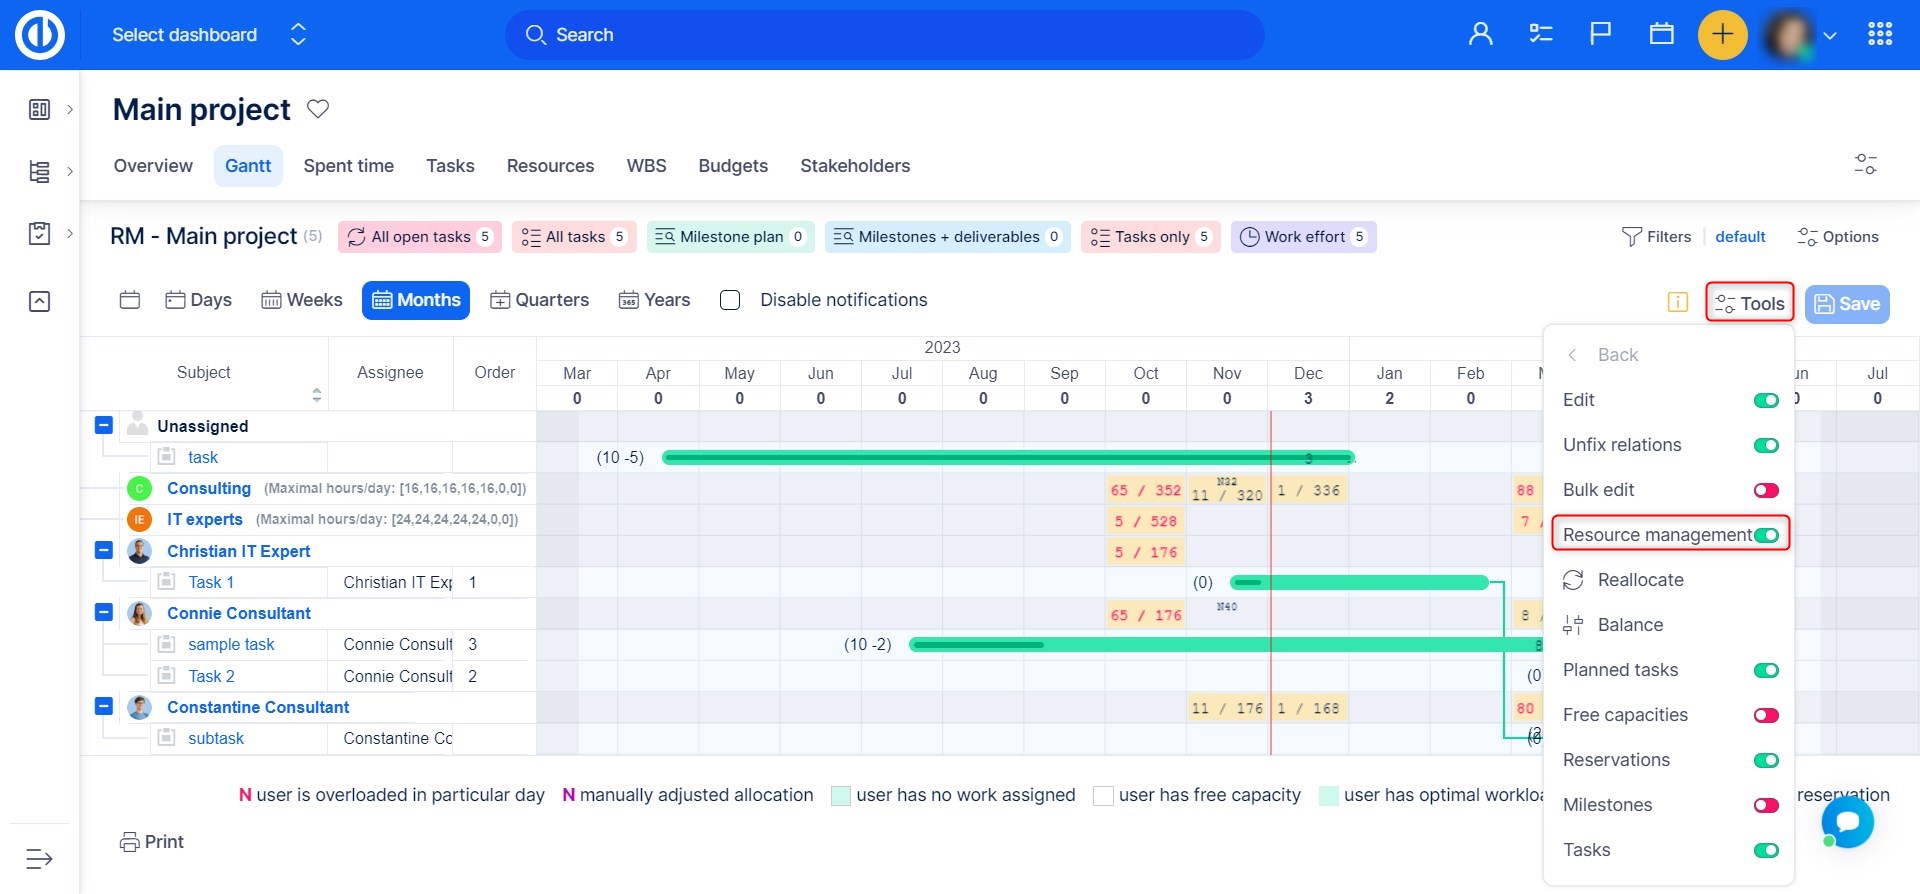
To show resource allocations in the Gantt chart (both project and global levels), click on the "Resources" button among the basic controls. Of course, the button is available only if Resource Management plugin is installed.
When pushed, a second line is added under the days/weeks/months line above the timeline. This line shows resource allocation sums (a number of allocated hours from tasks) per all the projects (project portfolio) shown on the timeline as illustrated below. Moreover, allocations per individual projects can be found on the particular project bars. When you display resource allocations on the project-level Gantt, make sure you expand all the relevant subprojects you need to see in Resource Management before switching to it (this integrated RM view is just another view of Gantt chart with no option to collapse or expand the tree structure any other way).
How to use Tools
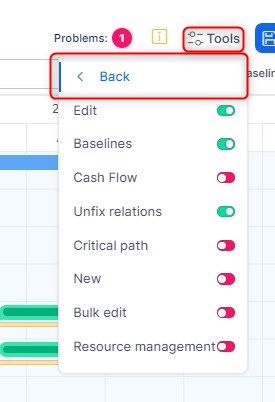
Under Tools button, you find some additional practical features which are slightly different in global and project Gantt chart as illustrated below.
Tools in global Gantt chart

Tools in project Gantt chart
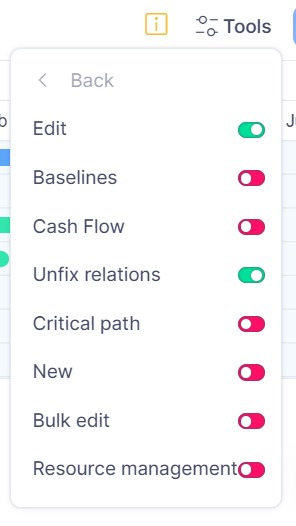
The options are as follows:
Only delayed projects
This button shows only delayed projects, i.e. open projects whose actual completion (% done) is in past.
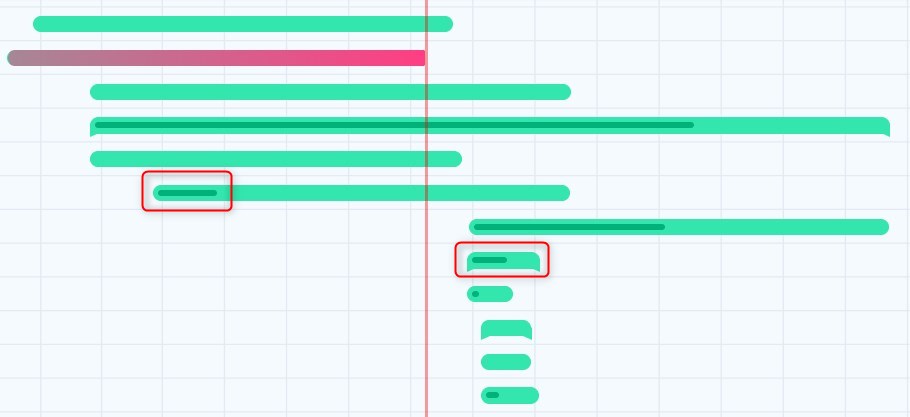
Show tasks with lowest progress date
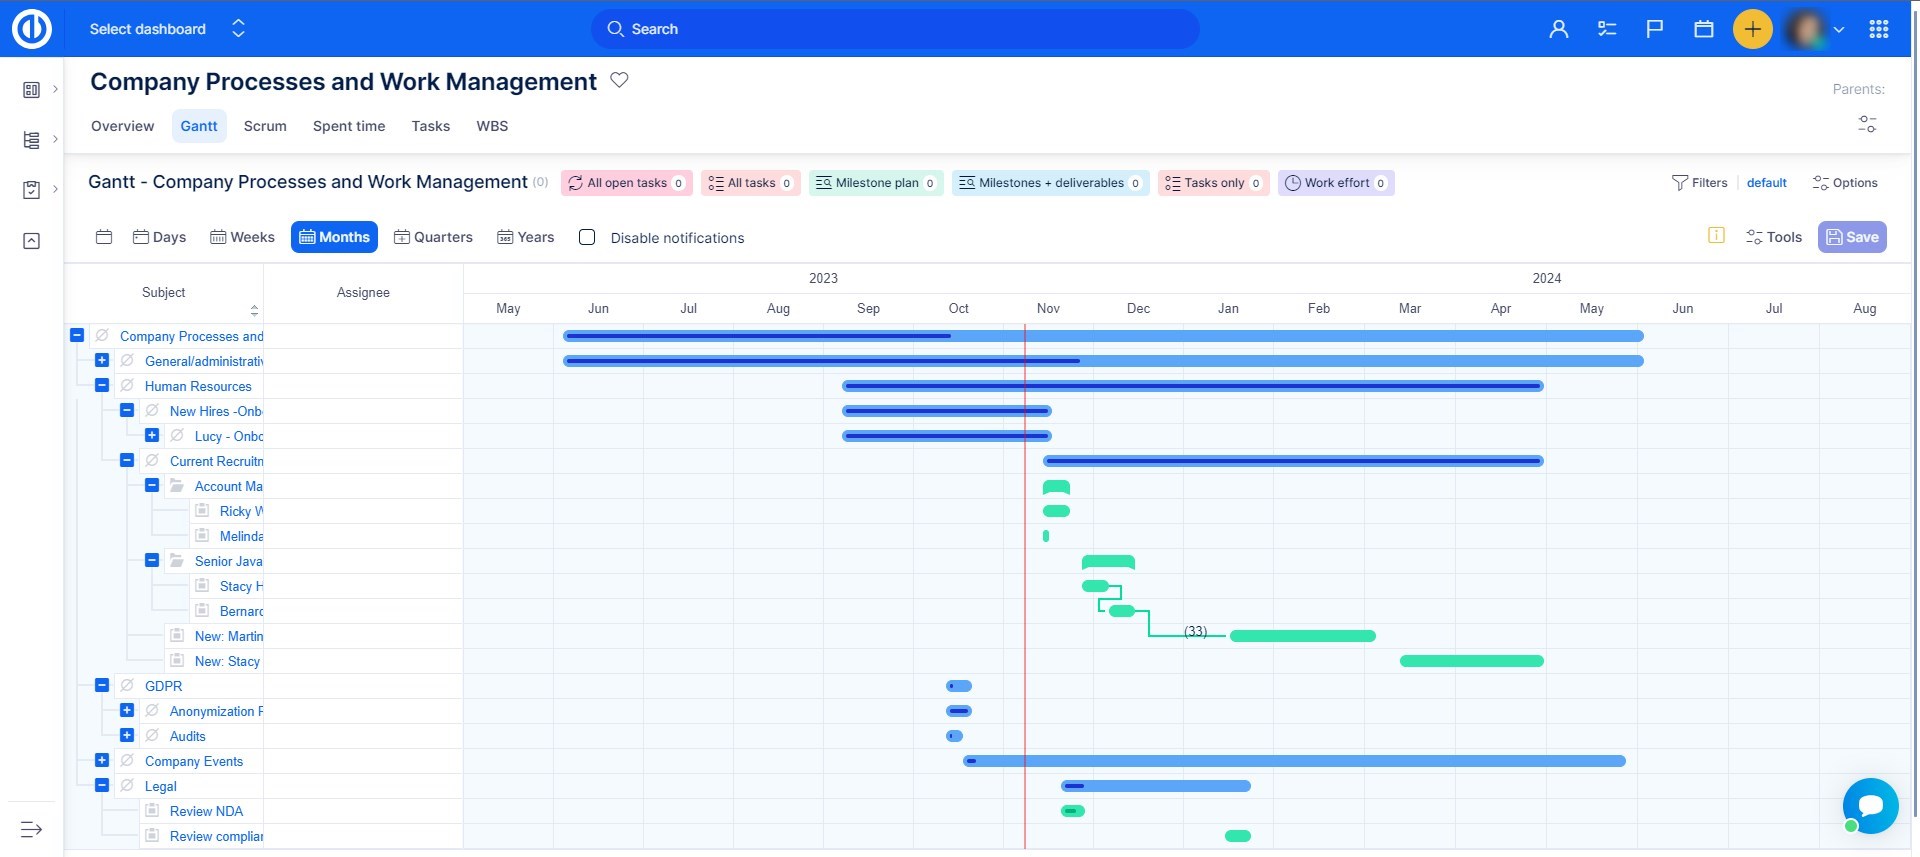
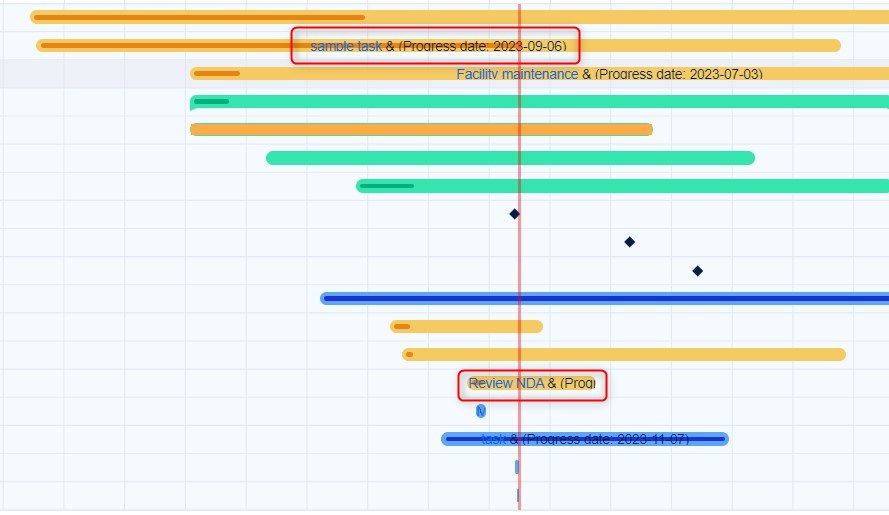
This button shows only tasks with the lowest progress date, i.e. one open task per project whose actual completion (% done) is most in past. On the below screenshot, you can see that the task appears directly on the projects bar and is clickable so that you can open it directly from this view. The information value of it is that it tells you on which task you should start working first. This option is only available when enabled in Gantt settings and is visible only on the global Gantt. You will not see this option on the project Gantt
Edit
This button will enable you to add relations and change progress bar directly in the Gantt chart. When this toggle is disabled, you are able to only move the bars in time.
Bulk edit (Only on global gantt)
This button will add checkboxes on the left side of task list so that you can check more tasks and edit them together using menu displayed upon click with the right mouse button.
Critical path
Cash flow
Resources / Resource Management
Unfix relations
How to show cash flow on the Gantt chart
To see cash flow in both project and global Gantt chart, click on the "Cash flow" button among the basic controls at the top right. In project Gantt, you must first unhide Cash flow button by clicking on the Tools button. Of course, the button is only available when Budgets statement plugin is installed in Easy Project.
Clicking on it adds a new horizontal line to the timeline. This line shows numbers representing the balances of planned incomes and expenses per selected period (day, week, month). To edit these balances, use Project Budgets module. The balances per individual projects are shown in the respective project bars. When you open a parent project using [+] button, it will show details per subprojects as well. To hide cash flow on the Gantt chart, click again on the Cash flow button.
This is the global-level cash flow.
And the project-level cash flow.
How to use Problems button
The Problems button can be found among the main controls at the top right but it only appears when there are some problems found. The button is complemented with a number that represents the number of problems identified as illustrated below. Clicking on the button expands the list of the problems including the names of affected tasks and short explanations. These list items are links so you can click on any and that will highlight the respective task on the timeline. Clicking again on the button collapses the list.

How tasks are sorted in Gantt chart
By default, tasks in Gantt chart sort automatically according to task attributes as follows.
Sorting rule #1: Tasks associated with milestones are prioritized in sorting order over those unlinked to any milestone.
Sorting rule #2: If rule #1 applies to more tasks, they sort by start date ascending (from an earlier date up to a later date down).
Sorting rule #3: If rule #2 applies to more tasks, they sort by due date ascending (from an earlier date up to a later date down).
Sorting rule #4: If rule #3 applies to more tasks, they sort by ID ascending (the earlier the task was created, the lower ID it has).
Subtasks are located just below their parent tasks in sorting order. Easy Gantt cannot sort tasks by parent task and milestone at a time. The parent task parameter overrides the milestone parameter. So all subtasks are always subordinate to their parent tasks, although they may have a different milestone than the parent task does.
Sorting by own attribute
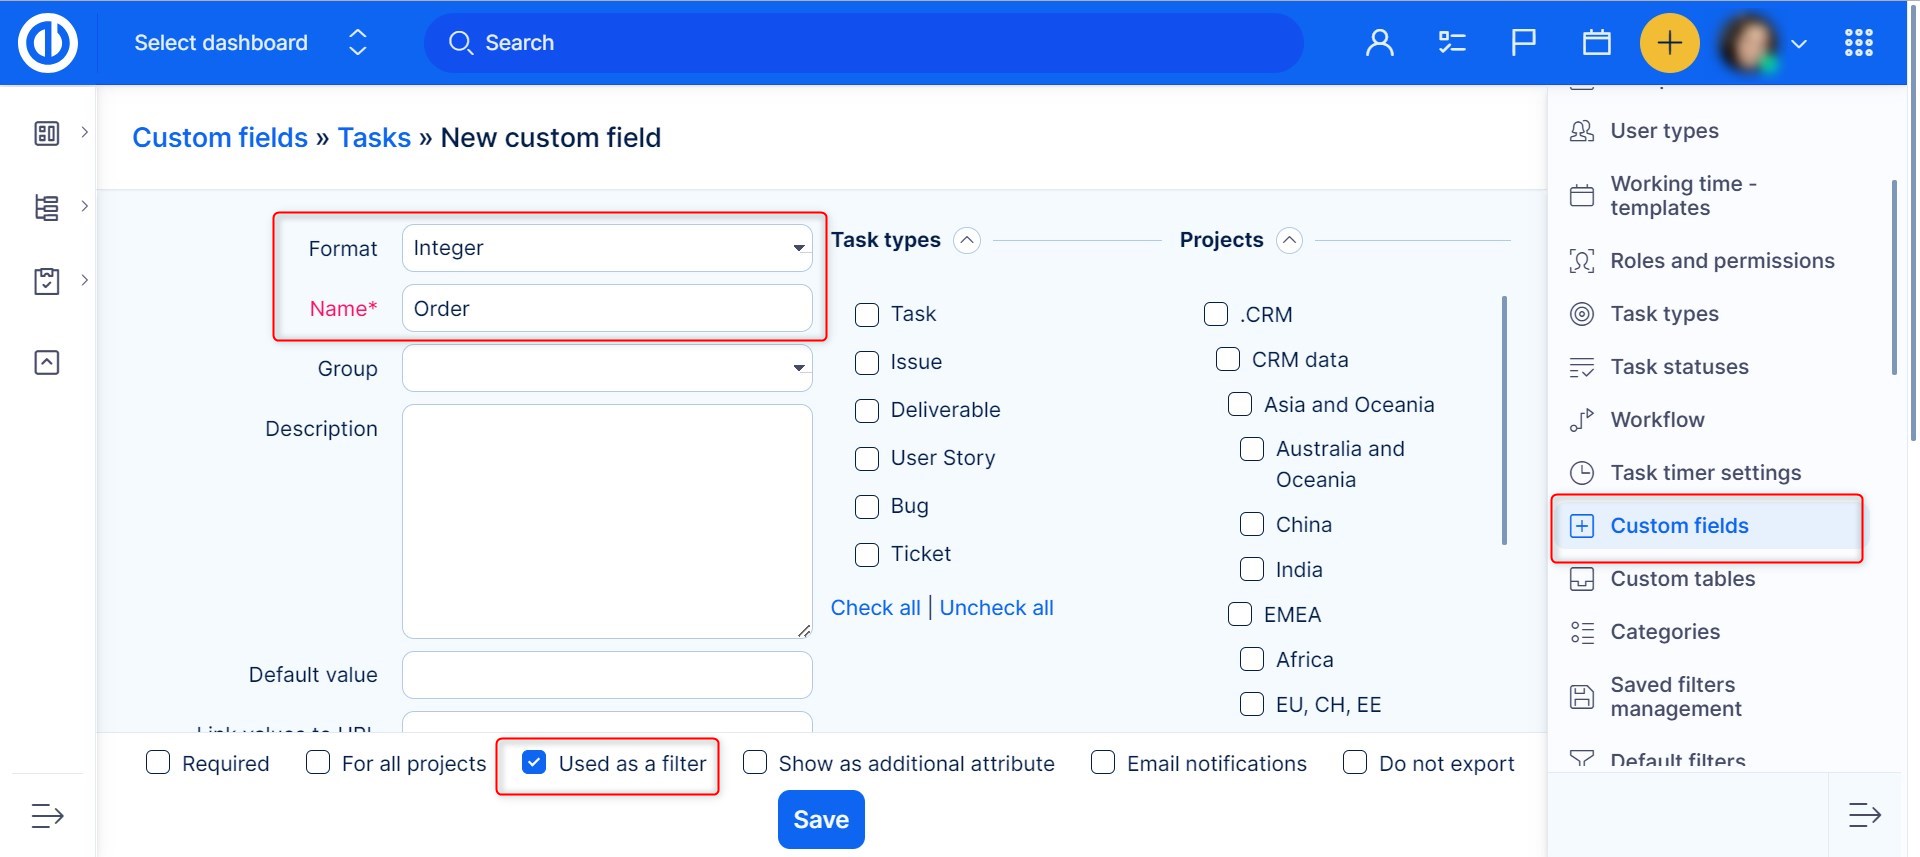
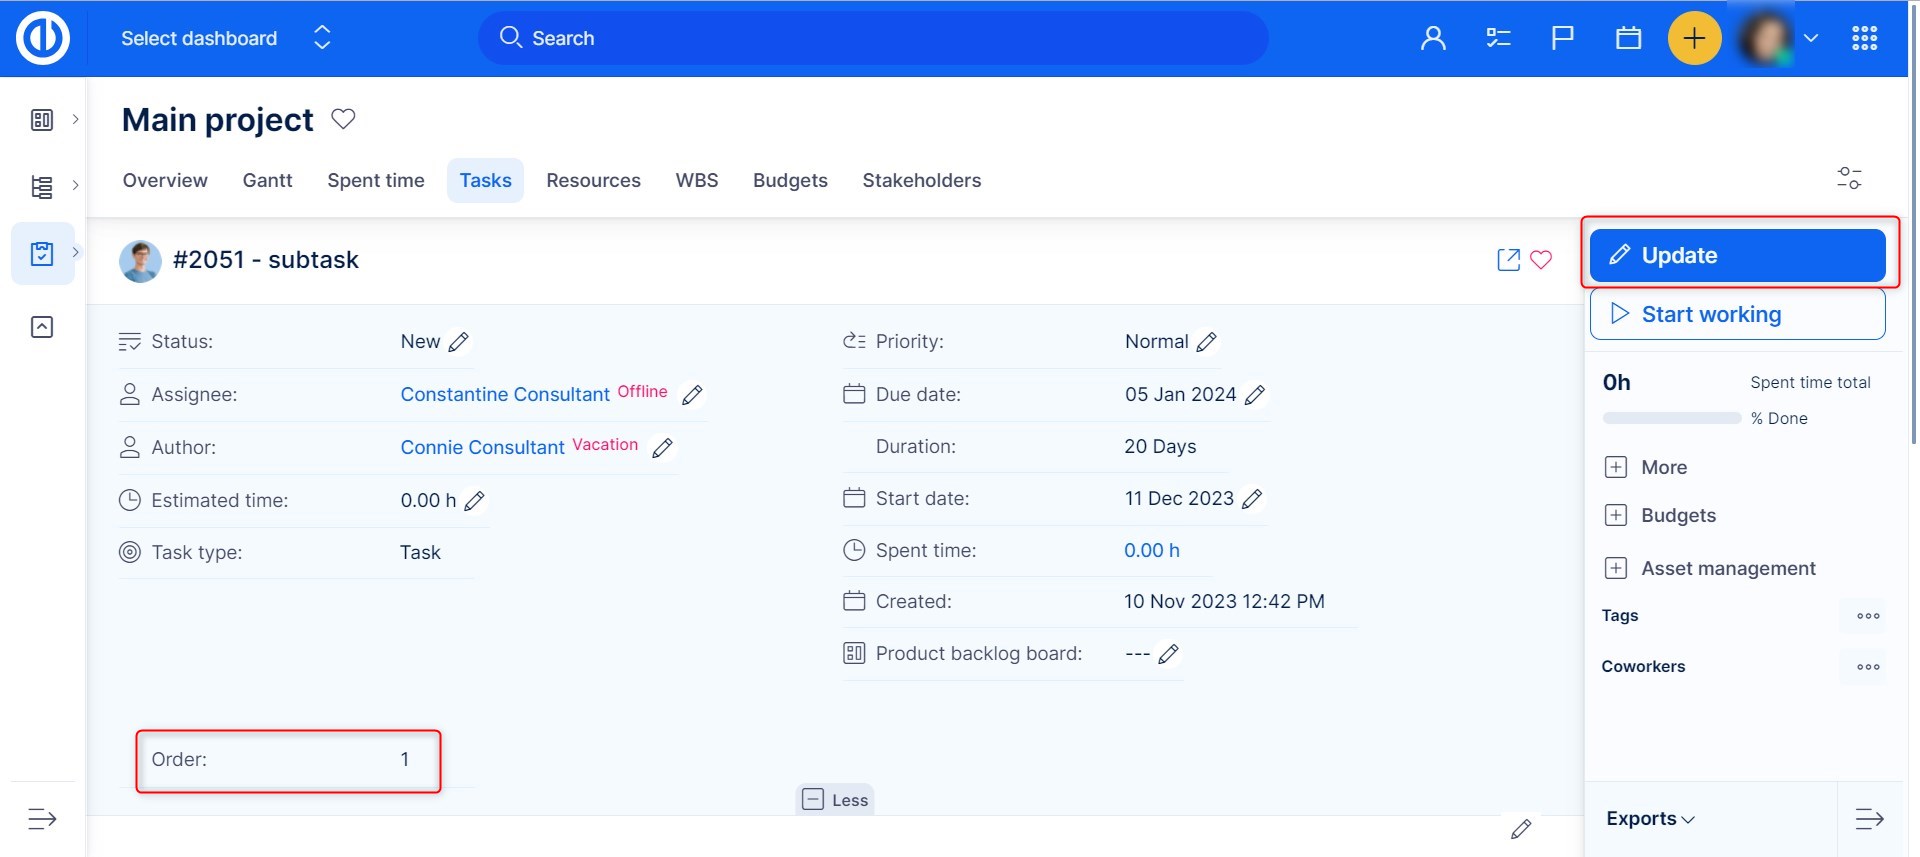
Nevertheless, there is a workaround to re-sort tasks as well as projects by any attribute in ascending or descending order. To give an example, create a task custom field named Order, format integer and check used as a filter as illustrated below.
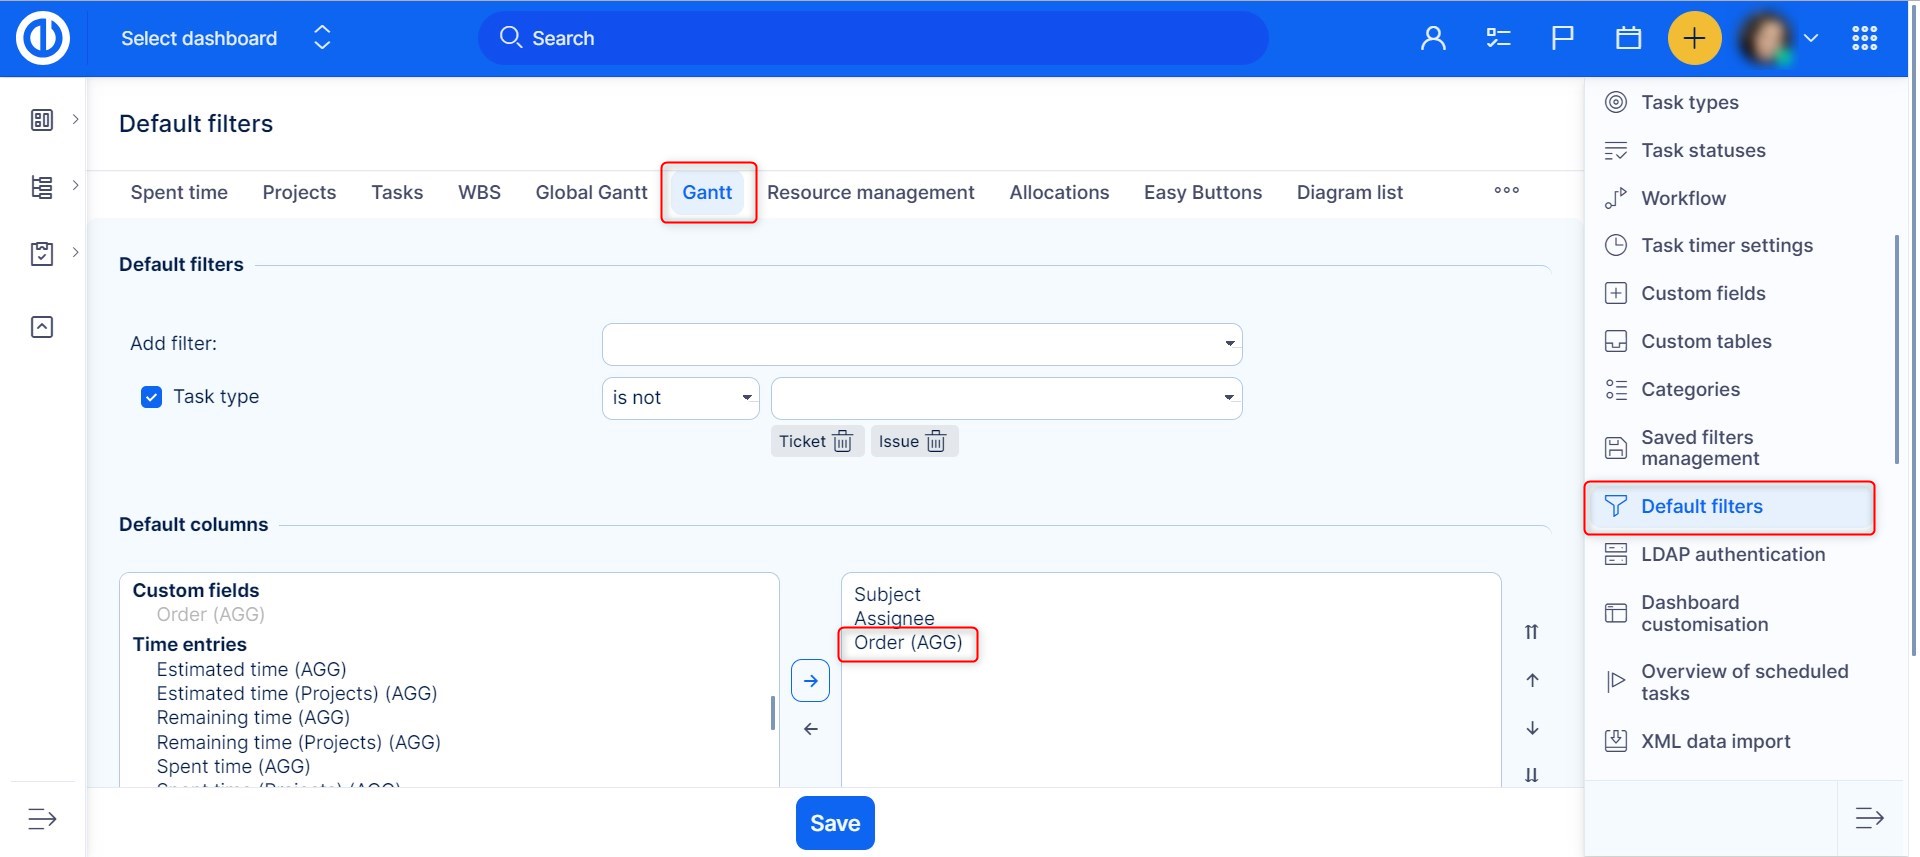
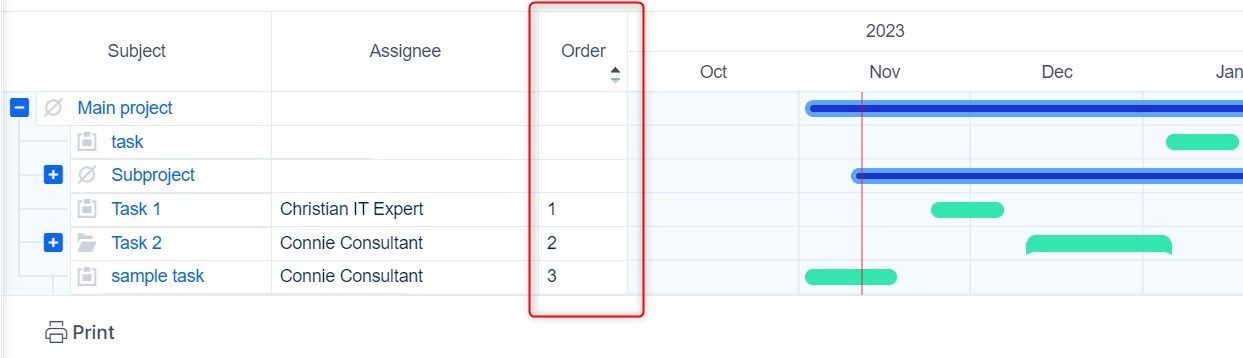
Then go to Global menu >> Administration >> Filter settings >> Easy Gantt & Resource management and add the custom field "Order" into default columns visible in Easy Gantt by moving it from the left side to the right.
Afterward, update several tasks within the same project and enter some values into the custom field "Order" according to which you need to have them sorted. For example, task 1 has order 1, task 2 has order 2 etc.
Finally, go to the project Easy Gantt and click on Order column to make all the project tasks sorted by it. One more click makes them sorted in opposite direction (ascending or descending order).
Gantt chart legend
The Gantt chart legend can be viewed by clicking the exclamation mark icon beside the Tools button.

This is how the Gantt chart legend looks like.

And here are some element descriptions right on the Gantt chart timeline.
How to guard the desired delivery date in Gantt chart
Everybody knows, that the desired delivery date is usually something else as a due date of the task. But it would be very nice to at least know if the desired delivery date is by some tasks not fulfilled. And with this tricky filter, we have this option available up to date even in Gantt chart, which is the best visualization tool for a human eye. And we have this information available all the time even during our dramatic movements with tasks in Gantt chart.
Main point
Create a task custom field. Name "Desired delivery date", format "date", check filtering.
Create a computed task custom field. Name "Desired date fulfillment", format "computed", check filtering.
Formula for this field:
"Desired delivery date" - "Due date"
Go to the Gantt chart and save the following filter:
Name: "Not fulfilled tasks"
Tagged in heading "yes"
"Desired date fulfilment" <= -1
Now you will see the number of not fulfilled tasks all the time in the Gantt chart.
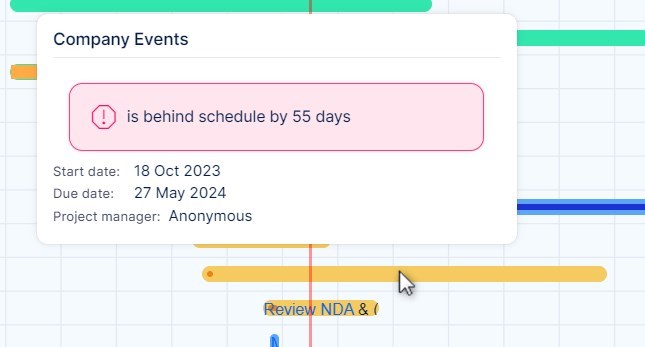
Tip
If you move the mouse button over any project on the timeline in the global Gantt, a warning message will appear in the tooltip if the completion of the project is delayed by a certain number of days compared to today.
Gantt chart on the personal home page
A global-level Gantt chart can be simply added as a widget on a personal home page. To do it, click on "Personalize this page" button in the lower left corner of the page and select the particular module from the list as illustrated below. Then customize widget filters if needed. To see a project Gantt, simply set up the filter to show one selected project only and save the settings. For a large project structure, it's not recommended putting it all on the site as it may slow down the loading speed. The feature is designed for a maximum of 50 projects shown at once.
The result might look like this.
Corner situations
- Corner situations of task relations
- When moving a task in a particular type into another project that does not allow this task type in the project settings, the type of the task will be changed automatically to the first allowed one in the list.
- There can be only one Gantt module on customizable pages (homepage, project overview, etc.). This includes modules: Gantt chart, Resource management, Personal Resource management - if one of these is active, no other will be shown on the same page. This is due to page loading speed. A workaround is to put these modules on different tabs of customizable pages.
- In case that task start/due date is calculated from subtasks and cross-project parent-child relationships are enabled, it may happen that the visible length (=duration) of a task on Gantt timeline is sometimes displayed incorrectly. It happens when a subtask from another project has been added to that task.
- If you drag-and-drop a task from "under the milestone" area to an "under the parent task" area in Gantt's left-side panel, the task disconnects from the milestone (is removed from that task) and connects to the new parent task (is added on that task). If you need to keep both the milestone and the parent task concurrently, you just need to make the change in the task detail window, not in Gantt chart.
- Closed milestones are not displayed in Gantt chart, therefore, any task placed under such a milestone will be shown like without a milestone.
- When a baseline is being created for a very large project with many tasks (1000+), meaning it takes a long time to copy all those tasks. The process may be accompanied by internal error messages if anybody creates a new task(s) on that particular project before the baseline creation is completed. While these errors are not supposed to prevent the baseline from successful creation, we recommend to create baselines in such large projects when no other user is working on them.
- Baseline is technically a copy of the project, and this copy is then use to display data as a snapshot. This means some limitations are applied : When a baseline is created, tasks from subprojects are not being copied, thus will not be part of the created baseline.
- Projects in the Gantt chart can only be moved when they are collapsed (closed) in the left-side tree structure. If you expand (open) the project to see its subprojects and/or (sub)tasks, you cannot move with the project. An empty project can be moved and saved under the condition that options "Calculate project start date from tasks" and "Calculate project due date from tasks" are disabled (can be changed in Administration >> Settings >> Projects >> Other).
- Custom fields with multiple values cannot be displayed in Easy Gantt.
- If a new mandatory custom field is added to the task entity, existing tasks can still be edited without the need to fill in this mandatory field (unless we have already filled this field with a value and saved it). This behavior applies to editing tasks directly or via WBS or Easy Gantt.
- When editing a task using Quick task editor, the changes will not be saved unless the user clicks on the Save button in the top right corner of the timeline window. Only the following fields are saved automatically: Description, Tasks, Comments, Log time, Tags, Coworkers, Custom fields.
- Subtasks, parent tasks, and related tasks are not possible to add via Quick task editor (valid for the Gantt chart and Resource Management only).
- If you select today's date as the start date of a task and use the modal view and a task without a start date set, this date will not be saved. To select today's date as the start date of a task, first select another date and then change it to today, or set the start date by dragging on the timeline, or set it on the task detail.
- Task edit using the context menu (right mouse click on a task in the list) in the Gantt chart is only possible when the user has the permission "Edit tasks". This feature is not related to permissions "Edit tasks where the user is the author" and "Edit tasks assigned to user".
- When creating task relations in the Gantt chart, it validates whether you are not trying to set an infinite loop of task relations. This validation found its performance limit in cca 40-45 task relations in one chain. When the limit is reached, creating a new task relation will freeze your browser until validation for the infinite loop is finished.
- Gantt chart will have issues with display of data in range of bigger than 2980 days ( aproximately 10 years). This limitation is there as a protection. Bigger limit can cause issues with performance due to a big data load.